This post contains affiliate links. As an Amazon Associate, I earn from qualifying purchases at no extra cost to you.
Are you looking for fire pit ideas that feel inviting (not fussy) and actually work for late-spring outdoor entertaining? Do you want to turn an empty corner of your yard into a cozy outdoor space where people naturally gather, laugh, and stay awhile?
In this post, I’m walking you through my favourite ways to plan a fire pit patio, choose comfortable seating, and layer lighting and textures so the whole setup feels intentional. I’ll share practical layouts, DIY-friendly builds, and small upgrades that make a big difference—especially when you’re hosting on warm evenings that still get a little breezy.
In my opinion, this is perfect for anyone who wants a welcoming backyard fire pit setup—whether you’re starting from scratch, refreshing an older pit area, or trying to make seating feel less random and more “designed.”
From my experience, the best results come from combining one strong focal point (the fire) with a clear seating plan, a soft glow overhead, and a ground surface that’s easy to maintain. I’ll show you options ranging from in-ground builds with gravel to budget circle kits, plus seating ideas that keep guests comfortable for hours.
I always start by mapping the circle, planning pathways, and deciding how many seats I truly need—then I build from there with lighting, side tables, and a few cozy details. Below are 25 Fire Pit Patio Ideas & Backyard Seating that…
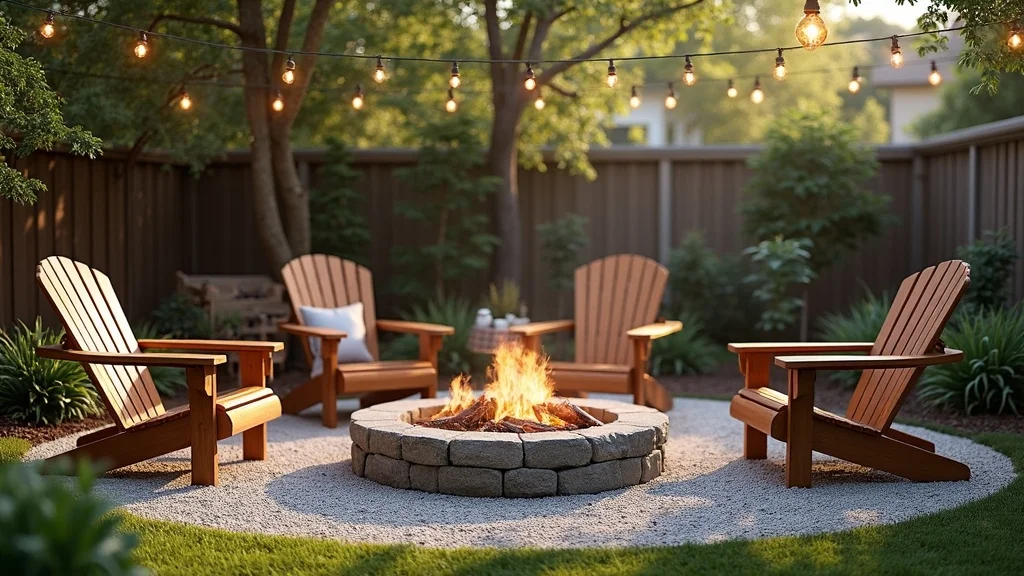
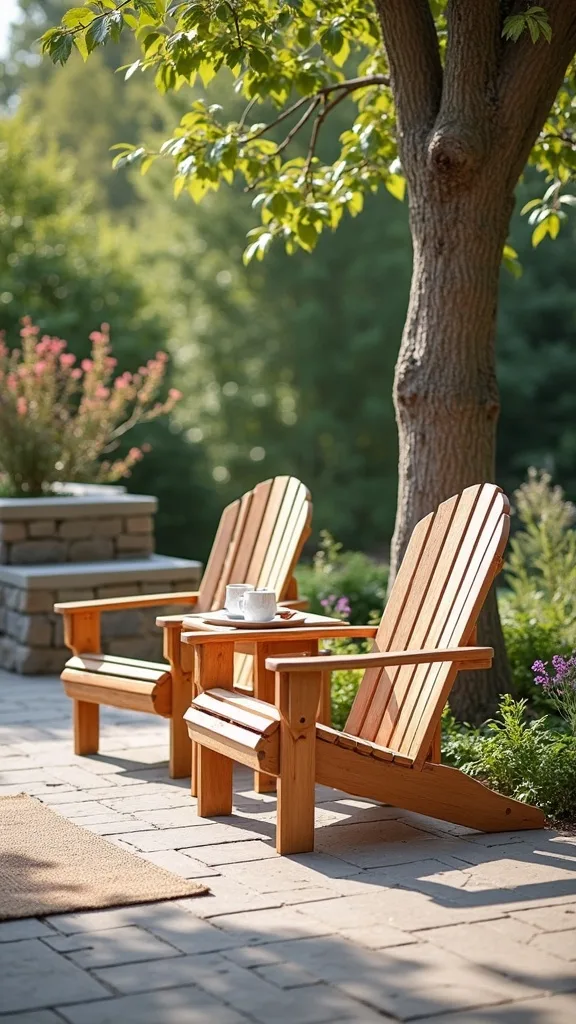
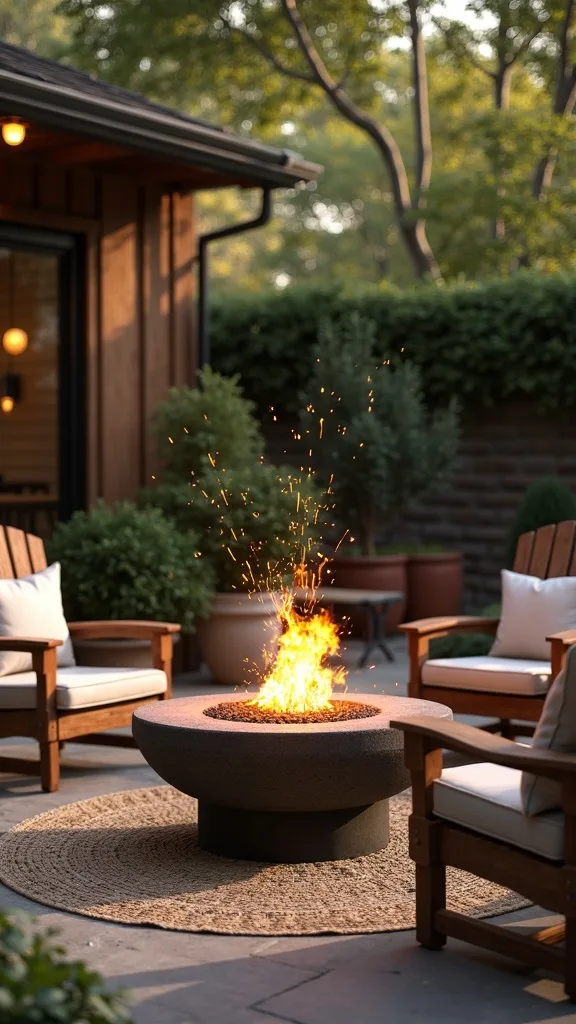
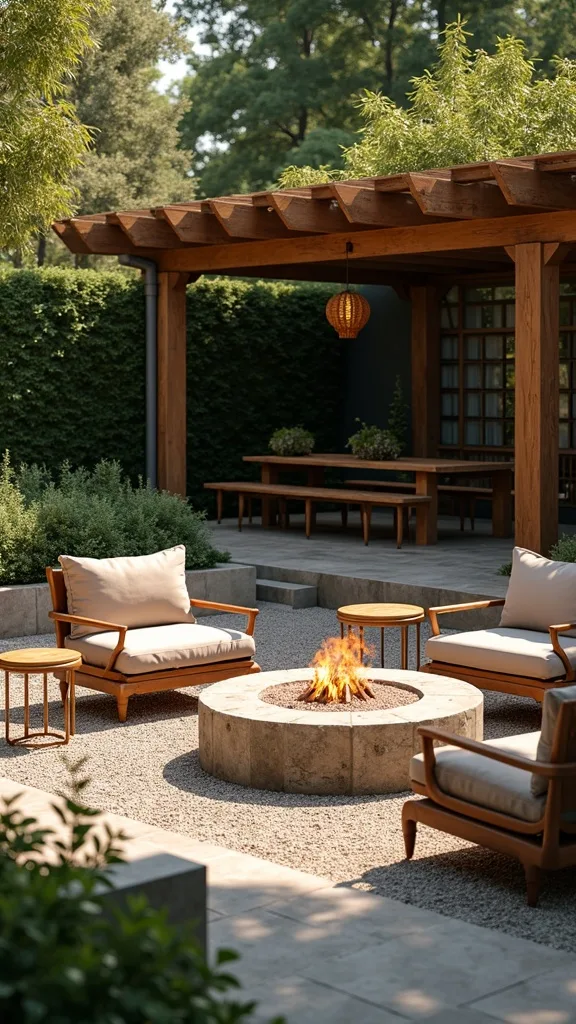
1. In-Ground Circular Fire Pit + Adirondacks + String Lights on Gravel
When I design this look, I lean on one simple formula: a clean circle, comfy chairs, and a warm glow overhead—because it instantly feels like a destination. I find that an in-ground circle surrounded by Adirondack chairs on a gravel base makes the whole fire pit patio feel grounded, tidy, and ready for late-spring evenings.
I always start by marking a 6–8 ft circle with marking paint, then I dig down about 8–12 inches, keeping the sides as even as possible. Next, I add landscape fabric, pour 3–4 inches of compactable base (like crushed stone), then finish with pea gravel; after that, I set a metal ring or stone liner and keep the fire area centered. Finally, I place Adirondacks with 24–30 inches between chair edges so people can move comfortably.
For materials, I like a black steel ring, natural pea gravel, and cedar or poly Adirondacks in white, charcoal, or a soft sage. Overhead, I string warm-white patio lights between two posts or nearby trees for that cozy outdoor space glow.
Pro tip: I always recommend adding two small stump tables between chairs so drinks don’t end up on the ground—this tiny upgrade makes your outdoor fire pit seating feel effortless and welcoming.
2. Build a “Conversation Circle” Layout That Keeps Everyone in the Warm Zone
From my experience, the biggest difference between an okay setup and an amazing one is the seating geometry. I find that a true conversation circle keeps heat and eye contact balanced, which makes your backyard fire pit feel naturally social.
I always start by choosing my fire pit diameter, then I measure out a second “seating circle” about 4–5 feet beyond the pit edge (adjust based on pit size and chair depth). Next, I place chairs so knees point toward the center, leaving one clear “entry gap” like a doorway. If I’m hosting, I add two extra folding chairs behind the main ring so late arrivals still have a spot without breaking the flow.
For colours and materials, I like mixing one statement chair colour (matte black or navy) with neutral cushions (oatmeal, sand, or light grey). A few outdoor pillows in rust or terracotta visually echo the fire.
Pro tip: I always recommend testing the circle at dusk with a tape measure and a flashlight—when you see the shadows, you’ll know exactly where to tighten the layout for a more cozy outdoor space feel.
3. Gravel Patio Base That Drains Fast (and Looks Crisp All Season)
I love a gravel base because it’s forgiving, budget-friendly, and it instantly cleans up the look around the fire. In my opinion, it’s one of the smartest fire pit ideas for late spring because surprise rain won’t turn your hangout into a muddy mess.
I always start by removing sod 3–4 inches deep, then I grade the area slightly away from the house for drainage. Next, I roll out landscape fabric, add 2–3 inches of crushed stone, and compact it with a hand tamper or plate compactor. Then I top with 1–2 inches of pea gravel and rake it level; if I want a more finished edge, I install steel or paver edging to keep gravel from wandering.
For a modern look, I choose grey gravel with black edging; for a softer cottage vibe, I use tan gravel with natural stone borders. Either way, the texture makes your fire pit patio feel intentionally designed.
Pro tip: I always recommend keeping a small rake and a leaf blower nearby—five minutes of tidying before guests arrive makes the whole area feel like a fresh, handcrafted outdoor room.
4. Add a Low Seat Wall for Built-In Extra Seating
When I want a fire pit area to feel permanent (and party-ready), I add a low seat wall. I find that this is one of my favourite approaches because it doubles as extra outdoor fire pit seating without cluttering the circle with too many chairs.
I always start by sketching a half-circle wall on the “back” side of the pit, leaving the front open for entry. Then I build with concrete retaining wall blocks on a compacted gravel base, checking level every row; I cap it with smooth wall caps so it’s comfortable to sit on. If I want more comfort, I place outdoor bench cushions or a row of weatherproof pillows along the top.
For colours, I like charcoal blocks with light cushions for a modern vibe, or warm tan stone with striped pillows for a relaxed, coastal feel. A wall also gives you a clean backdrop for lanterns or planters.
Pro tip: I always recommend building the wall 16–18 inches high for a true sitting height—then your cozy outdoor space feels like it was planned by a pro, even if you DIY it.
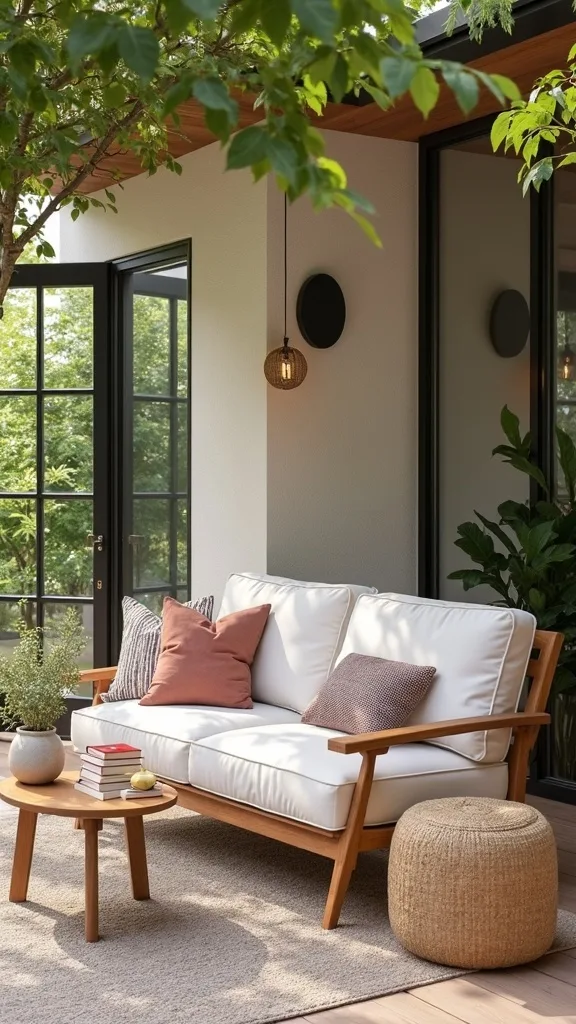
5. Mix Adirondacks and a Bench to Fit More Guests Without Feeling Crowded
I find that Adirondack chairs are perfect for lounging, but a bench is the secret weapon when you want to host. From my experience, mixing the two is one of the most practical fire pit ideas because it adds capacity while keeping the layout visually calm.
I always start by placing two Adirondacks at the “prime” angles facing the yard view, then I anchor the opposite side with a 5–6 ft outdoor bench. Next, I add one or two smaller chairs to complete the circle, leaving at least 30 inches for a walkway. To make the bench feel intentional, I center it on the fire pit and add a small side table at one end for drinks.
For materials, I like poly lumber Adirondacks (low maintenance) paired with a simple acacia or powder-coated steel bench. Colours that work beautifully are matte black + natural wood, or white + soft grey cushions.
Pro tip: I always recommend adding one long lumbar cushion across the bench—this tiny comfort upgrade makes your backyard fire pit seating feel like a cozy outdoor lounge.
6. Create a Clear Pathway So Guests Don’t Walk Through the Seating Circle
One of the quickest ways to make a fire pit area feel “off” is when people have to squeeze between chairs to get in. I find that a defined approach path is one of the most overlooked fire pit patio upgrades—and it makes entertaining smoother instantly.
I always start by choosing where guests naturally enter from the house or patio door, then I create a straight or gently curved path to the fire pit. For gravel patios, I set 18–24 inch stepping stones into the gravel so the walkway feels obvious. For grass yards, I use pavers or decomposed granite in a 30–36 inch width so two people can walk side by side.
For colours and texture, I like warm grey pavers with tan gravel, or natural flagstone with darker edging. If you want a handcrafted look, mix stone sizes but keep the spacing consistent.
Pro tip: I always recommend adding two low solar path lights near the entry—this simple touch makes your cozy outdoor space feel welcoming and safe as the sun goes down.
7. Use String Lights in a “Ceiling” Pattern for Instant Outdoor Room Vibes
When I design this look, I treat lighting like the ceiling of an outdoor room. I find that overhead string lights are one of the fastest fire pit ideas to make a backyard feel intimate—especially for late spring when you’re outside longer.
I always start by deciding where the “highest point” will be (a pole, pergola corner, or sturdy tree), then I run strands outward in a starburst or gentle zigzag. Next, I keep the lowest point at least 7 feet high so no one bumps their head, and I use a weatherproof extension cord routed along edges. If I’m mounting to posts, I install eye bolts and guide wire so the lights stay taut and don’t sag over time.
For the best glow, I choose warm white (2700K) bulbs and black wire so it disappears at night. Pair this with natural gravel and wood chairs for a soft, welcoming palette.
Pro tip: I always recommend adding a dimmer-compatible strand or smart plug—being able to lower the brightness makes your outdoor fire pit seating feel like a boutique patio lounge.

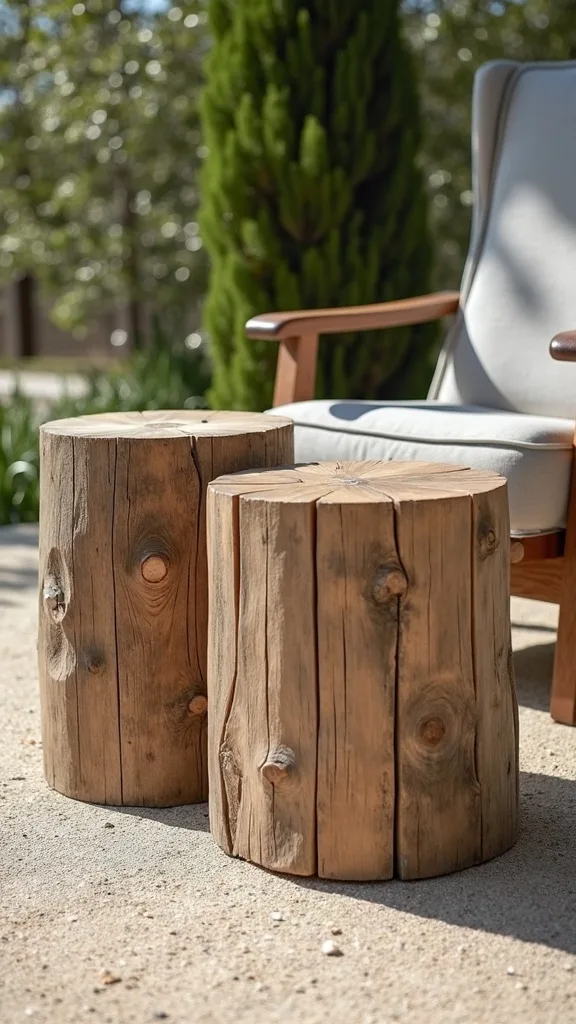
8. DIY Side Tables: Stumps, Crates, or Concrete Pavers on Blocks
I can’t tell you how many times I’ve watched guests balance plates on their knees because there’s nowhere to set things down. In my opinion, adding side tables is one of the most functional fire pit ideas you can do in an afternoon.
I always start by counting seats, then I plan for at least one surface for every two people. For a rustic look, I seal two tree stumps and place them between chairs. For a budget-friendly option, I flip a sturdy outdoor crate on its side and add a paver top. If I want a modern vibe, I stack two concrete blocks and top them with a 16×16 paver—heavy enough not to tip, simple enough to rebuild anytime.
For colours, I like natural wood tones with black hardware, or concrete grey with a warm cedar accent. A small outdoor tray on top keeps cups stable.
Pro tip: I always recommend making one “oversized” table for snacks—this tiny hosting upgrade makes your cozy outdoor space feel generous and effortless.
9. Add Outdoor Cushions and Throws That Handle Cool Late-Spring Nights
From my experience, comfort is what keeps people outside after the first hour. I find that layering cushions and throws is one of the easiest fire pit patio upgrades—especially in late spring when the temperature drops fast after sunset.
I always start by choosing quick-dry seat cushions sized for my chairs, then I add two to three lumbar pillows in a tighter weave (they hold up better outdoors). Next, I stash lightweight throws in a lidded deck box or a galvanized bin near the seating circle so guests can grab one without asking. If wind is an issue, I use pillow ties or non-slip rug pads under cushions to keep everything in place.
For colours, I like a neutral base (oatmeal, stone, or grey) with one warm accent (rust, clay, or mustard) to echo the firelight. Textures like canvas and bouclé-look outdoor fabric read cozy without trapping moisture.
Pro tip: I always recommend keeping one “extra warm” blanket for the friend who’s always cold—this thoughtful touch makes your backyard fire pit feel like hospitality at its best.
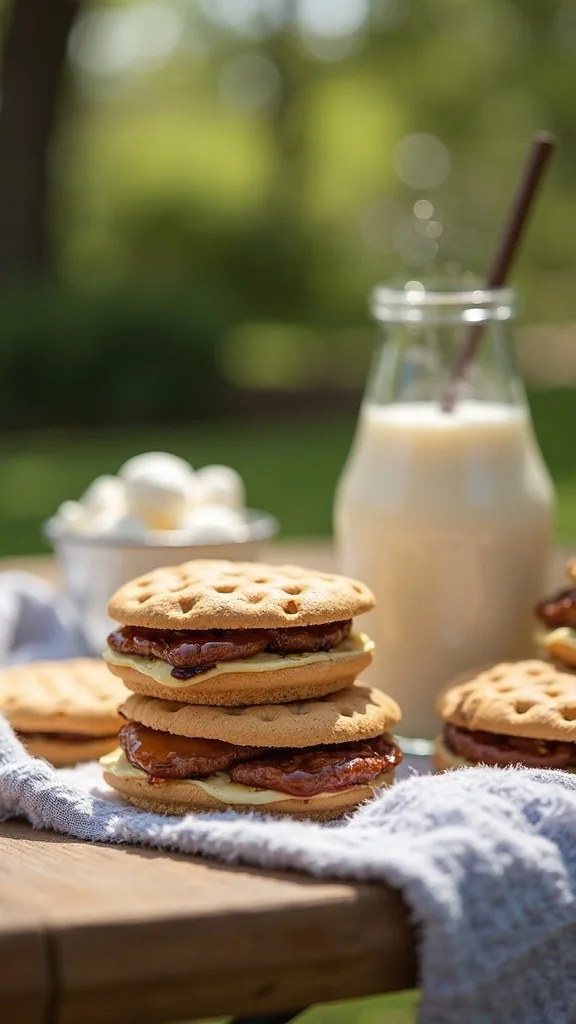
10. Create a S’mores + Drinks Station Within Arm’s Reach
When I’m entertaining, I like to keep the fun close to the fire so no one disappears back inside. I find that a small snack station is one of the most crowd-pleasing fire pit ideas because it encourages lingering and conversation.
I always start by placing a narrow outdoor console table or bar cart 4–6 feet behind the seating line, not inside it. Next, I set up bins for graham crackers, chocolate, and skewers, plus a tray for napkins and wet wipes. If kids will be around, I keep the skewers in a tall container and place the chocolate in a cooler so it doesn’t melt too fast.
For styling, I like a galvanized tub for drinks, a wood cutting board for treats, and a simple lantern for soft light. Colours that work well are natural wood + black metal + a pop of gingham.
Pro tip: I always recommend adding a small trash can with a lid nearby—clean-up stays easy, and your cozy outdoor space stays beautiful all night.
11. Use a Fire Pit Spark Screen and a Safe “No-Trip” Seating Distance
I love a real flame, but I’m always thinking about safety—especially with guests, pets, and late-night laughter. From my experience, smart spacing and a spark screen are the unsung heroes of great backyard fire pit design.
I always start by checking local rules and keeping the fire pit at least 10–20 feet from structures (your area may vary). Next, I set chairs so the front edge of the seat is roughly 4 feet from the fire pit rim; that’s usually warm without feeling too intense. I also keep one clear path to exit the circle quickly, and I place a small fire extinguisher or bucket of sand discreetly nearby.
For products, I like a steel spark screen with a top handle, a long poker tool, and heat-resistant gloves. If you’re styling, black metal tools look sharp against gravel and wood chairs.
Pro tip: I always recommend doing a “walk test” in the dark—if you can move around confidently, your outdoor fire pit seating will feel relaxed and safe for everyone.
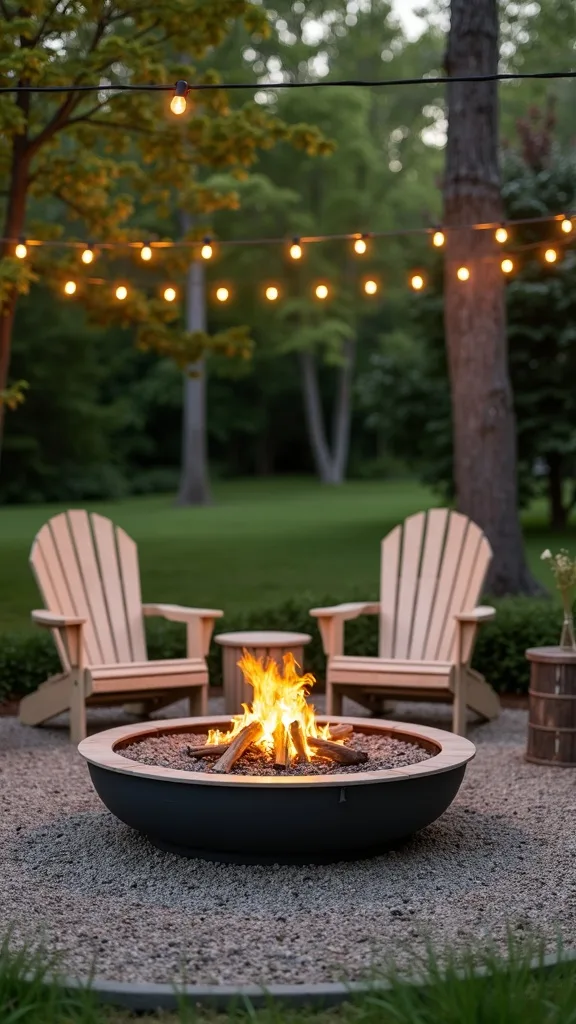
12. Go Budget-Friendly with a Metal Ring + Simple Stone Surround
If you want a classic look without a huge bill, I find that a metal ring with a simple stone surround is one of the best budget fire pit ideas. In my opinion, it looks finished, lasts well, and gives you flexibility to upgrade later.
I always start by setting the metal ring level on compacted gravel, then I build a one- or two-course ring of landscape stone around it, leaving small gaps for airflow if your ring design requires it. Next, I check that the top edge is even so drinks or tools don’t wobble when set down. If I’m using adhesive, I choose a high-heat rated product only where appropriate and keep it away from direct flame contact.
For materials, I like a 36–42 inch steel ring, medium grey retaining blocks, and a capstone in a slightly darker tone for contrast. This palette pairs beautifully with Adirondacks and string lights.
Pro tip: I always recommend spending a little extra on leveling and base prep—when the ring is perfectly even, your fire pit patio instantly looks more high-end.
13. Create Two Seating Zones: Fire Circle + Dining Area Nearby
When I plan for entertaining, I don’t want the fire pit to compete with dinner—I want it to complement it. I find that creating two zones is one of the most practical fire pit ideas for late spring because it keeps traffic flowing and gives guests options.
I always start by placing the fire circle 10–15 feet from the dining table area so smoke and heat don’t drift over food. Next, I connect the zones with a simple path (stepping stones or pavers) and repeat one element—like the same string lights or cushion colour—so it feels cohesive. If space is tight, I angle the dining set so the fire is still visible; that way, the fire becomes ambiance even during meals.
For materials, I like gravel under the fire seating and a simple outdoor rug under the dining set. Colours that tie it together: black metal, warm wood, and soft neutrals.
Pro tip: I always recommend adding one “landing spot” between zones (a small console or drink table)—it makes your cozy outdoor space feel thoughtfully designed and easy to use.
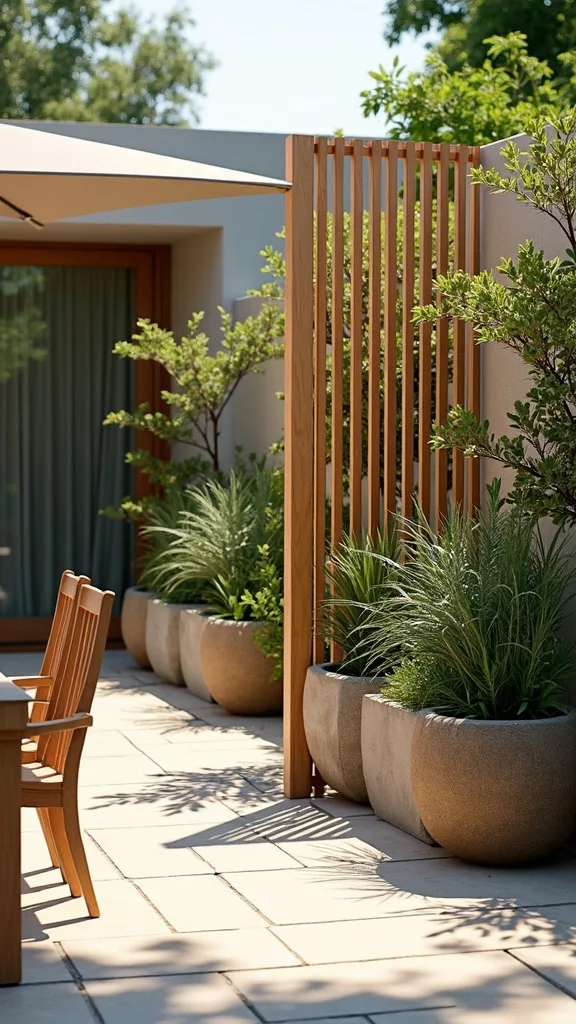
14. Add a Wind Break with Planters or a Slatted Screen
Late spring is gorgeous, but breezes can be unpredictable—and they can push smoke right into the seating circle. From my experience, a subtle wind break is one of the most comfort-forward fire pit patio upgrades you can make.
I always start by noticing wind direction at dusk (when you’ll actually use the fire). Next, I place tall planters or a slatted wood screen on the windward side, about 3–6 feet behind the chairs so it blocks gusts without feeling boxed in. If I’m using planters, I choose heavy ones and fill the bottom with gravel for stability; then I plant ornamental grasses or small evergreens for soft movement and privacy.
For colours, I like black planters with green grasses for a modern look, or cedar screens with terracotta pots for a warmer, handcrafted vibe. Either option frames your backyard fire pit beautifully.
Pro tip: I always recommend leaving a gap at the bottom of screens for airflow—this keeps the space comfortable and makes your outdoor fire pit seating feel calm and protected.
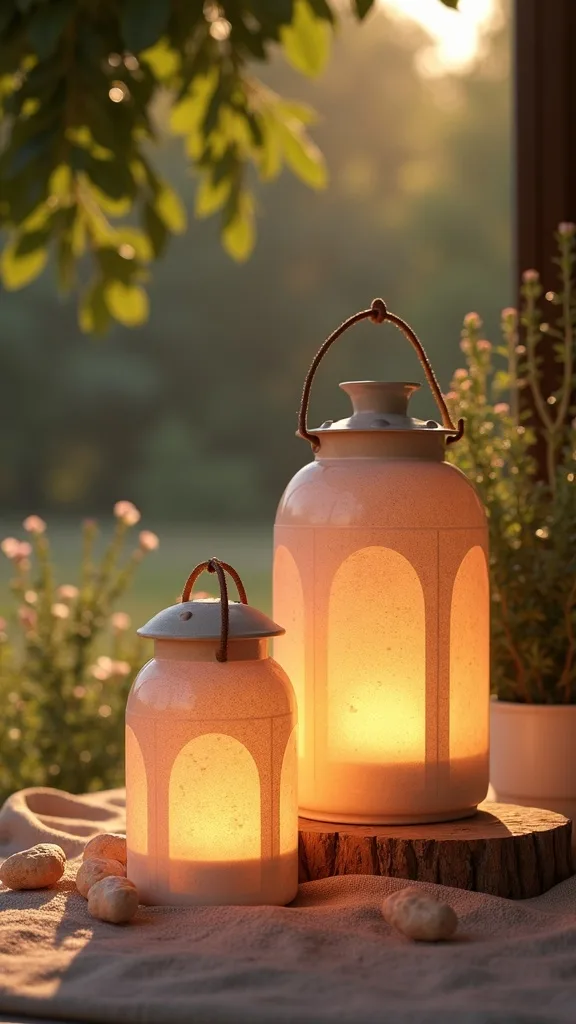
15. Layer Lanterns and Solar Stakes for Soft, Flattering Light
I love string lights, but I never rely on them alone. I find that layered lighting is one of the most magical fire pit ideas because it creates depth—so faces look warm and the patio feels inviting, not harsh.
I always start by placing two lanterns on the ground near the entry to the seating circle, then I add one lantern near the snack station. Next, I line the path with low solar stakes spaced about 4–6 feet apart, aiming for gentle guidance rather than runway brightness. If I’m using candles, I choose LED flameless options so wind doesn’t ruin the vibe.
For materials, I like matte black lanterns with warm LED candles, plus small bronze or black solar stakes. This combo looks beautiful against gravel and pairs well with Adirondack chairs.
Pro tip: I always recommend turning all lights on at twilight and then removing one source at a time—when the glow feels balanced, your cozy outdoor space will look effortlessly styled in photos and in real life.
16. Use an Outdoor Rug Under Front Chair Legs (Yes, Even on Gravel)
In my opinion, an outdoor rug is the quickest way to make a fire pit area feel like a living room. I find that even on gravel, a rug can work beautifully if you use it strategically and keep it out of the hottest zone.
I always start by choosing a rug that’s large enough for the front legs of each chair to rest on, then I place it so it sits about 2–3 feet away from the fire pit edge. Next, I smooth the gravel beneath it as evenly as possible and use landscape staples (or heavy furniture weight) at corners to prevent shifting. If sparks are a concern, I keep the rug farther back and rely on a spark screen.
For colours, I like flatweave polypropylene rugs in charcoal, cream, or a subtle stripe—patterns hide ash and footprints better. A rug also helps define your fire pit patio boundary.
Pro tip: I always recommend keeping a small handheld vacuum or brush for quick cleanups—when the rug stays tidy, your outdoor fire pit seating feels polished and intentional.
17. Add a Wood Storage Nook That Doubles as Decor
I find that messy wood piles can make even the prettiest setup feel chaotic. One of my favourite approaches is creating a dedicated wood storage nook, because it keeps your backyard fire pit area tidy and makes the whole scene feel styled.
I always start by choosing a spot 6–10 feet from the pit (close enough to be convenient, far enough to be safe). Next, I set down pavers or gravel so wood stays off damp soil, then I stack logs in a simple rectangle or use a metal rack. If I want a more handcrafted look, I build a basic lean-to frame with treated lumber and add a small roof panel to keep wood dry.
For materials and colours, I like black steel racks, natural wood tones, and a few woven baskets for kindling. This looks especially good under string lights.
Pro tip: I always recommend stacking wood with the cut ends facing outward—it dries better and looks like intentional decor, making your cozy outdoor space feel curated.

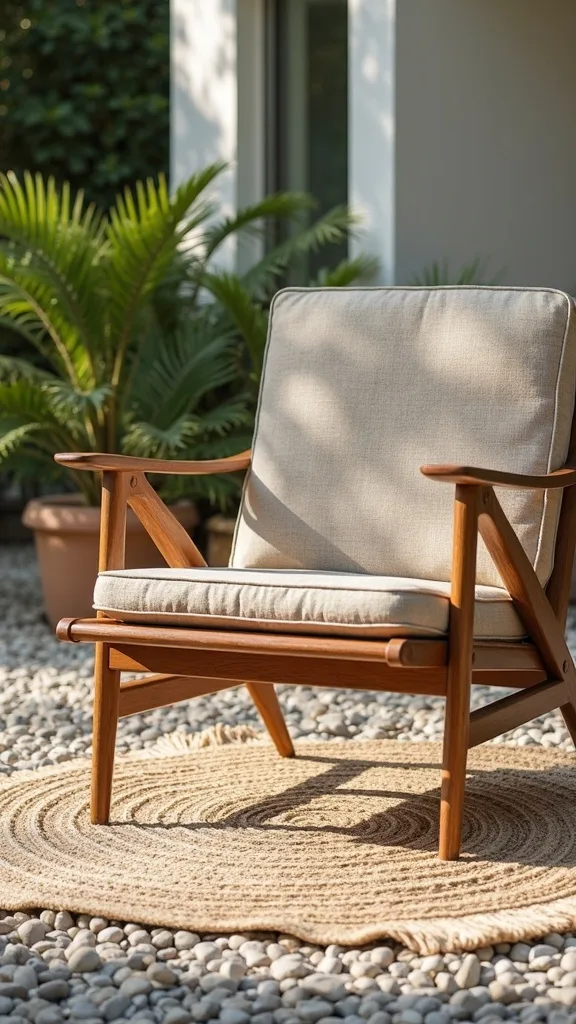
18. Choose Seating Materials That Match Your Maintenance Style
From my experience, the “best” chair is the one you’ll actually keep outside without stress. I find that picking the right materials is one of the most practical fire pit ideas because it prevents the slow slide into weathered, wobbly seating.
I always start by deciding how much upkeep I’m willing to do. If I want zero fuss, I choose poly lumber Adirondacks and powder-coated steel side tables. If I enjoy seasonal maintenance, I go with cedar or acacia and plan to oil or seal it once or twice a year. Next, I add furniture covers or a storage bench for cushions so everything lasts longer.
For colours, I like charcoal or black frames for a modern feel, and natural wood for warmth. Light cushions look fresh in spring, but medium tones hide smoke and ash better around a fire pit patio.
Pro tip: I always recommend buying one extra matching cushion cover set—when you can swap in a clean cover quickly, your outdoor fire pit seating always feels guest-ready.
19. Create a Kid-Friendly “Outer Ring” with Stools or Poufs
When families are coming over, I like to plan seating that flexes without putting little ones too close to the flame. I find that an outer ring of stools or poufs is one of the most adaptable fire pit ideas for mixed-age gatherings.
I always start by setting the main adult seating at the ideal warmth distance, then I place lightweight seats 2–3 feet behind that line. Next, I choose pieces that are easy to move—so kids can sit for s’mores and then drift to the side when they’re done. If you’re using poufs, I pick outdoor-rated, quick-dry styles and store them in a deck box when not in use.
For colours, I like darker neutrals (charcoal, navy) for the outer ring because they hide dirt. Texture-wise, woven resin or performance fabric holds up well near a backyard fire pit.
Pro tip: I always recommend adding a “snack stool” away from the fire—this gives kids a safe place to eat and keeps your cozy outdoor space calm and organized.
20. Use a Semi-Circle Layout for Small Yards or Tight Patios
I find that not every yard can handle a full circle, and that’s completely okay. In my opinion, a semi-circle is one of the smartest fire pit patio layouts for smaller outdoor spaces because it preserves flow while still feeling intimate.
I always start by placing the fire pit slightly forward, then I arrange seating in a half-moon with the open side facing the path or house. Next, I anchor the ends with two Adirondacks and fill the middle with a loveseat, bench, or two compact chairs. If the area is narrow, I use slimmer chairs with upright backs so the footprint stays manageable.
For materials, I like a gravel base with steel edging to keep the half-moon crisp. Colours that make small spaces feel bigger: light cushions, natural wood, and minimal patterns.
Pro tip: I always recommend adding a mirror-like element nearby—like a simple metal water bowl or glossy planter—because it bounces light and makes your cozy outdoor space feel more open and airy.
21. Add Privacy with Tall Grasses and a Simple Trellis Backdrop
Sometimes the missing ingredient isn’t furniture—it’s the feeling of being tucked away. I find that adding privacy layers is one of the most transformative fire pit ideas, because it turns an exposed yard into a true retreat.
I always start by identifying sightlines from neighbours or the street, then I place tall planters or a trellis where eyes naturally land. Next, I plant fast-growing climbers (like clematis in the right climate) or use outdoor fabric panels for a quick solution. If you’re renting or want flexibility, I cluster three tall planters behind the seating area and stagger heights for a natural screen.
For colours, I like black trellises with green foliage for a modern look, or warm wood trellises with white flowers for a softer vibe. This backdrop also makes string lights feel more “anchored.”
Pro tip: I always recommend leaving one open view—privacy feels best when your backyard fire pit still has a little breathing room and a sense of sky.
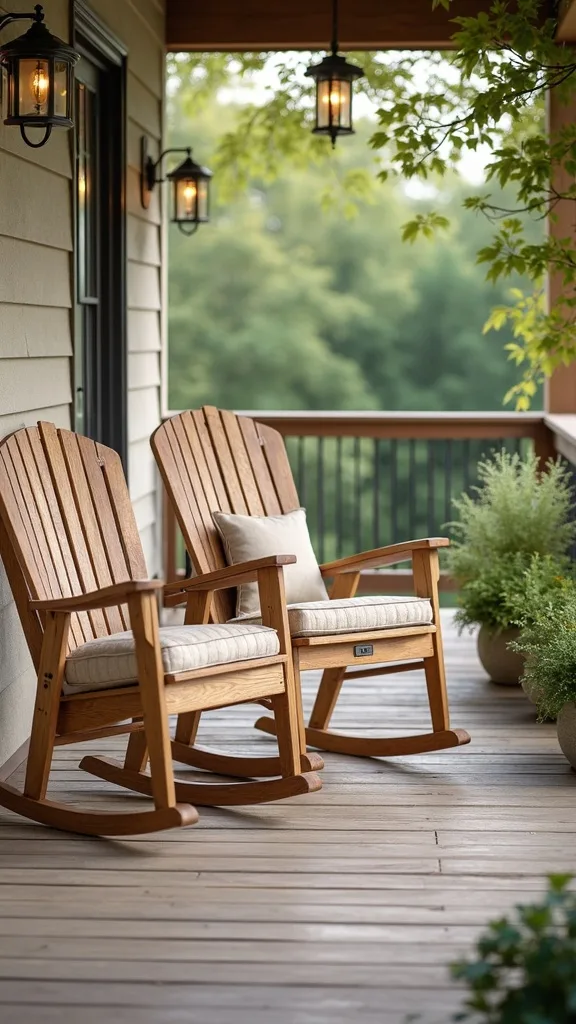
22. Upgrade Comfort with Rocking Adirondacks or Glider Chairs
I find that gentle movement makes people relax faster—it’s almost instant. From my experience, swapping two standard chairs for rocking Adirondacks or gliders is one of the most delightful fire pit ideas for long, chatty nights.
I always start by placing the rocking or glider chairs on the most stable surface (compacted gravel or pavers), then I give them a little extra clearance behind so they don’t bump anything. Next, I pair each moving chair with a side table so drinks stay secure. If you’re worried about gravel under rockers, I set a small paver pad beneath each chair to create a smooth base.
For materials, poly lumber rockers are my go-to because they handle weather and don’t splinter. Colours like white, black, and driftwood look timeless under warm string lights.
Pro tip: I always recommend adding a small lumbar pillow to rocking chairs—comfort plus motion makes your outdoor fire pit seating feel like the best seat in the house.
23. Keep Bugs Away with Scent Strategy (Not Just Citronella Everywhere)
Late spring evenings can be dreamy—until the bugs show up. I find that a thoughtful scent strategy is one of the most practical fire pit patio upgrades because it keeps the vibe relaxed without overpowering the space.
I always start by removing standing water and trimming nearby plants where mosquitoes hide. Next, I place two fans on low (moving air helps a lot), and I use one or two citronella candles only at the perimeter rather than right in the seating circle. If I want a nicer look, I use essential-oil infused outdoor torches or a discreet repellent diffuser placed downwind.
For styling, I like matte black candles or lantern-style citronella holders so they blend with the decor. Fresh herbs like rosemary in pots also smell amazing and look beautiful near a backyard fire pit.
Pro tip: I always recommend keeping a small basket of bug spray wipes at the snack station—when guests can help themselves, your cozy outdoor space stays comfortable and carefree.
24. Design for Cleanup: Ash Bucket, Tool Set, and a Hidden Storage Bench
In my opinion, the best outdoor spaces are the ones that are easy to maintain—because you’ll use them more. I find that planning cleanup tools into your layout is one of the most realistic fire pit ideas for busy households.
I always start by choosing a spot for a small storage bench or deck box within 6–10 feet of the pit. Next, I store a poker, shovel, heat gloves, and a small metal ash bucket inside so everything is in one place. After the fire is fully out and cold, I scoop ash into the bucket and dispose of it safely; I also keep a small brush for gravel so the area looks neat in minutes.
For products and colours, I like black metal tools and a neutral resin deck box that blends into the background. A wood bench with hidden storage also looks beautiful if it’s protected from heavy rain.
Pro tip: I always recommend creating a “reset routine” that takes under 10 minutes—when cleanup is simple, your cozy outdoor space stays ready for spontaneous nights.
25. Finish with One Signature Detail: A Handcrafted Sign, Mosaic, or Painted Border
Once the layout is solid, I love adding one personal detail that makes the space feel like yours. One of my favourite approaches is a small handcrafted touch—because it turns practical fire pit ideas into something memorable and story-filled.
I always start by choosing just one signature element so it doesn’t feel cluttered. You can paint a simple ring border on edging stones, create a small mosaic stepping stone at the entry, or hang a weatherproof wooden sign with your family name or a favourite phrase. Next, I repeat that colour once more—maybe in a pillow stripe or a planter—so it looks intentional rather than random.
For colours, I love warm terracotta, deep navy, or classic black and white—these work beautifully with gravel and natural wood. If you’re doing mosaic, choose glass tiles in fire-inspired tones (amber, copper, smoky grey).
Pro tip: I always recommend adding your signature detail near the entry path—every time you walk into your backyard fire pit area, it feels like stepping into a welcoming, cozy outdoor space you created with your own hands.
Final Thoughts
Final Thoughts
I always remind myself that the best fire pit setups aren’t about perfection—they’re about comfort, flow, and that warm “stay a little longer” feeling. If you take only one thing from these fire pit ideas, I hope it’s this: start with a clear circle and a smart seating plan, then layer in lighting and small surfaces so hosting feels easy.
From my experience, late spring is the sweet spot for building or refreshing a fire pit patio because you’ll enjoy it immediately and you’ll still have all summer to fine-tune the details. I’d start this weekend with one action step—mark your circle, set your chairs, or hang your string lights—and let your cozy outdoor space grow from there.
End the post with this exact section after Final Thoughts:
Products I Recommend for This Project
Here are some of my favourite products to help you bring these ideas to life:
- Sunnydaze 36 Inch Heavy-Duty Steel Fire Pit Ring Insert — I use a ring like this to get a clean, safe in-ground circle that’s easy to build around.
- Best Choice Products Set of 2 Folding Adirondack Chairs — I like these for flexible outdoor fire pit seating that you can move and store easily.
- Brightech Ambience Pro Waterproof LED Outdoor String Lights — I always recommend these for a warm overhead glow that instantly makes the patio feel like an outdoor room.
- Gorilla Carts Poly Yard Dump Cart — This makes hauling gravel, stone, and firewood so much faster and easier on your back.
- Keter Westwood 150-Gallon Resin Deck Box — I rely on a deck box like this to keep cushions, throws, and fire tools dry and ready for last-minute gatherings.