This post contains affiliate links. As an Amazon Associate, I earn from qualifying purchases at no extra cost to you.
Are you looking for a simple way to add height, privacy, and that “wow” moment to your outdoor space this spring? Do you want to guide vines and blooms upward without turning your garden into a messy tangle by midsummer?
I always start by thinking of a trellis as both outdoor furniture and living decor—something that shapes the space while supporting growth. In this post, I’m sharing my most practical trellis ideas, plus the step-by-step choices I make for placement, materials, and plant pairing so your setup looks intentional from day one.
From my experience, this is perfect for anyone planning a spring refresh who wants a backyard that feels more private, more romantic, and easier to maintain—without hiring a landscape crew.
When I design this look, I lean on a few standout moves: wooden panels that soften a fence line, arches that frame a path, and smart supports for a climbing plants trellis so jasmine and roses climb where you want them to (not where they feel like). I’ll also show you how I keep things sturdy in wind, how I make budget materials look high-end, and how I plan for watering and pruning before I ever pick up a drill.
If you’re ready to map out your spring garden planning with confidence, you’re in the right place. Below are 25 Trellis Ideas & Garden Design that…
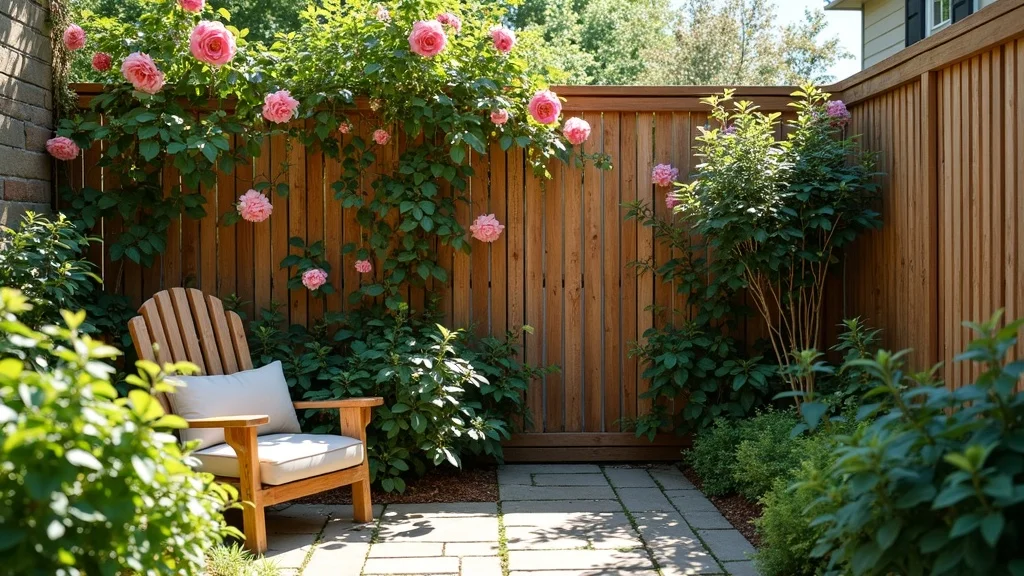
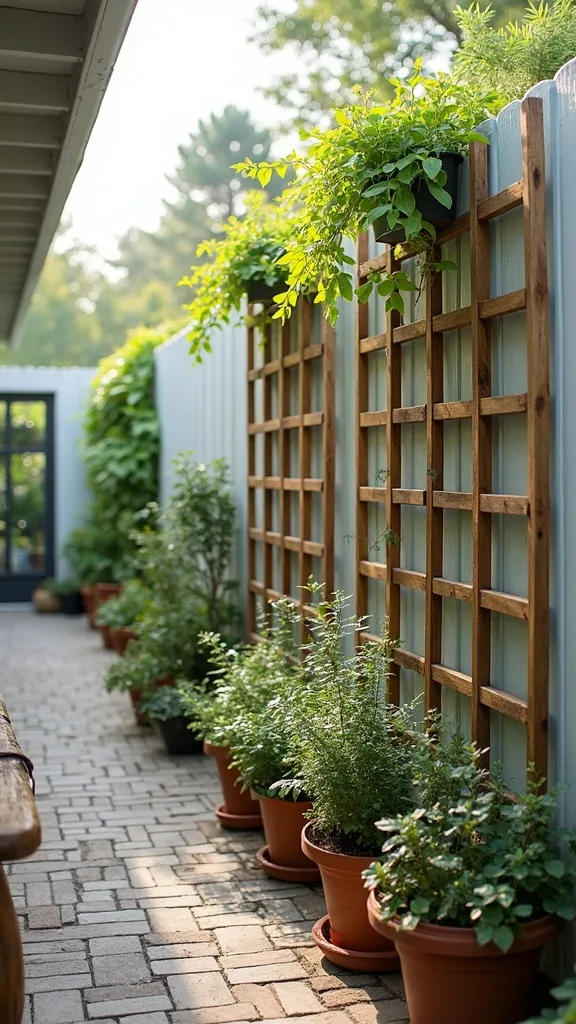
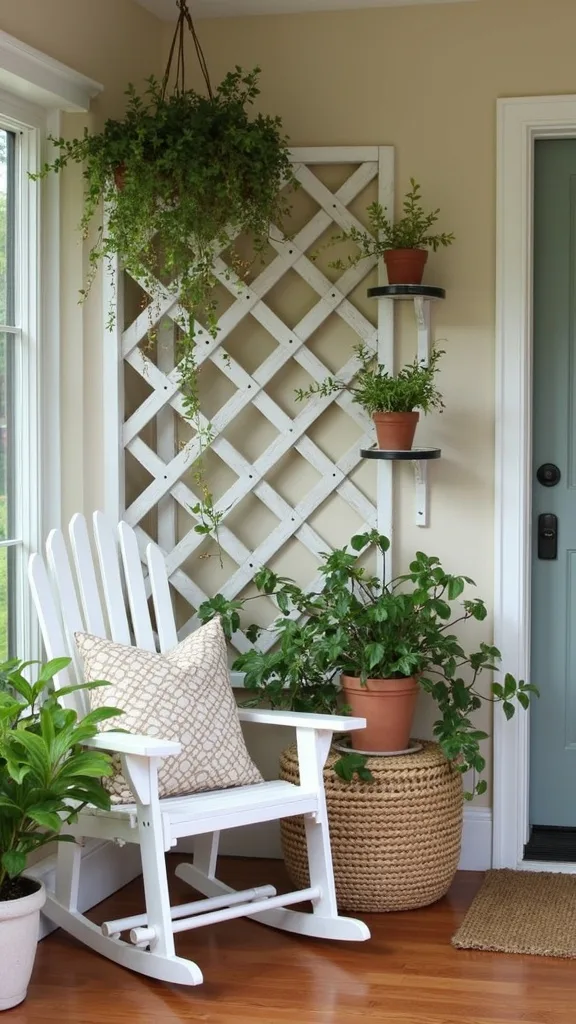
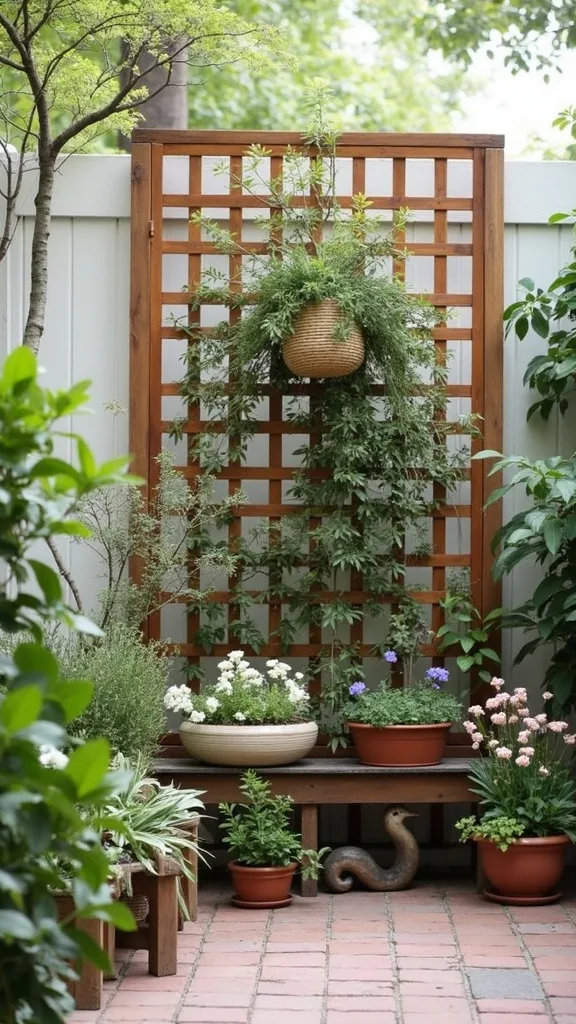
1. Wooden Panel Privacy Screen with Climbing Roses and Jasmine
When I want instant structure with a soft, romantic payoff, I build a run of wooden trellis panels and let roses and jasmine turn it into living lace. I find that this works because you get privacy fast from the panels, then even more coverage as the vines thicken through the season.
I always start by marking a straight line where I want the screen, then I set posts first (that’s what keeps everything from wobbling later). Next, I attach panels with exterior screws and leave a small gap at the bottom so the wood doesn’t sit in wet soil. Finally, I plant roses about 18–24 inches away from the base and train jasmine on the opposite side for layered fragrance.
For materials, I like cedar-toned stain, galvanized brackets, and soft green plant ties that disappear into foliage. I always recommend a simple drip hose nearby so watering stays consistent.
Pro tip: add a narrow bench or planter ledge at the base for a backyard trellis that feels like a destination—then watch your garden become your favourite “room” outdoors.
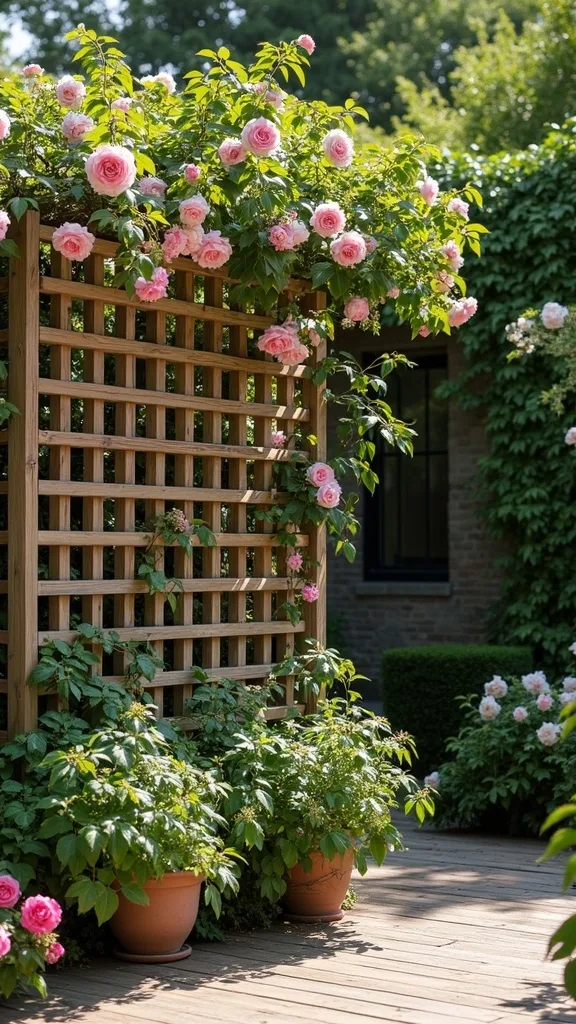
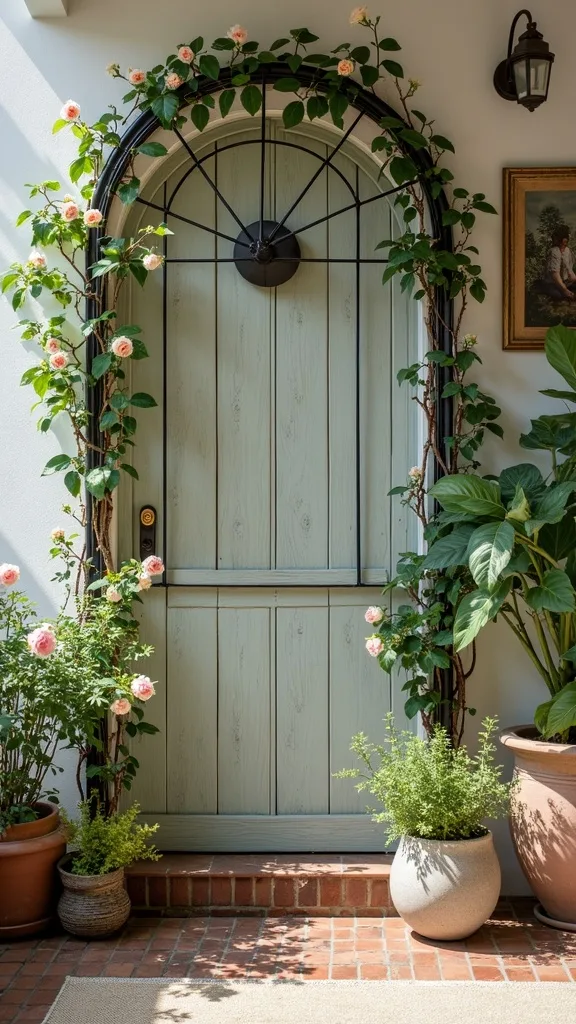
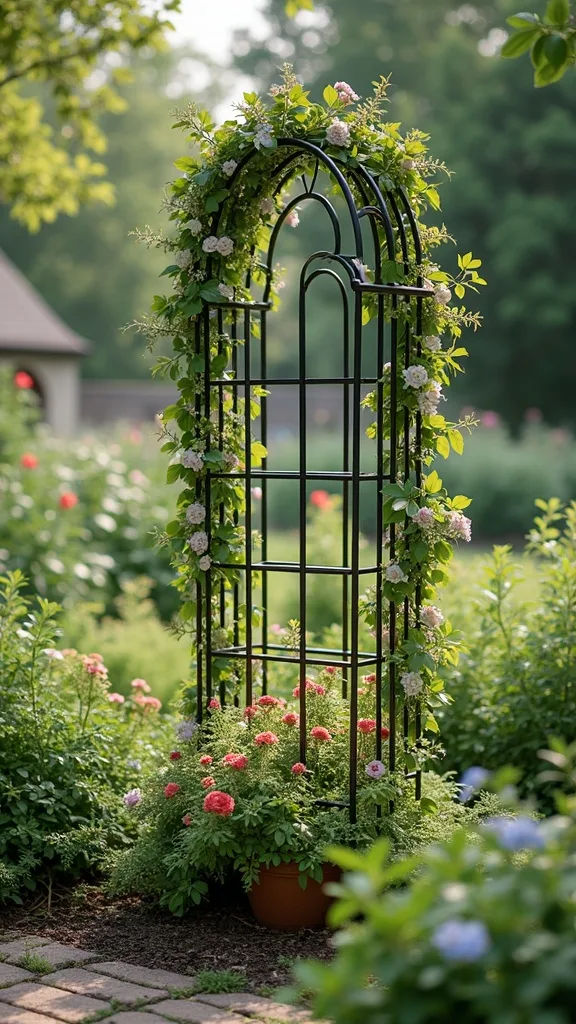
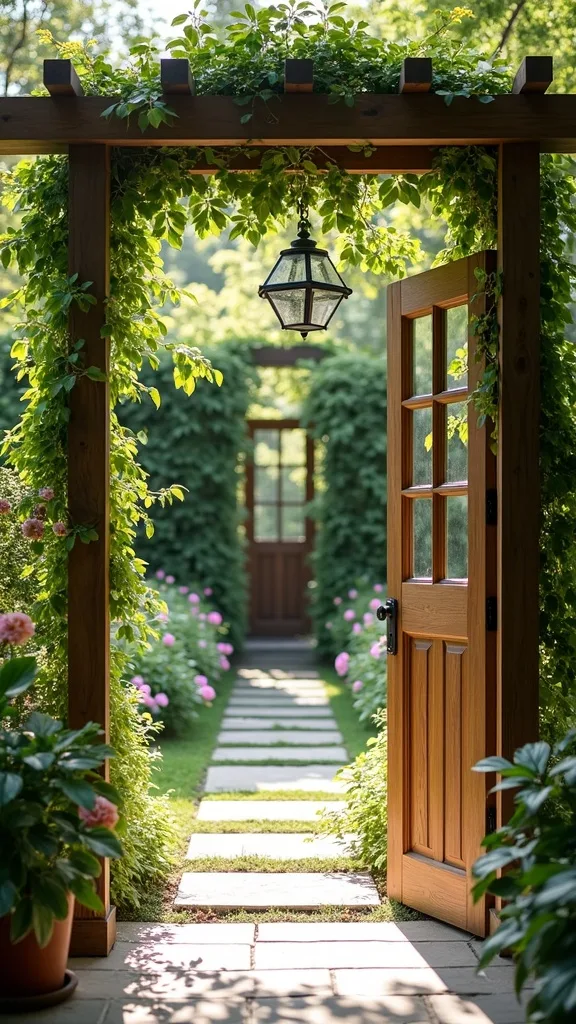
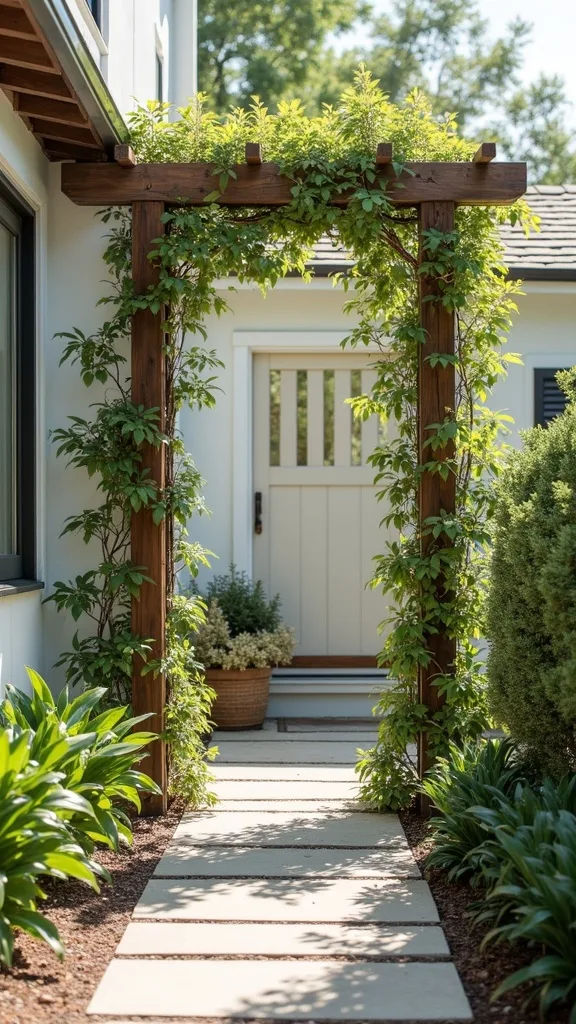
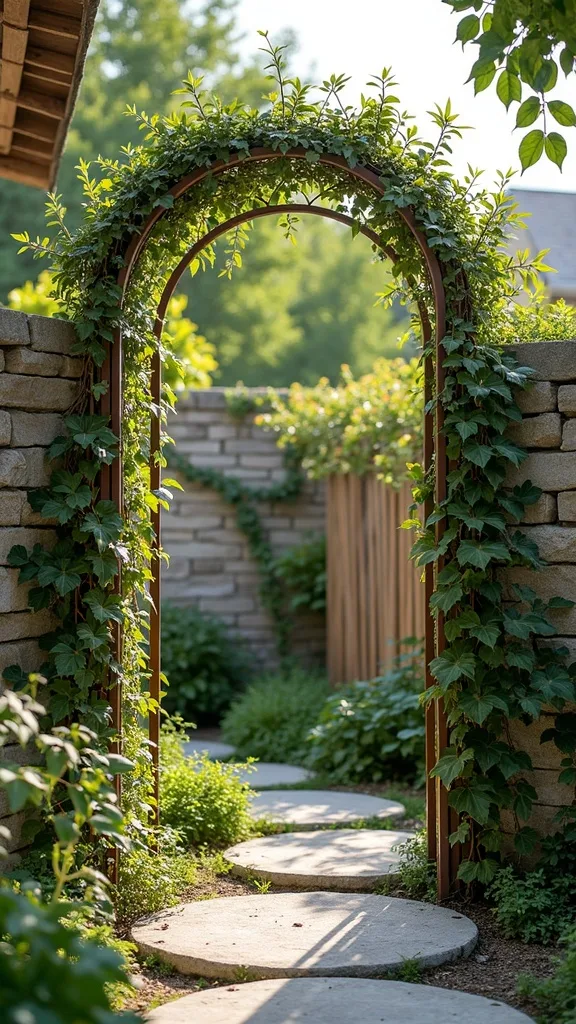
2. Classic Garden Arch Trellis to Frame a Path
One of my favourite approaches is using an arch as a “welcome sign” made of plants. I find that an arch works because it creates a clear transition—suddenly your garden feels designed, not just planted.
I always start by choosing the exact spot where I naturally pause or turn, then I measure the path width so the arch doesn’t feel tight. Next, I anchor the legs into the ground with stakes or post bases, and I check it with a level before tightening anything. After that, I plant climbers on both sides and loosely tie new growth upward every week or two.
For a warm look, I like stained wood or a matte black metal arch paired with white or blush blooms. If you want fragrance, jasmine near a seating area is hard to beat.
Pro tip: hang a small solar lantern that gives warm white light (2700K–3000K — the cosy, yellowish tone you see in most homes) so the arch glows at dusk and makes evening strolls feel magical.
3. Ladder-Style Trellis for a Narrow Side Yard
When space is tight, I reach for a ladder-style support because it adds vertical interest without eating up precious walking room. From my experience, this style is perfect for side yards that feel forgotten or purely functional.
I always start by leaning the ladder trellis slightly back toward a fence or wall, then I secure the top with brackets so wind can’t tip it. Next, I plant at the base and guide stems through the rungs as they grow—no complicated weaving required. If you’re renting, I recommend using a freestanding base planter so you don’t have to drill into anything permanent.
For materials, I like unfinished cedar (it weathers beautifully) or a painted sage green ladder for a cottage feel. Jute twine and soft plant clips keep stems supported without damage.
Pro tip: tuck a row of herbs at the base so your garden trellis becomes both pretty and practical—fresh snips right where you pass every day.
4. Fan Trellis for Roses That Need Gentle Guidance
I use a fan trellis when I want roses to look full and intentional instead of shooting straight up in a few awkward canes. In my opinion, the fan shape works because it spreads growth for better airflow and more blooms along the stems.
I always start by mounting the fan trellis to a fence or sturdy post at about chest height, then I plant the rose slightly off-center so I can angle canes outward. Next, I tie the canes in a wide “V” and keep adjusting as new growth appears. The trick is gentle tension—support, not squeezing.
For a polished look, I like black powder-coated metal or warm wood with a light stain. Pair it with soft pink or white roses for a classic spring vibe.
Pro tip: as you train stems more horizontal, you’ll encourage more flowering points—so your climbing plants trellis rewards you with a fuller, more generous wall of blooms.
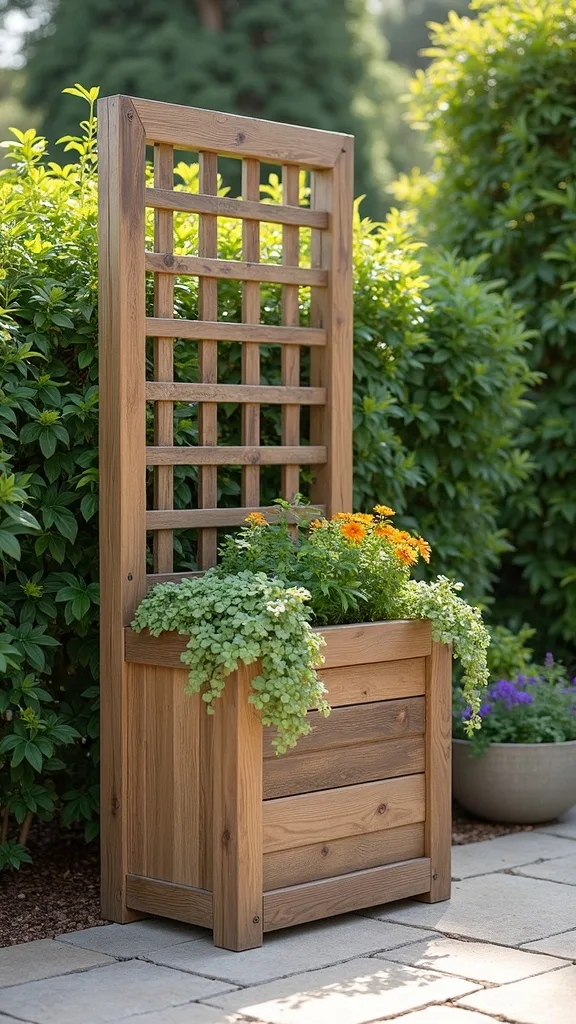
5. Freestanding Trellis Planter Box for Patios and Decks
When I design this look for a deck or paved patio, I go freestanding so I’m not limited by soil beds. I find that a trellis planter box works because it gives you a built-in base for stability and a clean, furniture-like finish.
I always start by choosing a deep planter so roots don’t dry out too fast, then I bolt a trellis panel directly to the back of the box. Next, I add a heavy bottom layer (like gravel in a liner) if wind is an issue, then fill with quality potting mix. Finally, I plant one main climber and a few trailing fillers to soften the edges.
For colors, I like charcoal planters with bright green foliage, or natural wood with white flowers. I always recommend a saucer or hidden drip tray to protect decking.
Pro tip: place two boxes side-by-side to create a natural privacy screen that feels intentional—like an outdoor room you’ll actually use.
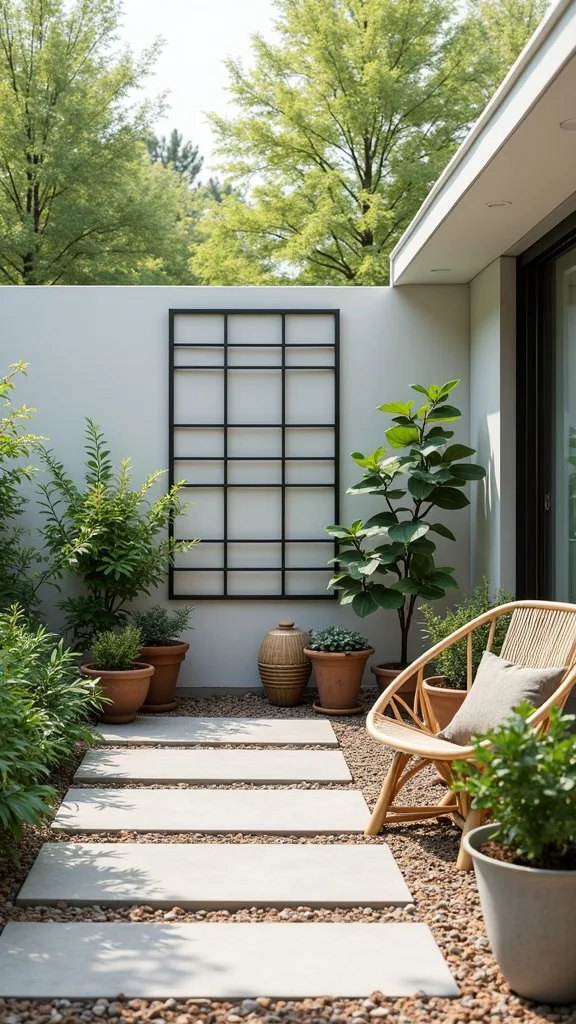
6. Grid Trellis Panel for a Clean, Modern Backyard
If you love a tidy, modern vibe, I lean into a square grid because it looks crisp even before plants fill in. From my experience, a grid panel works because it makes training easy—every stem has a clear next “step.”
I always start by sketching the panel size on paper so it matches the fence span or wall section. Next, I build a simple frame and attach evenly spaced slats, then I mount it with a small air gap behind (this helps prevent moisture issues and gives vines room). After planting, I guide new shoots horizontally and vertically to keep coverage balanced.
For materials, I like smooth cedar or painted black wood for contrast with green leaves. Stainless or galvanized screws hold up best outdoors.
Pro tip: repeat the panel rhythm across a fence for a cohesive trellis design garden moment—your backyard will feel curated, not cluttered.
7. Diagonal Lattice Trellis for Instant Cottage Charm
I reach for diagonal lattice when I want that classic garden feel that looks good in every season. I find that it works because the diamond pattern hides gaps quickly as vines grow, and it adds texture even when plants are young.
I always start by choosing a lattice scale that matches your space—smaller diamonds feel more delicate, larger diamonds feel bolder. Next, I frame the lattice with simple trim so it looks finished, then I secure it to posts or a fence with exterior hardware. After planting, I weave flexible stems through the openings and tie only where needed.
For colors, I love white lattice for a bright spring look, or natural wood for a softer, organic feel. Pair with climbing roses for romance or clematis for color bursts.
Pro tip: add a matching lattice gate nearby so your backyard trellis setup feels like a storybook entry into your own private garden.
8. Trellis Corner Screen to Soften a Harsh Fence Angle
Those sharp backyard corners can feel like dead space, so I like turning them into a feature with a corner trellis screen. In my opinion, this works because it visually rounds the space and gives climbing plants a beautiful “wraparound” moment.
I always start by measuring both fence runs, then I build two narrow panels and connect them at a right angle with sturdy brackets. Next, I anchor each panel to a post so the corner doesn’t flex. Then I plant one climber per side and train them toward the corner to meet in the middle.
For materials, I like cedar panels with black brackets for a subtle contrast. Add mulch or gravel at the base to keep the area tidy and easy to weed.
Pro tip: place a small bistro chair nearby so your garden trellis becomes a cozy nook—an unused corner turns into your new favourite pause spot.
9. Espalier-Inspired Trellis for a Decorative Living Wall
When I want a truly intentional look, I borrow espalier ideas and train plants into a pattern. I find that this works because it turns growth into art—orderly, elegant, and surprisingly space-efficient.
I always start by installing horizontal wires or slim wooden battens on a fence, spaced evenly so I can guide branches along each line. Next, I plant at the base and select a few strong stems to become my main “arms.” Then I tie them gently and prune extra growth so the shape stays clear as the season progresses.
For a soft backyard feel, I like warm wood battens and green-coated wire that blends in. This approach is gorgeous with flowering vines, but it also works with some fruiting plants if you want beauty and harvest.
Pro tip: take photos every two weeks—watching your trellis design garden pattern develop is incredibly satisfying and keeps you motivated to maintain it.
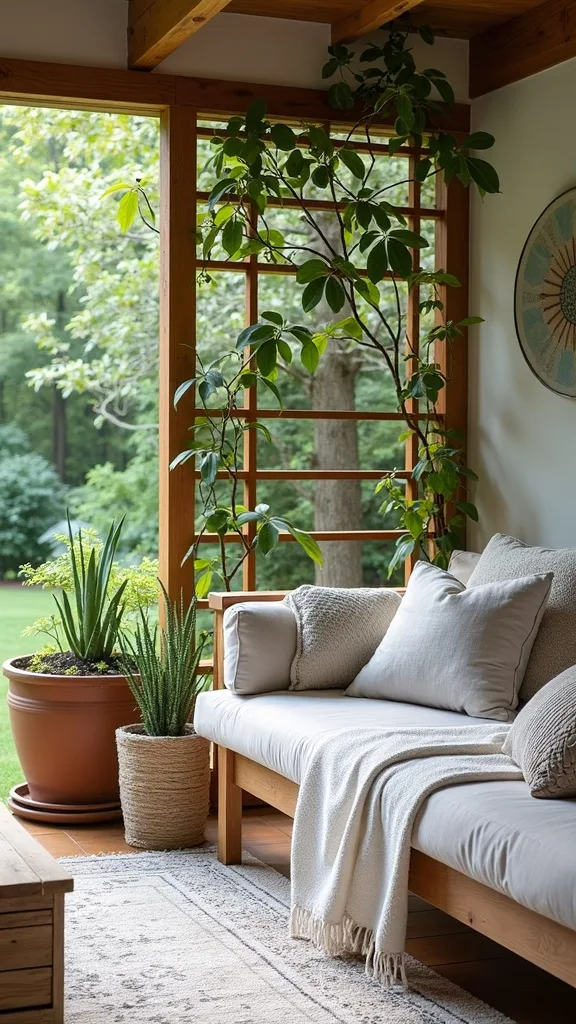
10. Pergola Side Trellis to Add Shade and Structure
If you already have a pergola (or plan to build one), I love adding side trellis panels to make it feel like a true outdoor room. From my experience, this works because the sides create enclosure and guide vines where you actually want coverage.
I always start by deciding which side needs privacy or wind protection, then I attach a panel between the pergola posts. Next, I plant climbers at the base and train them upward, keeping stems spread so the panel fills evenly. If you’re short on time, I recommend starting with one side this spring and adding more sections later.
For materials, I like cedar panels with a clear sealer to keep the tone warm. Pair with jasmine near seating for scent, and roses where you’ll see blooms in morning light.
Pro tip: add outdoor string lights with warm white light (2700K–3000K — the cosy, yellowish tone you see in most homes) so your trellis-covered pergola feels inviting long after sunset.
11. Obelisk Trellis for a Flower Bed Centerpiece
When a flower bed feels flat, I pop in an obelisk trellis to create height right in the middle. I find that it works because it acts like a garden sculpture early on, then becomes a tower of blooms as vines climb.
I always start by placing the obelisk first—before planting—so I can see the sightline from patios and windows. Next, I push the legs firmly into the soil and add stakes if the ground is loose. Then I plant climbers around the base and spiral the stems upward as they grow, tying lightly to keep them on track.
For a classic look, I like black metal obelisks with pastel flowers, or natural wood for a softer, handmade vibe. Add low edging plants around the base to hide bare stems.
Pro tip: repeat two obelisks along a path for a rhythmic garden trellis moment that makes the whole yard feel professionally planned.
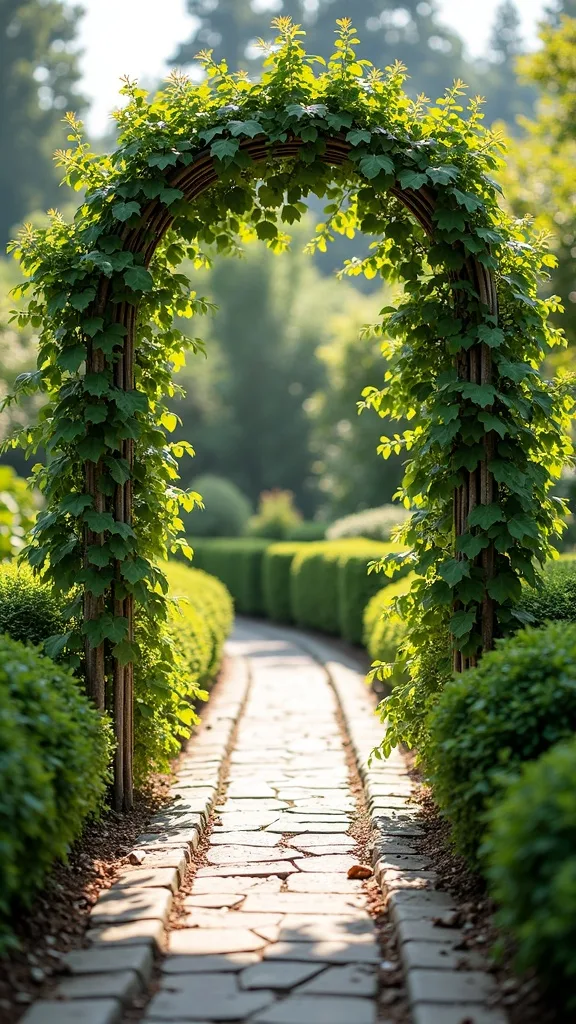
12. Cattle Panel Trellis for a Rustic, Budget-Friendly Statement
When I need big impact without a big spend, I use a cattle panel and turn it into an arch or upright trellis. In my opinion, it works because it’s sturdy, tall, and gives climbing plants tons of grip points.
I always start by deciding if I want it vertical (flat against posts) or arched (bent between two sides). Next, I secure it with heavy-duty ties or fencing staples to wood posts, then I check for sharp edges and cover them if needed. After planting, I guide vines through the openings and let them naturally latch on.
For style, I soften the industrial grid with roses, jasmine, or flowering vines. I also like adding wood posts stained a warm brown so it feels intentional, not purely farm utility.
Pro tip: plant on both sides for faster coverage and a more immersive backyard trellis tunnel effect—your spring effort pays off all summer long.
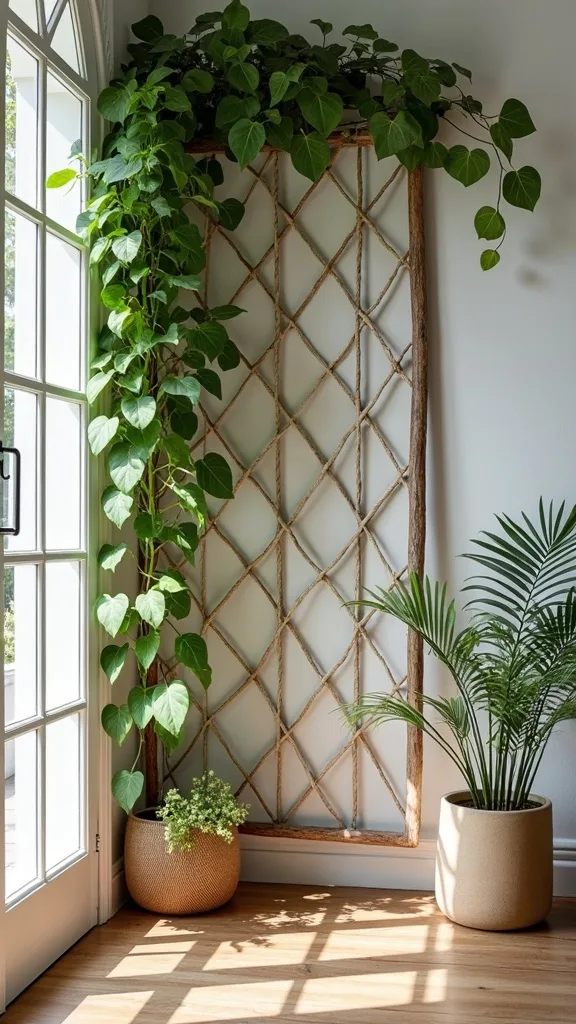
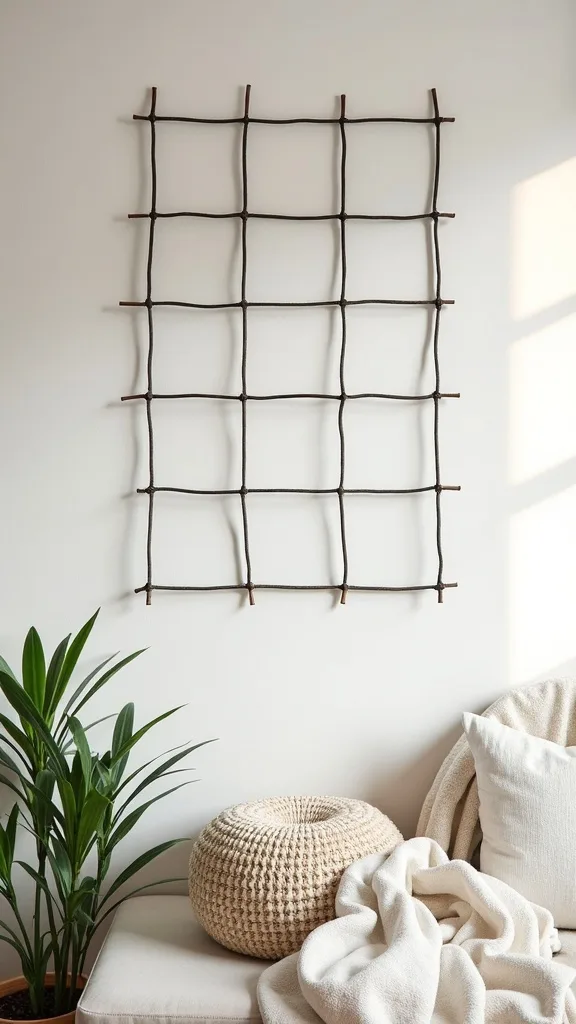
13. Wire-and-Eyelet Trellis for a Minimal Look on Walls
If you want something almost invisible, I always recommend a wire trellis system. I find that it works because the support disappears, and your plant becomes the star—perfect for a clean wall or fence section.
I always start by mapping the pattern with painter’s tape, then I install eyelets or hooks in a grid or diamond layout. Next, I thread coated wire through and tighten it so it doesn’t sag as vines get heavier. Then I plant at the base and tie stems to the lowest wire until they learn the route.
For materials, I like green-coated wire, stainless hooks, and simple turnbuckles so I can re-tighten later. This is especially helpful for vigorous climbers that gain weight quickly after rain.
Pro tip: create a gentle curve pattern instead of straight lines for a subtle, artistic trellis design garden touch that feels custom to your home.
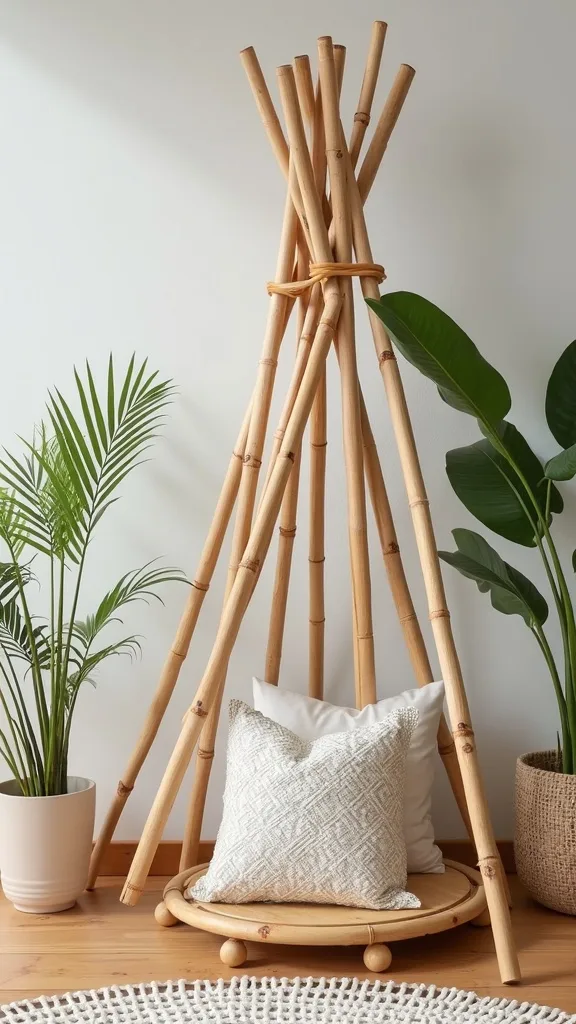
14. Bamboo Teepee Trellis for Quick Spring Setup
When I’m craving a fast win in early spring, I build a bamboo teepee trellis in minutes. From my experience, it works because it’s lightweight, inexpensive, and easy to adjust as your planting plan changes.
I always start by pushing 4–6 bamboo poles into the soil in a circle, then I gather the tops and tie them tightly with weather-resistant twine. Next, I add a few horizontal ties midway down so vines have extra grab points. Then I plant climbers around the base and train them upward as soon as they start reaching.
For a cohesive look, I keep bamboo natural and pair it with soft white or purple blooms. If you want it to blend into greenery, I lightly stain the bamboo a deeper brown.
Pro tip: cluster two teepees together for a playful “garden room” feel—this simple climbing plants trellis can make even a small bed feel abundant and joyful.
15. Trellis Gate Entry to Define Garden Zones
I love using a trellis gate when I want to separate spaces without closing them off completely. I find that it works because it signals, “You’re entering something special,” while still letting light and air move through.
I always start by deciding what I’m dividing—lawn from garden beds, patio from planting area, or veggie zone from play space. Next, I set two sturdy posts, hang a simple gate, and add matching trellis panels on either side for a built-in frame. Then I plant climbers near the posts so the entry gets softer and greener each week.
For materials, I like natural wood with black hinges for a handcrafted feel. If you want a brighter look, a white gate with green vines is timeless in spring.
Pro tip: add a small sign or house number plaque so your garden trellis entry feels personal—like a little invitation to slow down and enjoy your own backyard.
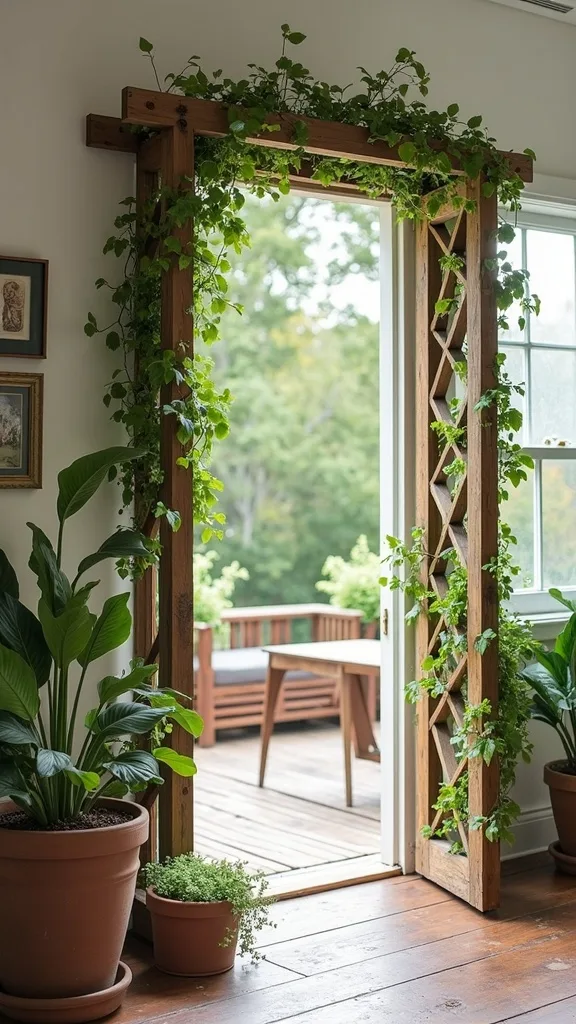
16. Window-Frame Trellis for Vintage, Handcrafted Charm
One of my favourite approaches is upcycling an old window frame into a trellis that feels collected and artistic. I find that it works because it adds instant character, even before a single vine climbs.
I always start by checking the frame for loose glass (and removing it for safety), then I sand and seal the wood so it can handle weather. Next, I mount it to posts or a fence with sturdy brackets, making sure it’s high enough that plants can reach the lower openings. Then I guide vines through the “panes” so the greenery looks like it’s spilling through a vintage backdrop.
For colors, I love soft white, faded sage, or weathered wood tones. Pair with delicate climbers so the look stays airy, not heavy.
Pro tip: repeat two frames side-by-side for a gallery effect—this trellis design garden idea makes your backyard feel like a curated outdoor studio.
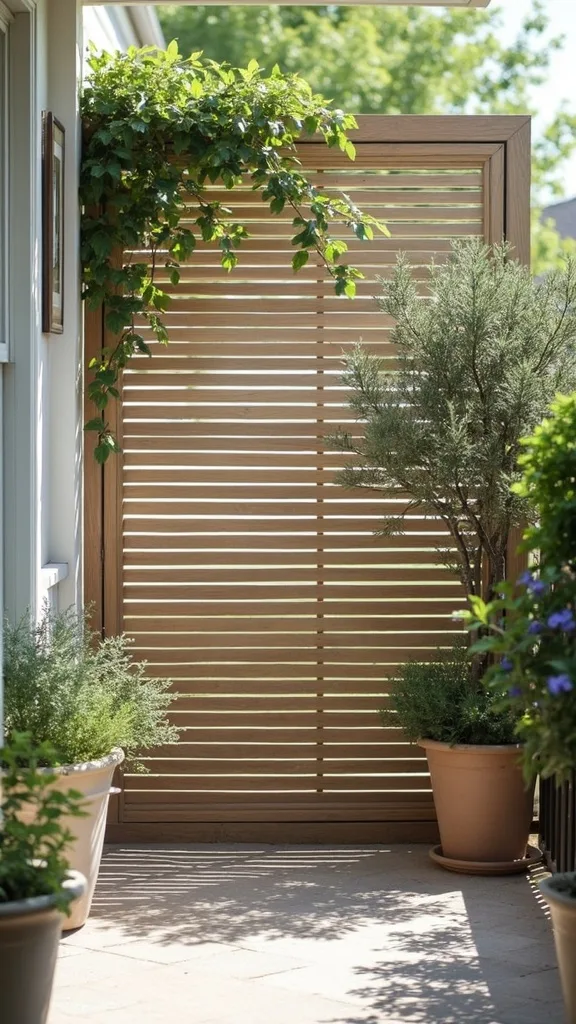
17. Horizontal Slat Trellis for a Sleek Privacy Upgrade
When I want privacy that feels modern and intentional, I build a horizontal slat trellis. In my opinion, it works because the lines visually widen the space while giving vines steady support points.
I always start by attaching vertical supports to posts, then I screw horizontal slats across with consistent spacing. Next, I leave a small gap behind the slats if they’re mounted to a fence so plants have room to tuck in. Then I plant climbers at intervals and train them along the slats to create a living “woven” effect.
For materials, I like cedar slats with a clear sealer, or painted charcoal for drama. Add matching planters at the base to make it feel like outdoor furniture, not just a fence fix.
Pro tip: alternate slat spacing for subtle pattern—your backyard trellis will look custom-built and elevate the whole garden instantly.
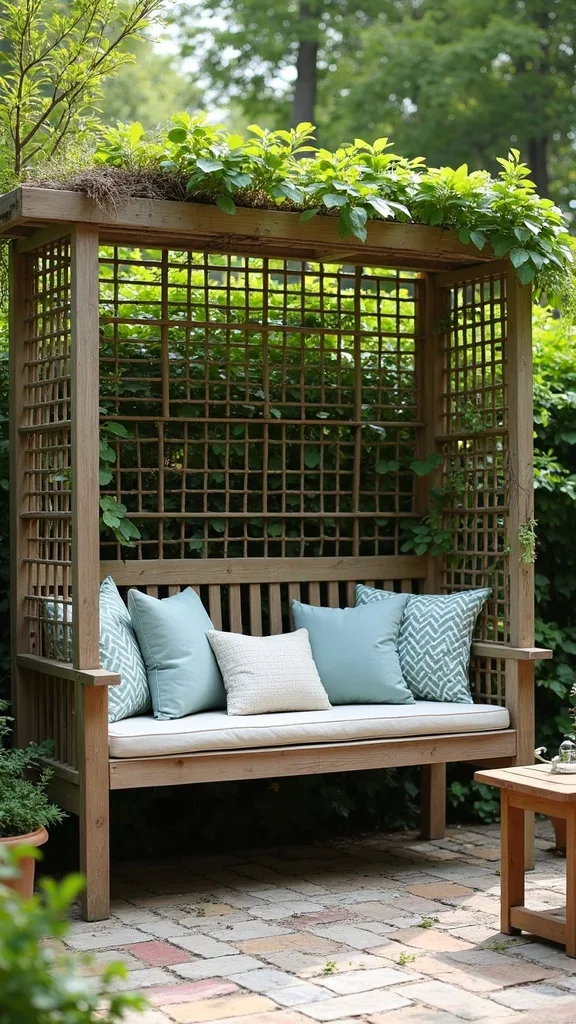
18. Trellis Behind a Garden Bench to Create a Backdrop
I like giving seating areas a “wall” of greenery, and a trellis behind a bench is my go-to move. I find that it works because it makes the bench feel anchored, cozy, and photo-ready from every angle.
I always start by placing the bench first, then I measure the width and install a trellis panel just behind it, attached to posts for stability. Next, I plant climbers to either side so you don’t sit directly on top of roots, and I train stems toward the center to frame the seat. If you want quick coverage, choose a vigorous climber and commit to weekly guiding in spring.
For comfort and style, I add weather-resistant cushions in a neutral tone and let the flowers provide the color. Wood-on-wood (bench + trellis) feels especially warm and cohesive.
Pro tip: add a small side table and a lantern so your garden trellis backdrop becomes a true outdoor retreat you’ll use every day.
19. Trellis Divider to Hide Trash Bins or Utility Areas
Every backyard has a practical corner, and I prefer to screen it with a trellis instead of pretending it doesn’t exist. From my experience, this works because you get airflow (so odors don’t trap) while still creating a prettier view.
I always start by measuring the footprint of what I’m hiding, then I build a simple three-sided screen with panels attached to posts. Next, I leave enough clearance for lids and access, and I anchor everything so it won’t shift when you roll bins in and out. Then I plant climbers on the “public” side only, keeping the utility side clear for maintenance.
For materials, I like pressure-treated posts with cedar panels, stained to match fencing. Choose hardy climbers that won’t mind heat reflecting off hard surfaces.
Pro tip: add a narrow shelf for gloves and tools—this trellis ideas upgrade keeps the area functional while still feeling like part of your garden.
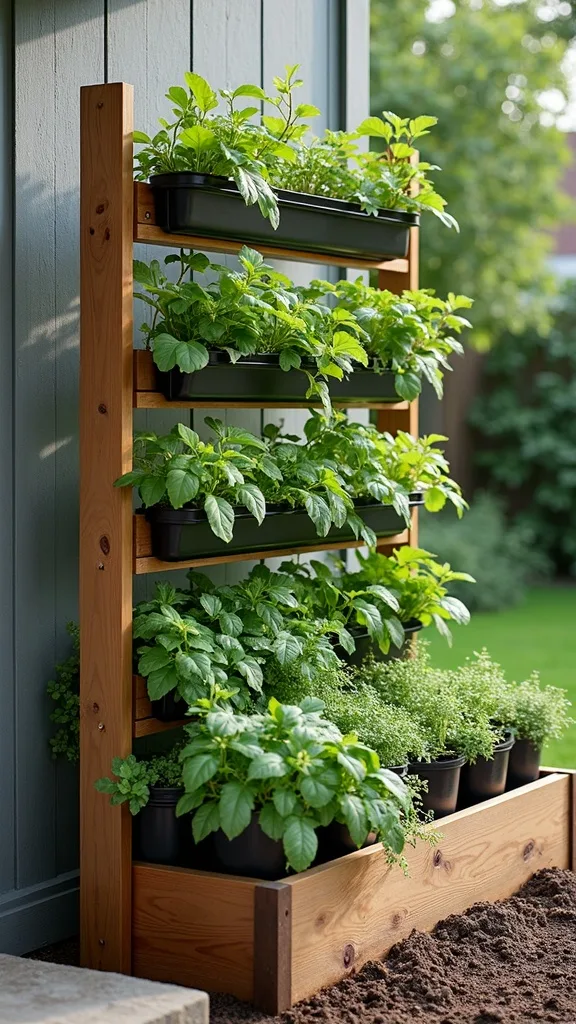
20. Raised Bed Trellis for Vertical Growing and Easy Harvesting
If you love a tidy garden that’s easy on your back, I pair raised beds with a trellis at the end or along the back. I find that it works because it keeps vines off the soil, improves airflow, and makes harvesting feel effortless.
I always start by building or placing the bed, then I attach a sturdy trellis frame to the bed corners with brackets. Next, I check stability by gently shaking it—if it wiggles now, it’ll wobble more later when plants get heavy. Then I plant climbers at the base and guide them upward early so they don’t sprawl across pathways.
For a cohesive look, I match the bed and trellis wood tone, then add simple labels for a neat, organized vibe. I always recommend mulch to hold moisture and reduce weeds.
Pro tip: add a second trellis on the opposite end for symmetry—this trellis design garden move makes your veggie zone look as beautiful as your flower beds.
21. Mailbox or Entry Trellis for Curb-to-Backyard Continuity
I love carrying a garden theme from the front entry into the backyard, and a small trellis near a mailbox or gate does that beautifully. In my opinion, it works because it signals a consistent style and makes the whole property feel thoughtfully cared for.
I always start by choosing a compact trellis that won’t block walking paths or visibility. Next, I anchor it into the ground with stakes or set it between two slim posts for extra strength. Then I plant a fragrant climber and train it upward, trimming regularly so it stays neat and welcoming.
For materials, I like simple wood with a light stain or black metal for a crisp outline. White flowers look especially fresh in spring, and jasmine adds that “stop and breathe” scent.
Pro tip: repeat the same stain color on your garden trellis structures front and back—this small detail makes your outdoor spaces feel connected and intentionally designed.
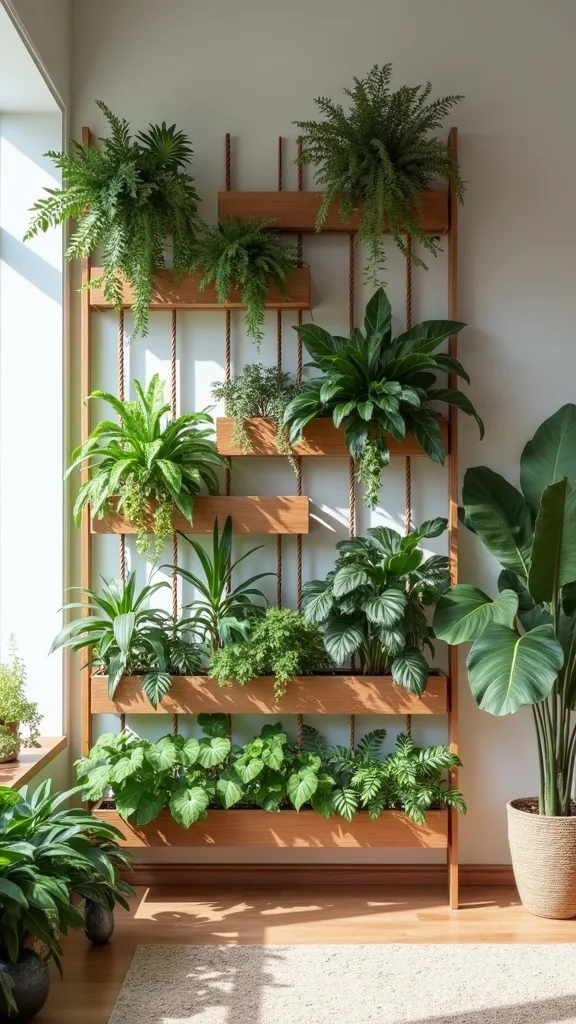
22. Trellis with Integrated Planter Shelves for Layered Styling
When I want a trellis to feel like decor, not just support, I add little planter shelves. I find that it works because you get vertical greenery plus styling moments—like an outdoor bookcase made of plants.
I always start by choosing a sturdy panel and attaching small shelf brackets at different heights, then I screw on narrow cedar planks as ledges. Next, I keep shelves shallow so they don’t sag, and I place heavier pots lower for stability. Then I plant a climber at the base and let it weave around the shelves for a lush, layered look.
For colors, I like terracotta pots for warmth or matte black pots for a modern contrast. Mix trailing plants with upright herbs so every level feels full.
Pro tip: add a few solar candles for evening glow—this backyard trellis idea turns into a styled focal point that feels like an outdoor living room.
23. Curved Trellis Panels to Soften Straight Fence Lines
If your backyard feels boxy, I like introducing a gentle curve with slightly bowed trellis panels. From my experience, this works because curves make a space feel more natural and relaxed—less “fenced in.”
I always start by deciding where the curve will be most noticeable, usually along the main sightline from the patio. Next, I build a flexible frame with thin slats or use pre-made arched panels, then I attach them to posts with enough support to hold the shape. After planting, I train vines to follow the curve so the greenery highlights the form.
For materials, I like warm wood tones that blend into the garden. Pair with climbing roses for softness and jasmine for scent, especially near seating.
Pro tip: repeat the curve in two sections for rhythm—this trellis ideas detail can make an average fence line feel like a designed garden boundary.
24. Trellis Lighting Plan for Spring-to-Summer Evenings
I don’t treat lighting as an afterthought—I plan it alongside my trellis layout. I find that it works because vines and flowers look completely different at dusk, and the right glow makes your garden usable longer.
I always start by identifying where I’ll sit or walk at night, then I run solar string lights or low-voltage options along the trellis frame. Next, I secure the cord with outdoor clips so it doesn’t droop into plants, and I keep lights slightly forward so foliage doesn’t smother them. Then I test the view from inside the house too—your windows become part of the experience.
I always recommend warm white light (2700K–3000K — the cosy, yellowish tone you see in most homes) for a flattering, relaxing feel. If you’re choosing brightness (measured in lumens), I go softer near seating and brighter along steps.
Pro tip: tuck one spotlight at the base aimed upward—your garden trellis will cast beautiful shadows that make ordinary leaves feel like art.
25. Spring Maintenance Routine to Keep Your Trellis Looking Designed
A trellis only stays beautiful if the growth stays guided, and I treat that like a simple weekly habit. In my opinion, this works because small, consistent touch-ups prevent the midseason chaos that makes trellises look messy.
I always start by walking the garden with soft ties and pruners once a week in spring. Next, I re-tie any stems that slipped, redirect new shoots to fill gaps, and remove growth that’s heading toward gutters, walkways, or neighboring plants. Then I check the structure—tighten screws, confirm posts feel solid, and clear debris at the base so moisture doesn’t rot wood.
For tools, I keep a small bucket with plant ties, gloves, and hand pruners near the back door so I’m more likely to do the quick upkeep. A simple mulch refresh keeps everything looking clean.
Pro tip: take ten minutes after watering to train vines—your climbing plants trellis will look intentional all season, and you’ll feel proud every time you step outside.
Final Thoughts
I always remind myself that the best trellis isn’t the fanciest one—it’s the one I’ll actually use, maintain, and enjoy looking at every day. When I design a spring setup, I focus on placement first (privacy, pathways, seating), then I choose a structure that matches my time and budget, and only then do I pick the plants that will bring it to life.
From my experience, a trellis is one of the quickest ways to make a backyard feel like a real outdoor room—especially when I pair wood panels with fragrant climbers like roses and jasmine. If you try even one of these ideas this season, I recommend taking it step by step: set posts straight, attach panels securely, plant with enough breathing room, and train growth early while stems are flexible.
If you want, tell me what you’re working with—fence line, patio corner, or a blank side yard—and I’ll help you narrow it down to a trellis plan that feels doable and looks beautiful by summer.
Products I Recommend for This Project
Here are some of my favourite products to help you bring these ideas to life:
- DEWALT 20V Max Cordless Drill/Driver Kit (DCD771C2) — I use it to assemble panels and drive exterior screws quickly without fighting the wood.
- Hillman Exterior Wood Screws, Star Drive (T25) — I like these for strong, clean connections that hold up outdoors with less stripping.
- Gardener’s Supply Company Soft Plant Ties (Stretch Tie Tape) — I reach for these to secure stems without cutting into tender growth.
- Miracle-Gro Performance Organics All Purpose Container Mix — I use it in trellis planters to keep roots happy and reduce the “dry pot” struggle.
- Brightech Ambience Pro Solar Outdoor String Lights — I hang these on trellises to create a cozy evening glow that makes the garden feel like an outdoor room.