This post contains affiliate links. As an Amazon Associate, I earn from qualifying purchases at no extra cost to you.
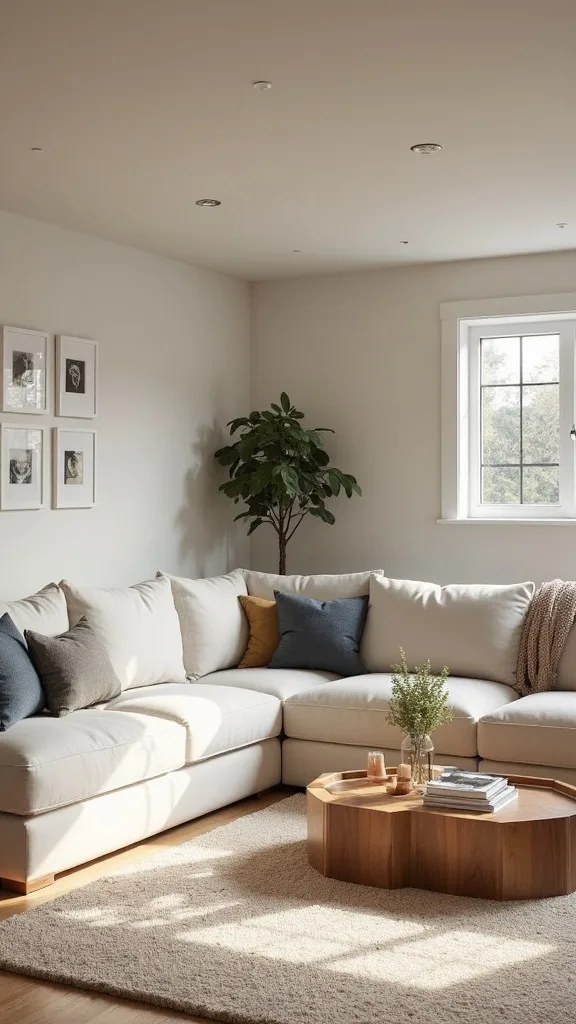
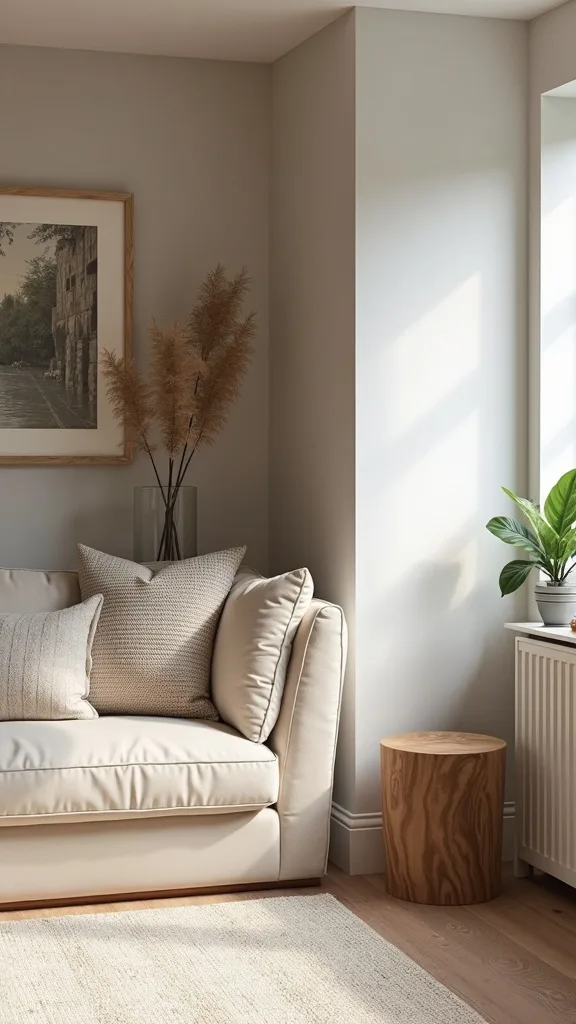
The moment a basement stops feeling like “storage with a lightbulb,” the whole house feels bigger. Ours went from concrete, cobwebs, and a sad tangle of extension cords to a real basement living room with LVP underfoot, a painted ceiling, and a sectional you actually want to sink into—and the total spend was $1,642.17. Not “TV-makeover” money. Real-life money.
This is a summer home project for people who’d rather sweat in the driveway for a weekend than hand over five figures. I’m sharing 25 practical, high-impact upgrades: flooring, lighting, layout, egress-window moments, and garage-adjacent organization tricks that make a basement feel finished without pretending it’s a magazine set.
If you’re budget-smart, love the hunt, and don’t mind mixing thrift store scores with one or two new essentials, this is your lane.
Inside you’ll find the stuff that actually moves the needle: the $40 paint choice that makes low ceilings disappear, the finish basement shortcuts that don’t look like shortcuts, and the storage moves that keep the “garage creep” from taking over again.
Below are 25 Basement Conversion & Transformation Ideas that turn a genuinely rough “before” into a space you’ll use every day—with basement transformation wins that are affordable, realistic, and repeatable.
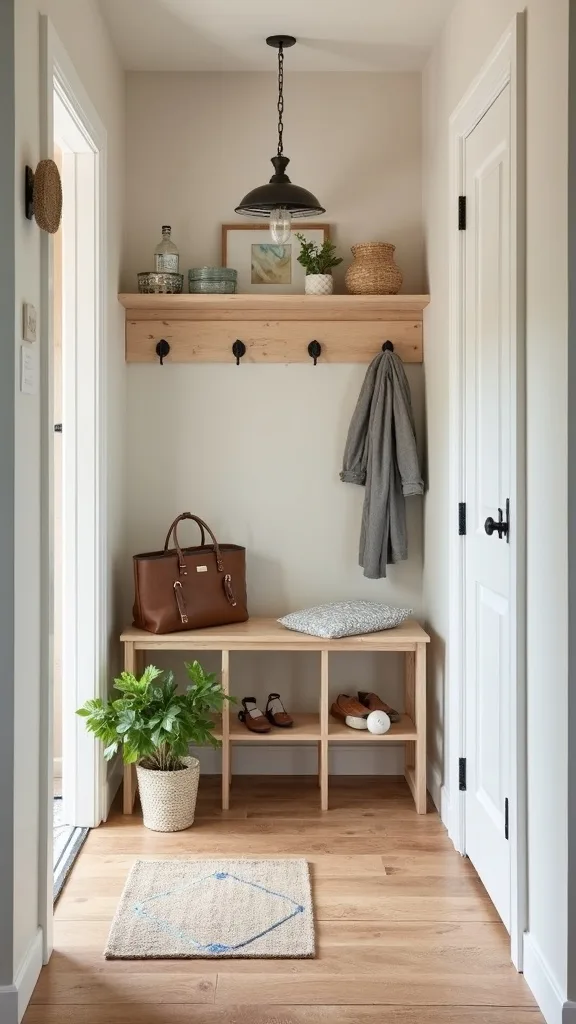
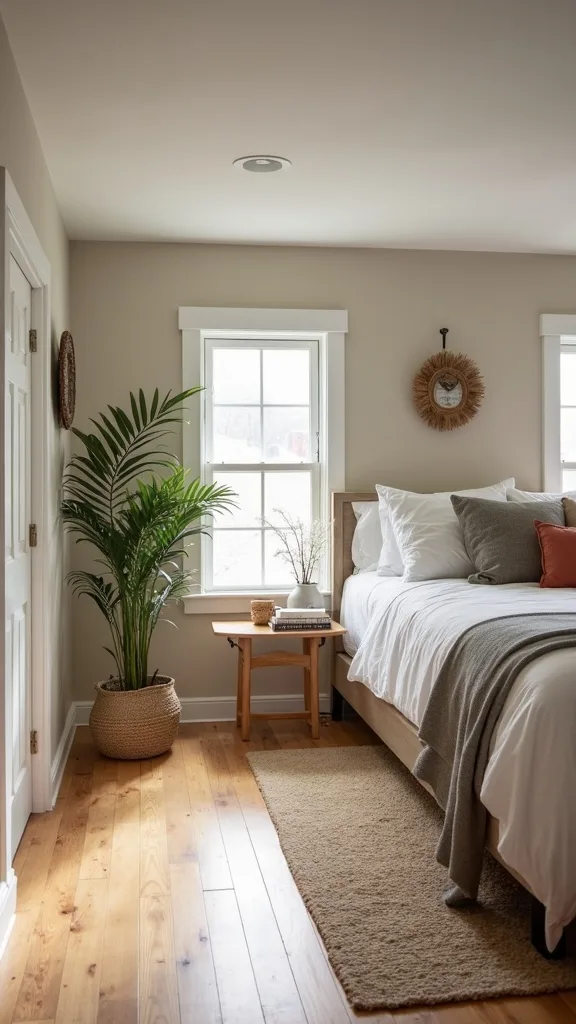
1. Copy the LVP + painted ceiling + egress window + cozy sectional formula
This combo is the fastest way to make a basement feel like a real room, not a holding cell for holiday bins. LVP flooring reads clean and intentional, a painted ceiling hides the “utility vibe,” and a cozy sectional configuration makes the space feel finished even if the walls are simple.
How to do it: run LVP the long direction of the room to visually stretch it, then paint the ceiling joists/ducts one color (matte black or warm white) so the eye stops catching every pipe. Frame the egress window with a simple wood casing and hang curtains high and wide so it feels like a normal window.
Budget materials: LVP at Home Depot (Lifeproof or TrafficMaster) often lands around $2.29–$3.49/sq ft; ceiling paint can be a $19 mistint gallon; curtains can be IKEA LILL ($4.99/panel) or thrifted.
Pro tip: put the sectional’s chaise on the “ugly wall” so the best sightline faces the window—layout is a finish, and it costs nothing to get right.
2. What’s the cheapest way to make a basement floor feel finished?
The cheapest “it finally feels done” move is covering cold concrete with a durable floor you can mop without babying. LVP is forgiving, looks modern, and won’t cry if a summer thunderstorm makes your dehumidifier work overtime.
Implement it: measure the room, add 10% for cuts, and start on the straightest wall. If the slab isn’t perfect, use an underlayment rated for basements and keep a 1/4″ expansion gap at the edges (trim hides it).
Budget swaps: if new LVP isn’t happening, check Habitat ReStore for leftover boxes (I’ve seen $15–$25/box), Facebook Marketplace for “extra after remodel,” or do a large indoor/outdoor rug over sealed concrete as a bridge.
Pro tip: spend $18 on a pull bar tool—it saves your wrists and makes the last row look professional, which is the part everyone sees.
3. How do you hide an ugly basement ceiling without drywalling it?
If your ceiling is a spaghetti bowl of wires and pipes, paint is your best friend. A single color turns visual chaos into a deliberate “industrial” look, and it makes the whole basement read taller.
Do it: vacuum the joists, tape off shutoff valves you need to see, then roll and brush a flat ceiling paint. Use a cheap sprayer only if you can truly mask everything—otherwise, a roller is slower but controlled.
Affordable picks: a $79 5-gallon contractor paint (Lowe’s or Home Depot) covers a lot; or ask for “oops paint” in flat black/white for $9–$20 a gallon. Pair with simple LED shop lights converted to warm white light (2700K–3000K — the cosy, yellowish tone you see in most homes).
Pro tip: paint the ceiling and the top 6″ of the wall the same color for a clean cap line that looks intentional.
4. How can you make an egress window look like a design feature?
An egress window is safety-first, but it can also be your “we have natural light!” brag moment. Treat it like a real living-room window and the basement mood changes instantly.
Implement it: add a deep wood stool (even 1×10 pine) for a little ledge, paint the casing the same as your trim, and hang curtains from a rod set 4–6″ above the frame and wider than the opening.
Budget options: thrift two curtain panels (I paid $12.99 for a pair last summer) and hem with iron-on tape. For the well itself, lay pea gravel neatly and add a solar step light so it doesn’t look like a pit.
Pro tip: if privacy is an issue, use a light-filtering film (Amazon) instead of heavy blinds—soft light makes basements feel expensive.
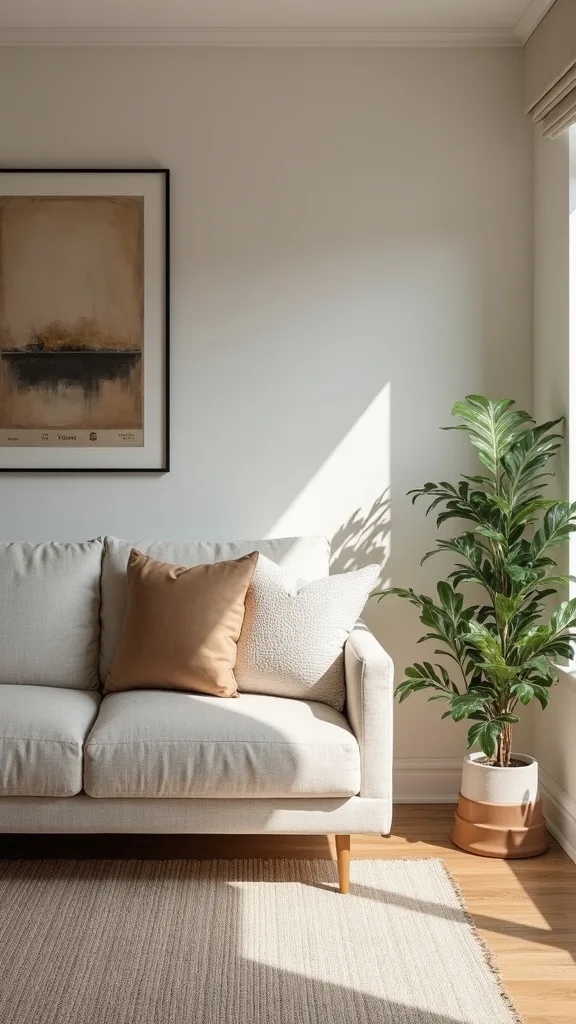
5. What sectional layout works best in a basement living room?
Basements love sectionals because they create a “room within a room” and hide awkward corners. The trick is leaving a clear path to storage/utility areas so you don’t resent the space later.
Set it up: float the sectional 6–12″ off the wall if you can, put the TV on the shortest wall to reduce glare, and keep a 30–36″ walkway to the stairs, laundry, or garage door. Add a slim console table behind the sofa for chargers and drinks.
Budget seating: Marketplace is gold—older sectionals often go $150–$400 if you can haul. If you need new, IKEA KIVIK is a classic “solid for the price,” and a washable cover saves you.
Pro tip: use two mismatched thrifted side tables instead of one big coffee table—flexible surfaces make movie nights and projects easier.

6. How do you plan a basement conversion when it shares space with garage storage?
If your basement is also the drop-zone for sports gear and “I’ll deal with it later” boxes, zoning is non-negotiable. A good plan keeps the living area calm while the storage stays functional.
Do it: mark the room with painter’s tape—living zone, walkway, storage wall. Put storage closest to the garage/entry, then create a visual barrier (curtain, tall shelf, or half wall) so the hangout space isn’t staring at bins.
Budget barriers: a $29 tension rod with blackout curtains, a thrifted bookcase turned sideways, or IKEA KALLAX with baskets. Label bins with painter’s tape and Sharpie before you buy anything fancy.
Pro tip: set a hard rule: nothing crosses the tape line except a basket that belongs there—boundaries are decor when storage is involved.
7. What should you avoid before you finish a basement?
Avoid building your dream room on top of mystery moisture. It’s the fastest way to waste money and end up with warped flooring, musty rugs, and that basement smell you can’t candle away.
What to do instead: run a dehumidifier for a week, check corners after storms, and do the “tape test” (tape plastic to the slab and see if condensation forms). If water shows up, handle drainage/gutters first, then seal the floor before you install anything.
Budget-friendly tools: a basic hygrometer (often $10–$15 on Amazon) tells you humidity; a $35–$60 sealant can buy you time; and a used dehumidifier from Marketplace is usually $50–$120.
Pro tip: if you can only splurge once, splurge on moisture control—comfort starts with dry, not throw pillows.
8. How can lighting make a low basement ceiling feel higher?
Bad lighting makes basements feel short, even when the ceiling height is decent. The fix is layering light so you’re not relying on one harsh overhead fixture.
Implement it: keep overhead lighting simple and bright, then add two lamps at seated height. Choose warm white light (2700K–3000K — the cosy, yellowish tone you see in most homes) so the space doesn’t look like a garage.
Budget sources: thrift lamps ($6–$15 is common), add new shades from Target clearance, and use LED bulbs with good brightness (measured in lumens)—look for 800–1100 lumens for living areas. For overhead, a 4-pack of flush LEDs is often under $60 on Amazon.
Pro tip: uplight matters—aim one lamp at a wall or ceiling for bounce light that visually lifts the room.
Cost & Materials Estimate
A practical basement refresh with LVP, painted ceiling, and a cozy seating setup typically lands between $800 and $3,500 depending on how much you thrift and whether you already own a dehumidifier.
| Item | Estimated Cost | Where to Buy |
|---|---|---|
| LVP flooring (300–500 sq ft) + underlayment | $750–$1,850 | Home Depot / Lowe’s |
| Ceiling paint + rollers/brushes/tape | $60–$180 | Lowe’s / Home Depot |
| Lighting (2–4 flush LEDs + 2 thrifted lamps + bulbs) | $120–$320 | Amazon / Home Depot |
| Curtains + rod/track for egress window | $35–$140 | IKEA / Amazon / Target |
| Dehumidifier (30–50 pint class) | $170–$320 | Amazon / Home Depot |
| Rug (8×10 or 9×12) + rug pad | $140–$450 | Wayfair / IKEA / Amazon |
Total estimated cost: $800–$3,500 Save money by thrifting the sectional and lamps; splurge on moisture control and flooring because they protect everything else.
9. How do you pick paint colors that don’t fight basement light?
Basements can turn “pretty greige” into “sad cement” in one afternoon. The win is choosing colors with warmth so the room doesn’t feel cold.
Do it: test two swatches on poster board and move them around morning vs. night. If you painted the ceiling dark, keep walls lighter; if the ceiling is white, you can go mid-tone on walls for coziness.
Budget paint hacks: ask for mistints in warm off-whites, light taupes, or soft olives ($9–$20/gallon). Trim can be a single quart of semi-gloss in bright white so it looks crisp.
Pro tip: pick one “bridge color” that ties storage and living zones together—matching undertones is what makes a basement feel intentional.

10. How can you do a basement makeover with thrifted furniture that still looks cohesive?
Thrifted doesn’t mean random. Cohesion comes from repeating shapes and keeping your big pieces in the same color family.
Implement it: choose one anchor (sectional, rug, or media console), then thrift around it with a rule: wood tones must match or intentionally contrast (light oak + black, or walnut + brass). Use one spray paint color to unify mismatched frames.
Where to hunt: Goodwill for side tables, Habitat ReStore for cabinets, Facebook Marketplace for rugs, and TJ Maxx/HomeGoods clearance for pillows. My best score: a solid wood console for $45 that just needed a wipe-down and new knobs.
Pro tip: swap hardware—$12 of knobs can make a $20 thrift find read like a $200 piece, and small details signal “finished”.
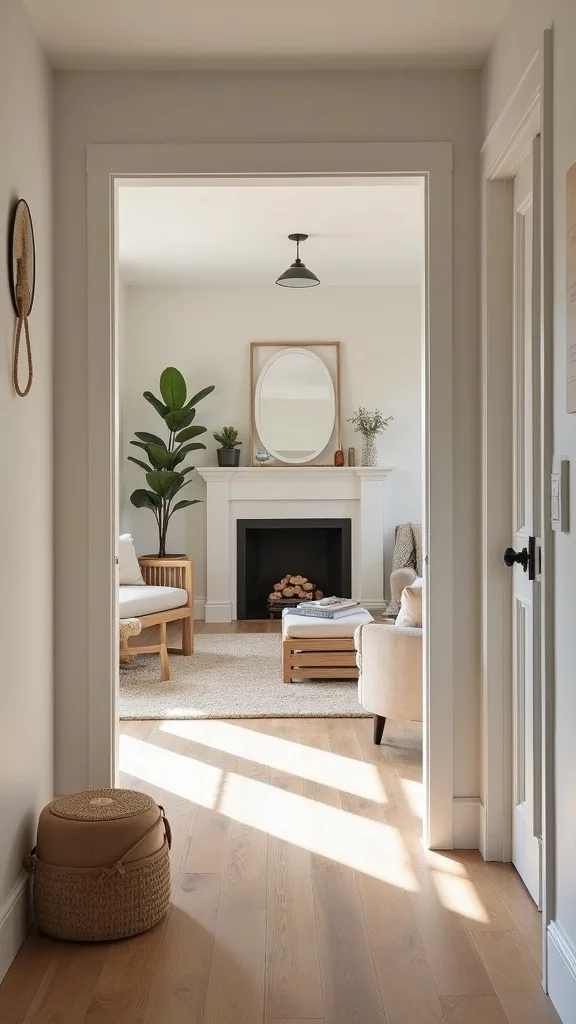
11. What’s the smartest way to create a media wall without custom built-ins?
A media wall gives the basement a focal point, which is half the battle in making it feel like a living room. You don’t need built-ins—just structure.
Do it: mount the TV (or place it on a low console), then flank it with two matching bookcases or cabinets for symmetry. Use baskets on the bottom shelves for controllers, cables, and the stuff that loves to look messy.
Budget options: IKEA BILLY shelves, Walmart Mainstays bookcases, or two identical thrift cabinets painted the same color. Add stick-on cord covers (they’re cheap and make a huge difference).
Pro tip: hang one large art piece or tapestry above the console if the TV isn’t mounted—vertical lines keep the wall from feeling squat.
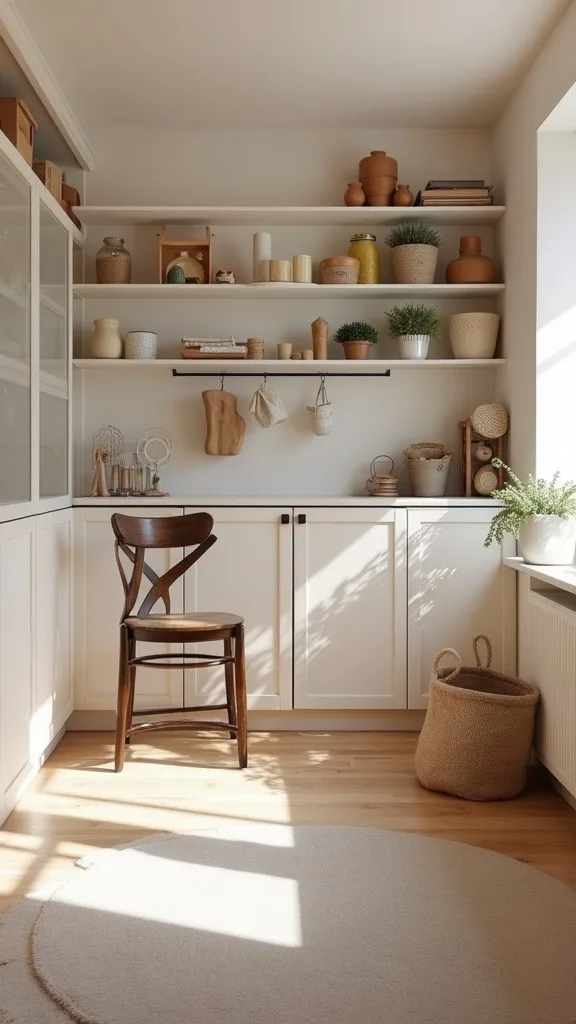
12. How do you keep basement storage from taking over again?
Storage doesn’t ruin a basement—unassigned storage does. If every bin is “misc,” the living area will slowly become the overflow.
Implement it: dedicate one wall to storage only, use identical bins, and label by category and season. Keep a 12″ “no stack” zone near the living room boundary so stuff can’t creep.
Budget systems: Home Depot black/yellow totes go on sale often; shelves from ReStore are cheap; and heavy-duty wire racks from Costco are a workhorse if you can swing it. For smaller items, Dollar Tree baskets are shockingly useful.
Pro tip: leave 15% empty shelf space—breathing room is what keeps your new setup from collapsing by Labor Day.
13. How can you add warmth fast without expensive wall-to-wall carpet?
Carpet can be cozy, but in a basement it can also be a risk if humidity swings. A big rug over LVP gives you softness without committing.
Do it: choose a rug large enough that the sectional’s front legs sit on it (8×10 is a common sweet spot). Add a rug pad to keep it from sliding and to make it feel thicker.
Budget finds: Marketplace rugs are everywhere—offer $50–$120 and rent a carpet cleaner. New options: IKEA, Wayfair sales, or a washable rug if you have pets/kids.
Pro tip: pick a pattern with contrast (not all beige) so it hides real life—basement rugs should be forgiving, not precious.

14. How do you create a “mudroom” moment at the basement/garage entry?
If your basement connects to the garage, that doorway needs a plan or your new living space will become shoe city. A small landing zone protects the makeover.
Implement it: install wall hooks, a bench (or sturdy chair), and a boot tray. Add a small closed cabinet for the stuff you don’t want visible.
Budget alternatives: thrift a narrow dresser ($30–$80), remove two drawers for baskets, and add hooks above. Boot tray can be a $6 oil-change pan from an auto store—unsexy, wildly effective.
Pro tip: put a mirror near the door—it bounces light and makes the entry feel intentional, like a real transition space.
15. How do you make exposed foundation walls look finished on a budget?
Foundation walls can make a basement feel unfinished even after you’ve done everything else. The goal is to soften the look without creating moisture traps.
Do it: patch obvious holes, paint with masonry-safe paint, then add removable decor—large art, a curtain track, or tall shelving that doesn’t sit tight to the wall.
Budget picks: masonry paint can be found as mistint; oversized art can be DIY (drop cloth + black paint + a simple abstract). For curtains, use a ceiling-mounted track to hide uneven wall lines.
Pro tip: don’t push fabric directly against damp-prone walls—leave an air gap so pretty doesn’t become musty.

16. What’s an affordable way to add a ‘finished’ trim look?
Trim is one of those quiet upgrades that screams “we meant to do this.” Even basic baseboards and door casing can change the whole vibe.
Implement it: add simple 3-1/4″ baseboards, caulk the top edge, and paint them semi-gloss white for wipeability. If you can’t add trim everywhere, do it on the most visible wall first.
Budget moves: check ReStore for leftover trim bundles; paint with a $15 quart; fill nail holes with spackle you already own. If your budget is tight, even quarter-round at the floor edge helps.
Pro tip: caulk is the magic—clean lines are what separates “DIY” from “done.”
17. How can you add sound control so the basement feels calmer?
Basements can echo, especially with LVP and painted ceilings. Sound control makes movie nights better and makes the room feel softer.
Do it: layer textiles—rug + curtains + upholstered seating. Add one “soft wall” element like a fabric tapestry or a row of drapes on a blank wall.
Budget options: thrift blankets as wall tapestries, use IKEA curtains, and grab pillow inserts on sale. If you want a more structured look, DIY acoustic panels with thrifted frames and leftover batting.
Pro tip: put felt pads under chairs and side tables—quiet details are the kind you notice every day.

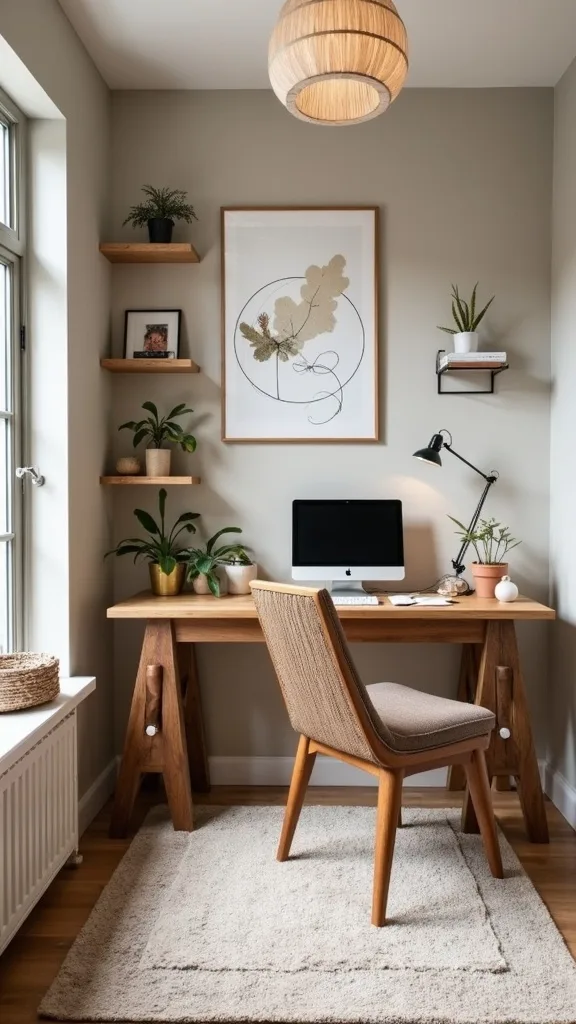
18. How do you set up a basement office nook without losing the lounge feel?
A basement can be both chill and productive if the work zone has boundaries. The trick is keeping the desk visually light and storage closed.
Implement it: place a small desk behind the sectional or along a low-traffic wall, add a plug-in wall sconce, and hide supplies in a lidded box. Use a rug or bookshelf as a divider so the office doesn’t spill into movie mode.
Budget desk options: thrift a table ($20–$60), add furniture pads, and call it a desk. Or use an IKEA LAGKAPTEN top with cheap legs.
Pro tip: pick one basket that holds “work stuff” and can disappear into a cabinet—resetting the room should take 60 seconds.
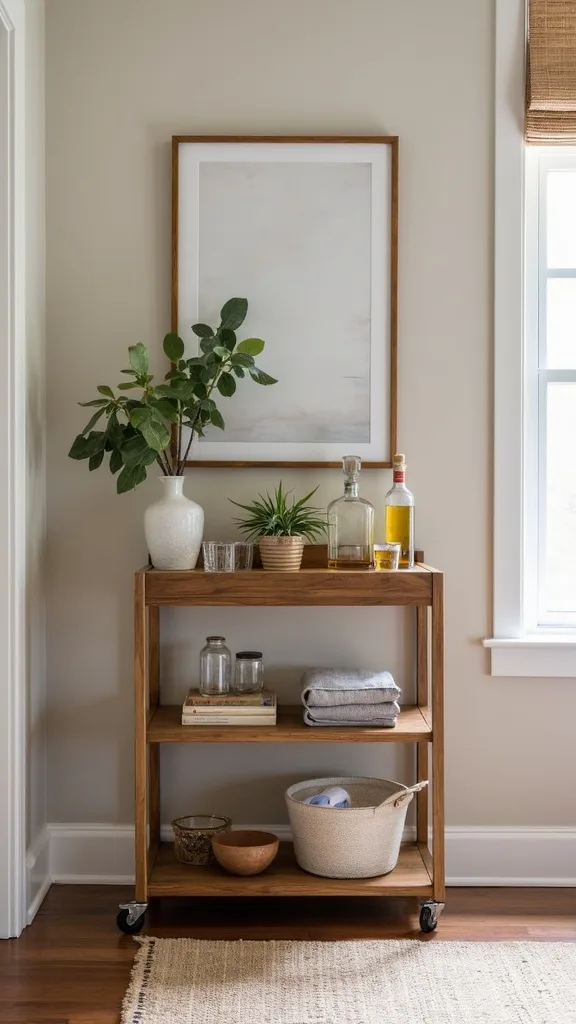
19. What’s a realistic bar cart or snack station setup for basements?
Basements beg for snacks. A small station keeps cups and chips out of your main kitchen and makes the space feel like an actual hangout.
Do it: use a rolling cart or a narrow console with a tray, mini trash can, and a basket for napkins. If you have a utility sink nearby, keep it close for easy cleanup.
Budget sources: thrift a microwave cart ($25–$50), paint it, and add hooks on the side for towels. Dollar Tree glass jars look surprisingly tidy for candy and popcorn.
Pro tip: keep the station “dry” unless you’ve got reliable plumbing—spills happen, and basements are not the place to pretend they don’t.
20. How do you handle cords so the space stops looking like a workshop?
Cords are the basement makeover killer. You can have new flooring and a nice sofa, but one power strip jungle brings the whole vibe down.
Implement it: choose one outlet wall for the media zone, mount a power strip to the back of the console, and run cords through stick-on raceways that match your wall color. Use Velcro ties so you can undo it later.
Budget fixes: raceways are usually $10–$20; Velcro ties are cheap; and a $12 cable box hides the surge protector. If you’re renting, command-strip solutions still work.
Pro tip: label both ends of every cord with tape—future-you will thank you the next time you rearrange.
21. How can you add ‘built-in’ vibes with freestanding pieces?
Built-ins are pricey, but the look is easy to fake. Matching cabinets or shelves lined up cleanly gives that custom feel without custom pricing.
Do it: place two bookcases side by side, add a strip of trim across the top, and paint them the same color as the wall for a seamless look. Anchor them to studs for safety.
Budget route: IKEA BILLY hacks are famous for a reason; thrift two similar cabinets and unify with paint; or use Wayfair sale units if you need them delivered.
Pro tip: add puck lights inside shelves for glow (battery ones work)—tiny lighting makes cheap shelving feel intentional.

22. How do you make a basement feel cooler in summer without a full HVAC redo?
Summer basements can swing from clammy to stuffy. Comfort is part of the transformation, and you don’t need a whole system overhaul to feel a difference.
Implement it: run a dehumidifier, add a box fan to circulate air, and use breathable fabrics (linen-look curtains, cotton throws). If the basement is cold at night, keep a lightweight blanket basket nearby.
Budget buys: a used dehumidifier is often the best deal; fans go on sale constantly; and a $25 door sweep can reduce humid air sneaking in from garage areas.
Pro tip: don’t block supply vents with furniture—airflow is free, and it’s the kind of free you feel immediately.
23. How do you create a kid-friendly zone that doesn’t look like a toy explosion?
A basement is prime kid territory, but it has to reset fast or it’ll swallow the living room. Closed storage and a defined play footprint are the secret.
Do it: use a low shelf with bins, keep one large washable rug for play, and limit toys to what fits in the bins—no overflow. Add one small table for crafts that can double as game night space.
Budget options: KALLAX + bins, Dollar Tree bins for small pieces, and thrifted kids’ chairs. If you find a secondhand toy kitchen, paint it one neutral color so it blends.
Pro tip: make the last step of bedtime “bin sweep” and set a 5-minute timer—systems beat lectures.
24. How can you make the ‘before’ basement smell go away for real?
Basement smell isn’t a candle problem. It’s usually a humidity + old materials problem, and fixing it is what makes the space feel truly livable.
Implement it: remove anything dampy (old cardboard, mystery rugs), vacuum everything, wash hard surfaces, then run a dehumidifier consistently. Add an air purifier near the living zone if you’re sensitive.
Budget tools: baking soda bowls help short-term, but the real wins are a $15 hygrometer and consistent dehumidifying. Thrifted washable slipcovers beat “absorbing” smells into old fabric.
Pro tip: avoid storing paper goods directly on the floor—use shelves so air can move and odors don’t come back.
25. What’s the simplest weekend plan to finish a basement in phases?
Basement projects die when they’re too big to start. A phased plan keeps momentum and lets you enjoy the space while you keep improving it.
Do it: Weekend 1—clear, clean, dehumidify, and paint the ceiling. Weekend 2—install LVP and set the sectional layout. Weekend 3—add lighting, curtains at the egress window, and one storage wall so the garage/organization side behaves.
Budget approach: spend first on moisture + lighting, thrift everything else as you go. I keep a running list in my phone of “if I see it under $30, buy it” items: baskets, lamps, side tables.
Pro tip: take one honest “before” photo (mess and all) and one progress photo each weekend—visible progress is what keeps you going.
Final Thoughts
The unglamorous truth: the “before” basement photo should make you cringe a little. Ours did—bare bulbs, stained concrete, a random treadmill wedged next to paint cans, and that one suspicious corner we avoided. The transformation wasn’t one magical purchase. It was a stack of small, smart choices that made the space feel dry, bright, and actually usable.
If you only do three things, do these: control moisture, commit to a layout, and add warm lighting. After that, every thrifted side table and clearance curtain panel feels like a win instead of a gamble. That’s the whole point of a good basement makeover—real-world comfort without pretending you have an unlimited budget.
Do one action today: measure your basement and tape out a 30–36″ walkway plus your sectional footprint on the floor—then you’ll know exactly what to shop for (and what to stop dragging home).
What I’d Do Differently
When I first tried this, I started with decor because it was the fun part—two thrifted lamps ($9 each), a rug I was weirdly proud of, and a “temporary” cord situation that turned into a permanent eyesore. Then the first humid week hit, the basement smelled off again, and I realized I’d basically decorated on top of a problem. The specific mistake: I didn’t run a dehumidifier consistently before choosing textiles, so everything I brought in started absorbing that damp basement funk. The correct approach is boring but effective: get humidity under control first (even if it’s a used dehumidifier), then paint and light the space, and only then bring in rugs, curtains, and upholstered pieces.
I also wish I’d taped out the sectional footprint on day one. I bought a coffee table that was the wrong scale, then had to resell it for $20 less than I paid. Measure, tape, and walk the path to the stairs/utility area before you commit to furniture. Pick one upgrade to start this weekend—ceiling paint or a dehumidifier—and you’ll feel the shift immediately.
Products I Recommend for This Project
Here are some of my favourite products to help you bring these ideas to life:
- Frigidaire 50-Pint Dehumidifier with Pump — Handles summer humidity fast, which protects flooring, rugs, and that “fresh room” feeling.
- DEWALT DWHT55036 Pull Bar for Flooring Installation — Makes tight LVP rows actually lock in without wrecking the edges.
- 3M Command Large Picture Hanging Strips — Lets you hang big art and frames on basement walls without drilling (great for concrete block situations).
- Legrand Wiremold CordMate Cord Cover Kit — Hides TV and lamp cords so the room stops looking like a workshop.
- GE Relax LED Light Bulbs (Warm White 2700K) — The easiest swap for cozy lighting that doesn’t feel like a garage.