This post contains affiliate links. As an Amazon Associate, I earn from qualifying purchases at no extra cost to you.
Are you looking for resort bedroom ideas that feel like you checked into a private suite—without renovating the whole house? Do you want to wake up to vacation home decor energy that reads calm, sun-washed, and quietly polished?
I always start by borrowing what I love most from a true hotel bedroom style: crisp whites, breathable texture, and a layout that makes the bed the undisputed centerpiece. In this post, I’m sharing 25 specific ways I recreate that resort mood using approachable swaps—think linen, bamboo, warm lighting, and art that feels collected on a coastal stroll.
In my opinion, this is perfect for anyone styling a summer bedroom, refreshing a guest room for vacation season, or simply craving a more elevated daily routine.
I find that the magic lives in the details: the canopy’s softness, the bedside texture, the duvet’s generous drape, and the tropical prints that whisper “island time” without shouting. I’ll also share the exact measurements I use, the finishes I prefer, and the small trade-offs that keep the look livable.
Below are 25 Resort-Style Bedroom Ideas & Vacation Vibes that bring a luxury resort bedroom feeling home—one intentional upgrade at a time.
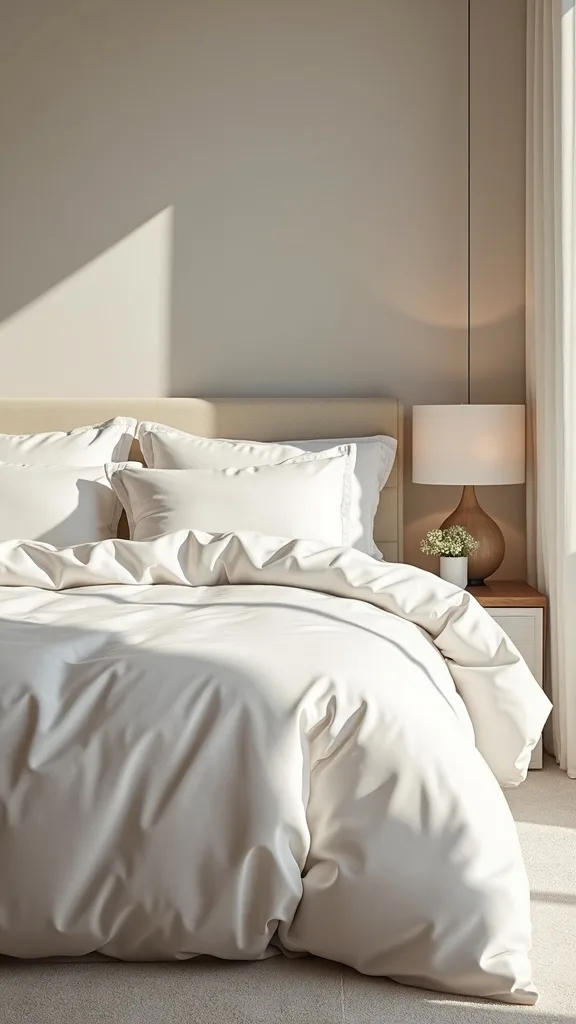
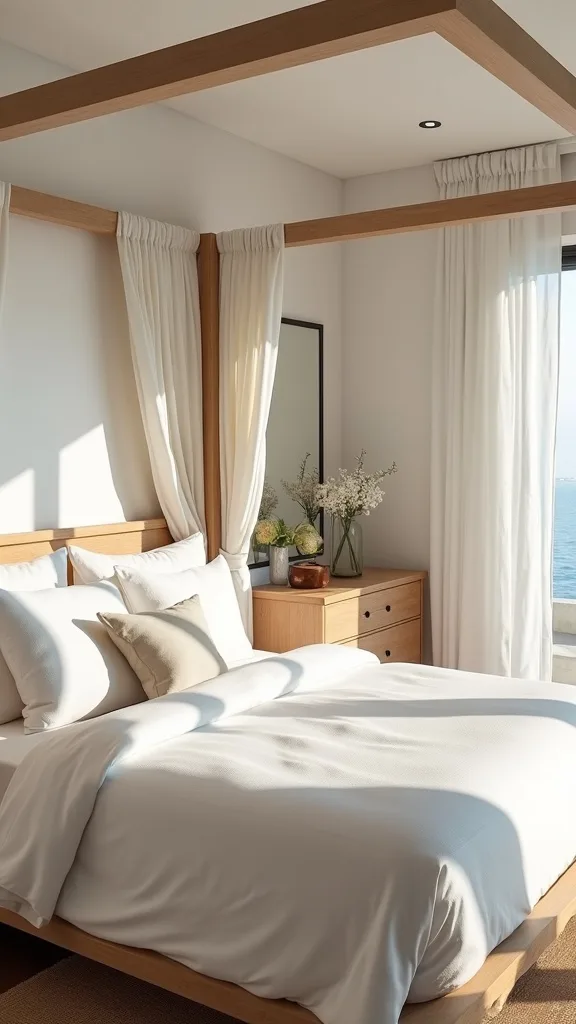
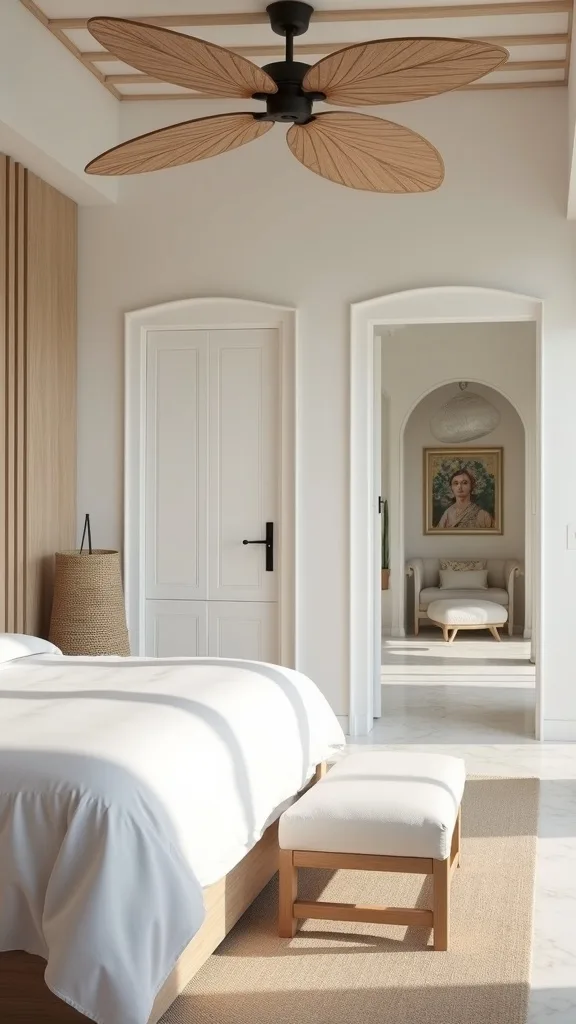
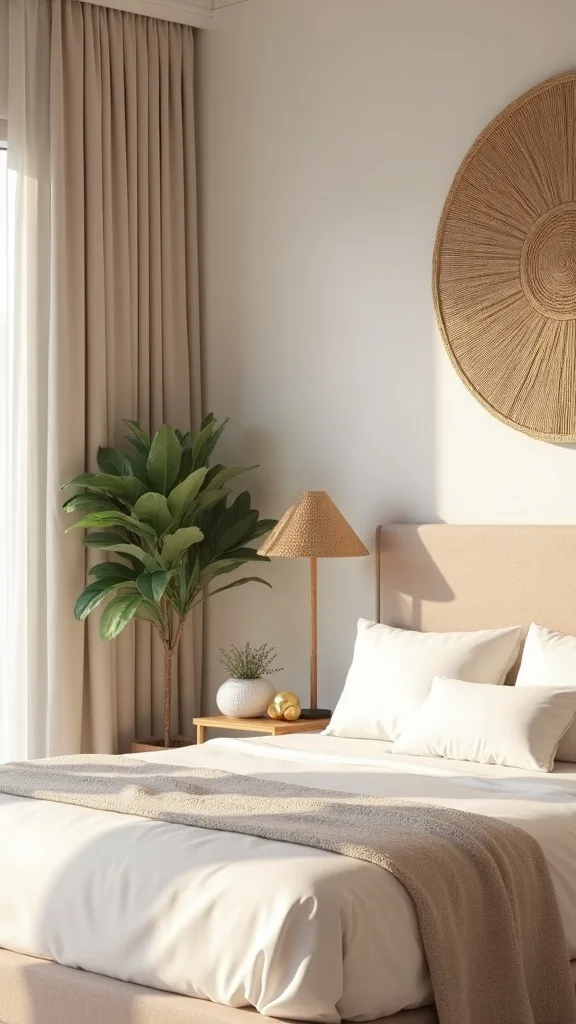
1. Start With the Signature Look: White Canopy + Bamboo + Linen + Tropical Prints
I always start by anchoring the whole room in the exact visual theme I want: a white canopy, bamboo bedside tables, an oversized linen duvet, and 2–3 tropical art prints, because it instantly reads “suite” instead of “spare room.” From my experience, this combo works in most bedrooms because white expands the space while bamboo and art add that vacation-home warmth without clutter.
I hang a 108″ x 96″ white cotton voile canopy (or linen-look) so it falls 2–4″ above the floor, then I flank the bed with two 18–22″-wide bamboo or rattan nightstands for symmetry. I find that a linen duvet insert in a 106″ x 96″ cover gives the drape I associate with hotel bedroom style, especially when I fold the top edge down 10–12″.
When I design this look, I stick to matte white, sand, and pale oak tones, then choose tropical prints in 24″ x 36″ frames with thin black or warm wood profiles. Typically, I prefer real linen or a linen-cotton blend because it relaxes beautifully over 2–3 washes, even though it wrinkles more.
Pro Tip: I’ve found the canopy looks most “resort” when I mount it 6–8″ wider than the headboard on each side—otherwise it reads like a mosquito net instead of a deliberate, architectural frame.
2. Choose a Resort-White Paint That Doesn’t Turn Blue at Night
From my experience, the fastest way to get resort polish is choosing a white paint that stays creamy under lamps, because many bright whites shift icy after sunset. I find that the right white makes even budget bedding look more expensive, which is why I treat it like the foundation of my luxury resort bedroom mood.
I always recommend testing 3 samples in 12″ x 12″ swatches: one warm white, one neutral, and one soft ivory, then checking them at 9 a.m. and again at 9 p.m. under your bedside lighting. Typically, I paint bedrooms in eggshell sheen for walls and satin for trim, and I plan on 2 coats with a 3/8″ nap roller for a smooth, hotel-like finish.
When I want that vacation glow, I reach for Benjamin Moore White Dove (OC-17) or Sherwin-Williams Alabaster (SW 7008) because they read calm next to bamboo and linen. The trade-off is that warmer whites can make very cool gray flooring feel slightly yellow, so I balance with black accents in frames or hardware.
Pro Tip: I’ve found that placing your paint samples behind the headboard area is the most honest test—canopies and tall headboards cast shadows that can make the same white look 1–2 shades darker than on an open wall.
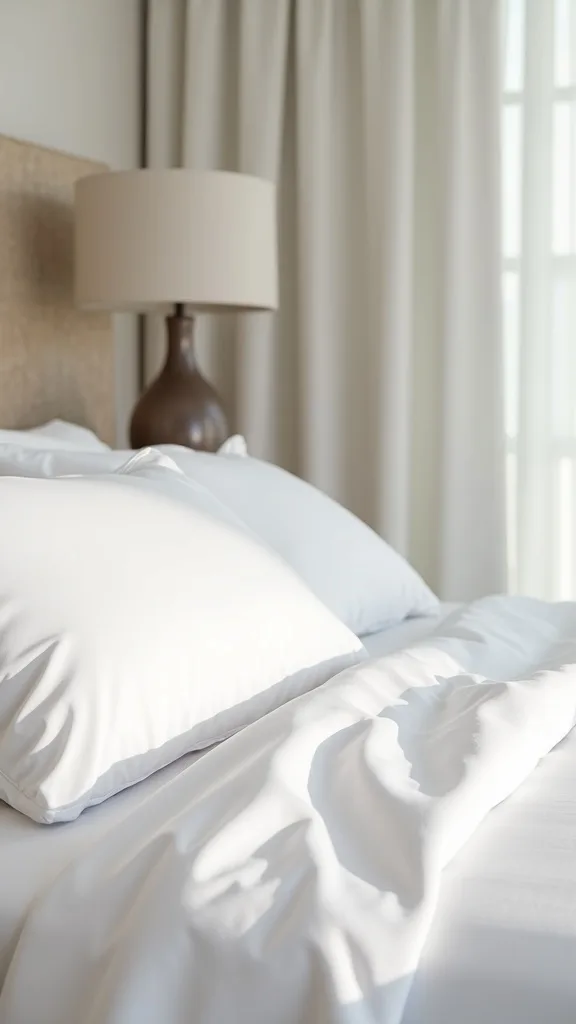
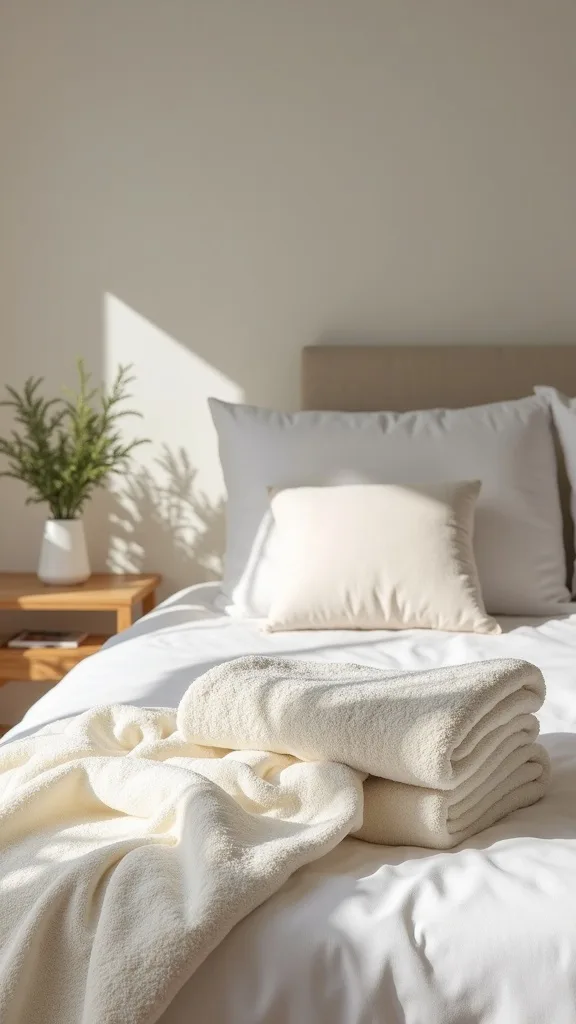
3. Layer an Oversized Duvet for That Hotel “Float”
I find that the bed only feels like a resort when the duvet looks generous—almost like it’s spilling into the room with intention. From my experience, sizing up is the simplest trick for hotel bedroom style because it creates that plush, effortless drape even on a basic bed frame.
I always recommend using a king duvet insert (about 106″ x 96″) even on a queen bed, then pairing it with a matching oversized linen or cotton-linen duvet cover. I aim for a 12–16″ drop on the sides, and I give myself 20 minutes to do the “hotel fold”: pull the duvet to the top, fold it down 10–12″, then stack pillows in 3 layers.
When I design this look, I add 2 Euro shams (26″ x 26″), 2 sleeping pillows (20″ x 30″), and 1 lumbar (14″ x 36″) in a sandy stripe. Typically, linen costs more upfront ($120–$250 for a cover), but it breathes better for summer and softens within 2 weeks of regular use.
Pro Tip: I’ve found duvet corner ties matter more with oversized inserts—if your cover doesn’t have them, I hand-stitch 4 small ribbon loops in 15 minutes to stop that annoying “lump drift” after a few nights.
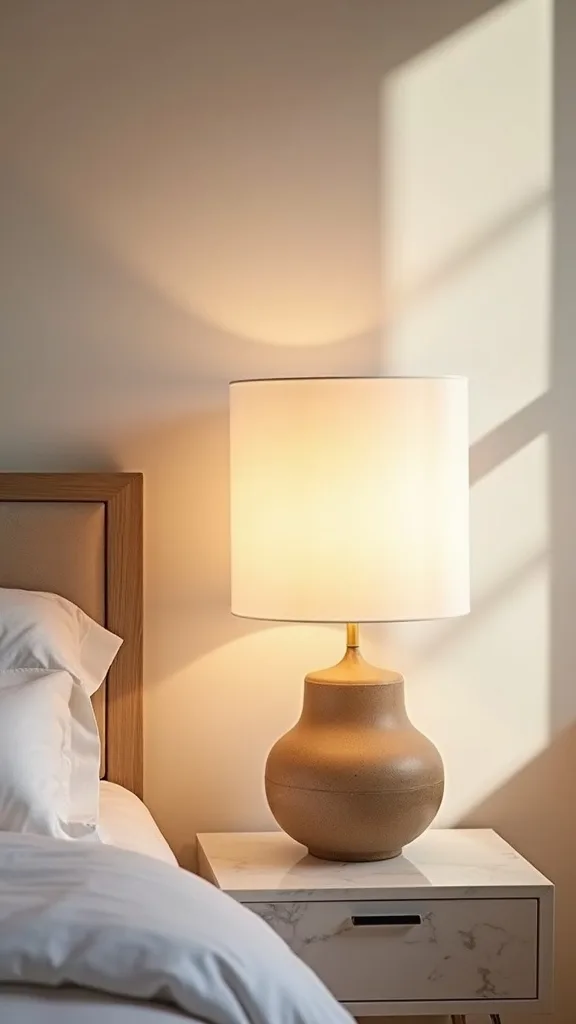
4. Swap Harsh Bulbs for Warm White Resort Lighting
I always start by fixing lighting because a room can have perfect decor and still feel wrong if the bulbs are too cool. From my experience, warm white light (2700K–3000K — the cosy, yellowish tone you see in most homes) is what makes whites look creamy and skin look healthy, which is exactly the vibe I want for a summer bedroom.
I recommend using two matching bedside lamps with 8–10″ shades and bulbs around 800 brightness (measured in lumens) for reading without glare. I find that placing lamp bases 2–3″ back from the front edge of an 18–22″-deep nightstand keeps cords hidden and leaves room for a water glass.
When I design this look, I mix materials: a ceramic or travertine lamp base with a woven shade, plus a dimmer plug so I can drop the light to 20–30% after 9 p.m. Typically, dimmers cost $12–$25 each and they’re worth it, though the trade-off is one more device to manage if you dislike gadgets.
Pro Tip: I’ve found that using the same Kelvin range in every bulb within the bedroom (including the closet) prevents that “patchwork” look where the bed area feels golden but the doorway looks clinical.
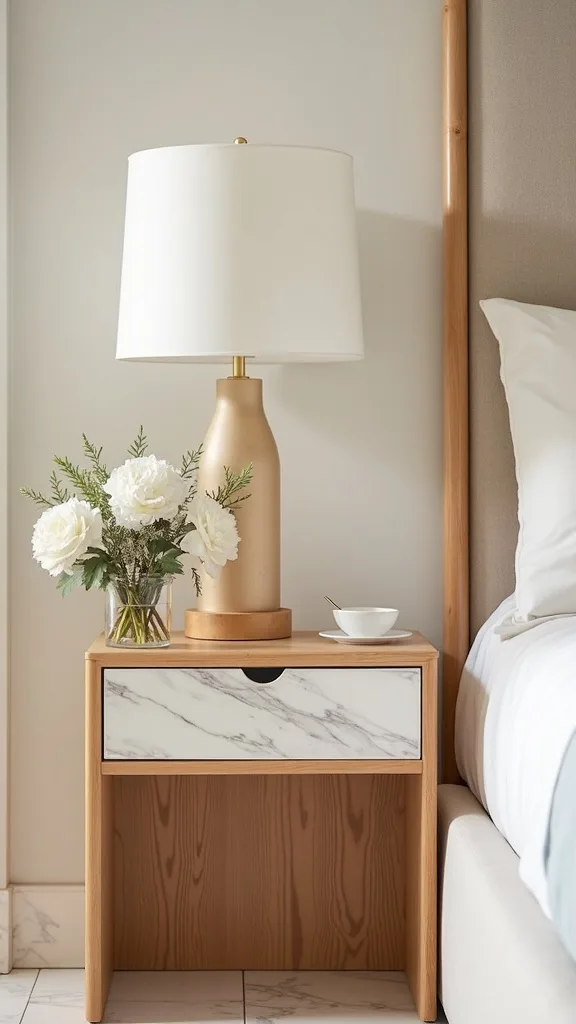
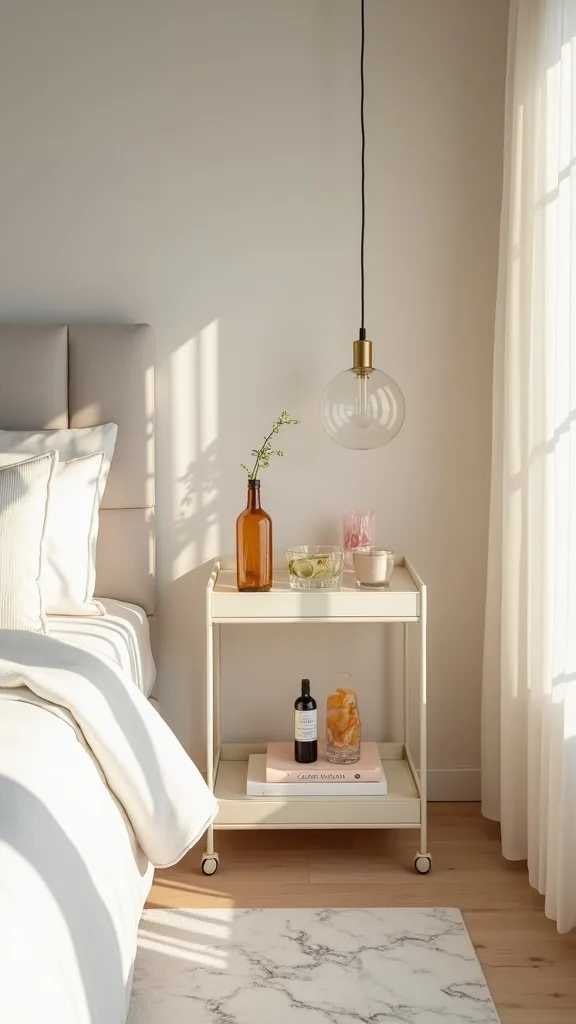
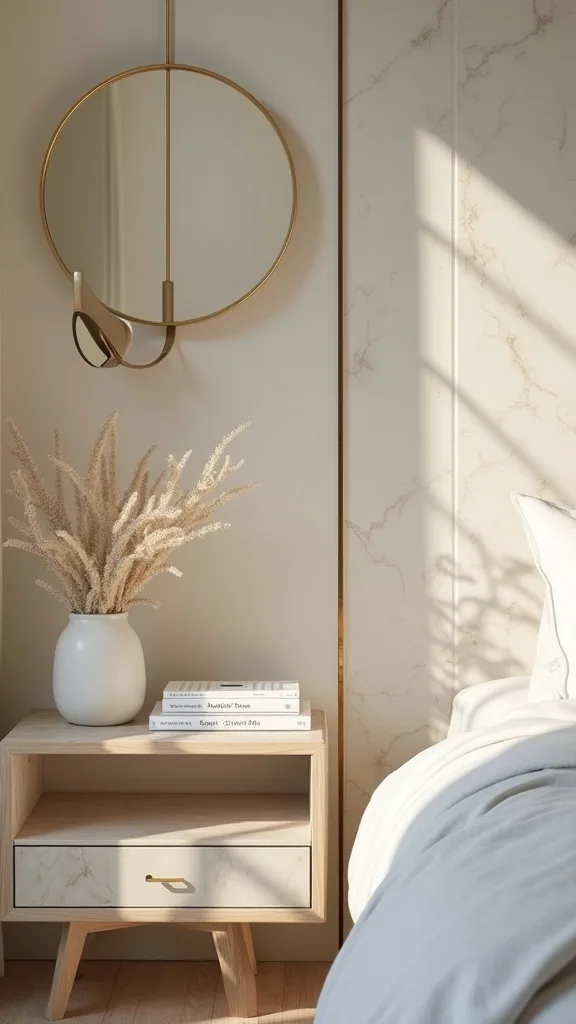
5. Use Bamboo Bedside Tables to Add Instant Vacation Texture
From my experience, bamboo is the quickest way to whisper “resort” without committing to a full tropical theme. I find that two matching bamboo bedside tables create a calm rhythm around the bed, which is essential for that vacation home decor feeling.
I always recommend choosing nightstands that are 24–28″ tall (roughly level with a 10–12″ mattress plus frame) so the lamp and book feel effortless to reach. If I’m working with a tight room, I pick 16–18″-wide bamboo tables and leave at least 24″ of walkway on each side of the bed for comfortable movement.
When I design this look, I keep the surface styling to 3 items max: a lamp, a small tray (about 6″ x 10″), and one sculptural object like a coral-inspired ceramic. Typically, bamboo scratches more easily than hardwood, so I add clear felt pads under lamps and use a wipeable rattan-safe cleaner once a week.
Pro Tip: I’ve found bamboo looks most elevated when you repeat it exactly twice—nightstand + nightstand—then switch to a different natural texture (like linen or seagrass) elsewhere so the room doesn’t start reading like a tiki set.
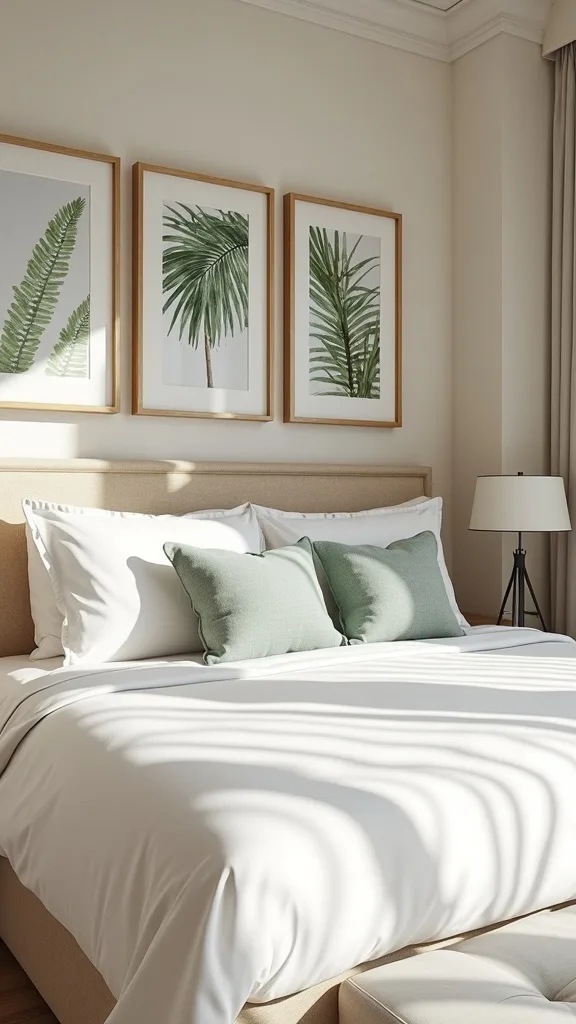
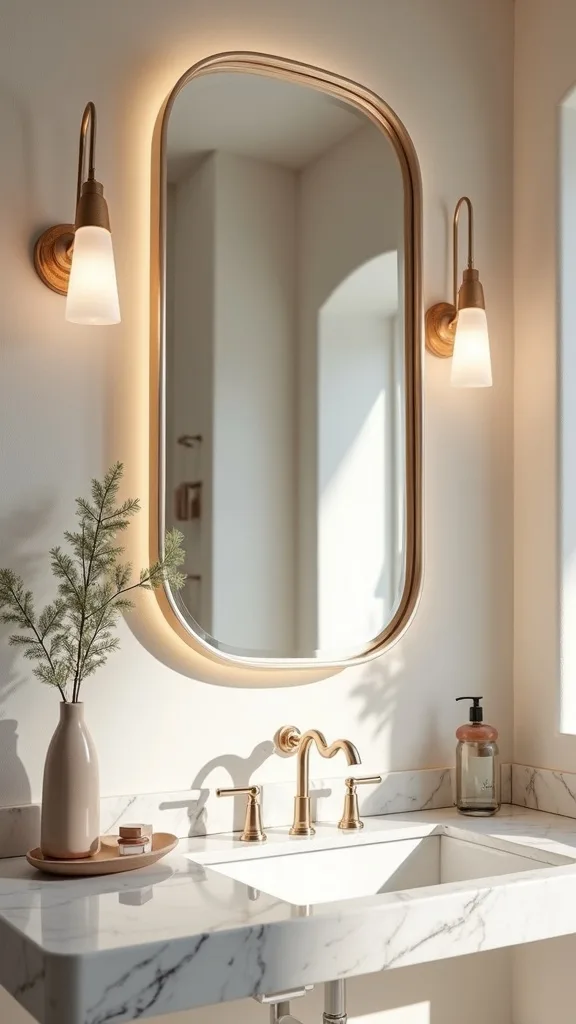
6. Hang Tropical Art Prints Like a Boutique Hotel
I find that tropical art is where the vacation story lives, but it has to feel curated, not themed. From my experience, oversized prints with generous white matting are what push the room into hotel bedroom style territory.
I always start by choosing 2 matching frames—24″ x 36″ or 30″ x 40″—and I hang them so the center sits about 57–60″ from the floor. If I’m placing art above a headboard, I keep the bottom edge 6–8″ above it, and I use a laser level so the pair stays perfectly aligned within 1/8″.
When I design this look, I like palm studies, vintage botanical plates, or abstract ocean forms in muted greens and inky blues. Typically, I choose UV-protective acrylic instead of glass because it’s lighter and safer over a bed, though it can scratch, so I dust with a microfiber cloth every 2 weeks.
Pro Tip: I’ve found that adding a 2–3″ white mat instantly makes even inexpensive prints look gallery-grade, and it keeps the greens from “fighting” the warm bamboo tones.
7. Create a Canopy Without a Four-Poster Bed
In my opinion, you don’t need a four-poster to get that dreamy canopy softness—you just need the right mounting points and fabric. I find that a ceiling-mounted canopy creates a luxury resort bedroom mood because it frames the bed like a private cabana.
I always recommend using a 48–60″ ceiling track or a 24–36″ hoop, then hanging 2 panels that are at least 96″ long so they puddle slightly or hover 1–2″ above the floor. For most rooms, I place the track 8–12″ in front of the headboard so the fabric doesn’t rub your pillows at night, and I use drywall anchors rated for 50–75 lbs for peace of mind.
When I design this look, I choose cotton voile for an airy summer effect or a linen-blend for a more tailored drape. Typically, voile is easier to wash monthly, while linen-blend looks richer but may need steaming for 10 minutes before guests arrive.
Pro Tip: I’ve found that adding tiny curtain weights (about 10–20 grams each) to the hem keeps the canopy from fluttering into your face when the ceiling fan is on medium.
8. Add a Woven Bench at the Foot of the Bed
I always start by asking, “Where do the extra pillows go?” because resort rooms feel calm partly because they have a landing zone. From my experience, a woven bench instantly adds function and that beachy texture that elevates vacation home decor.
I recommend a bench that’s 48–54″ long and 16–18″ deep so it fits most queen beds without blocking walkways. I find that leaving 12–16″ between the bench and the bedspread keeps the duvet from dragging, and it makes vacuuming faster—usually under 5 minutes for the whole bed zone.
When I design this look, I choose a seagrass, rattan, or teak bench with a light cushion in performance fabric. Typically, performance fabric costs $30–$60 more than cotton, but it handles sunscreen, damp towels, and summer iced coffee far better.
Pro Tip: I’ve found the bench looks most “hotel” when its height is 2–4″ lower than the mattress top—any taller and it visually chops the bed, especially with an oversized duvet.

Cost & Materials Estimate
Typically, I see a resort-style bedroom refresh land between $250–$1,800 depending on whether you’re swapping furniture or focusing on textiles and lighting.
| Item | Estimated Cost | Where to Buy |
|---|---|---|
| White canopy (ceiling track or hoop + 2 voile panels) | $45–$160 | Amazon |
| Bamboo/rattan bedside tables (pair) | $180–$420 | Wayfair |
| Oversized duvet insert + linen/linen-blend duvet cover | $160–$520 | Amazon |
| 2 bedside lamps + warm white bulbs (2700K–3000K) | $90–$260 | IKEA |
| Tropical art prints + frames (2 large) | $70–$220 | Amazon |
Total estimated cost: $545–$1,580 I’d save by keeping existing furniture if it’s the right scale, and I’d splurge on the duvet + sheets because you feel that upgrade every single night.
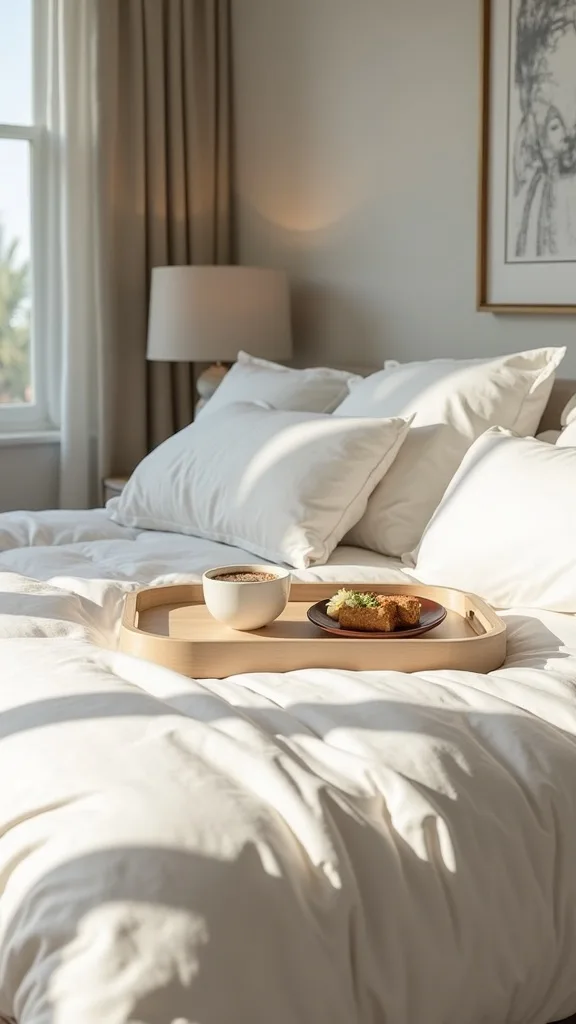
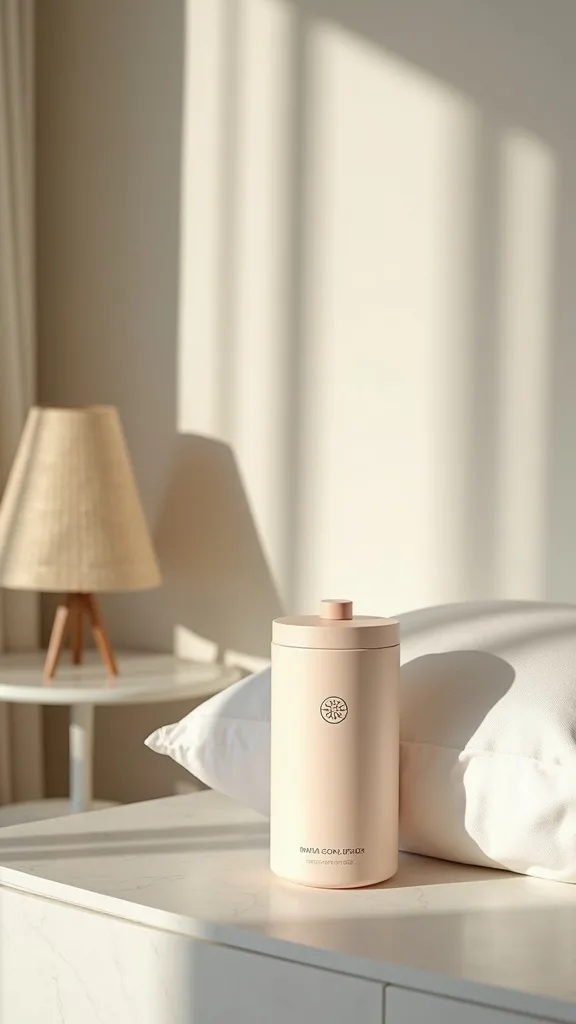
9. Style a Bedside Tray Like Room Service Is Coming
I find that a tray is the smallest detail that makes a bedroom feel intentionally styled rather than merely tidy. From my experience, that “room service” cue is a huge part of hotel bedroom style, especially in summer when I’m always reaching for water and skincare.
I always recommend a tray around 6″ x 10″ or 8″ x 12″—large enough for a carafe and candle, but not so big it eats the nightstand. I keep it to 3 items: a 16–20 oz glass carafe, a small dish (4–5″ wide) for jewelry, and a candle in the 8–10 oz range for balance.
When I design this look, I choose materials that echo the room: travertine, bamboo, or a matte white resin tray. Typically, stone trays cost $25–$45 and feel more elevated, but they can chip, so I add clear bumpers underneath and avoid placing them right at the edge.
Pro Tip: I’ve found that swapping the carafe for a slim, capped bottle on nights you run the ceiling fan prevents that faint “dust in water” taste—tiny detail, big resort payoff.
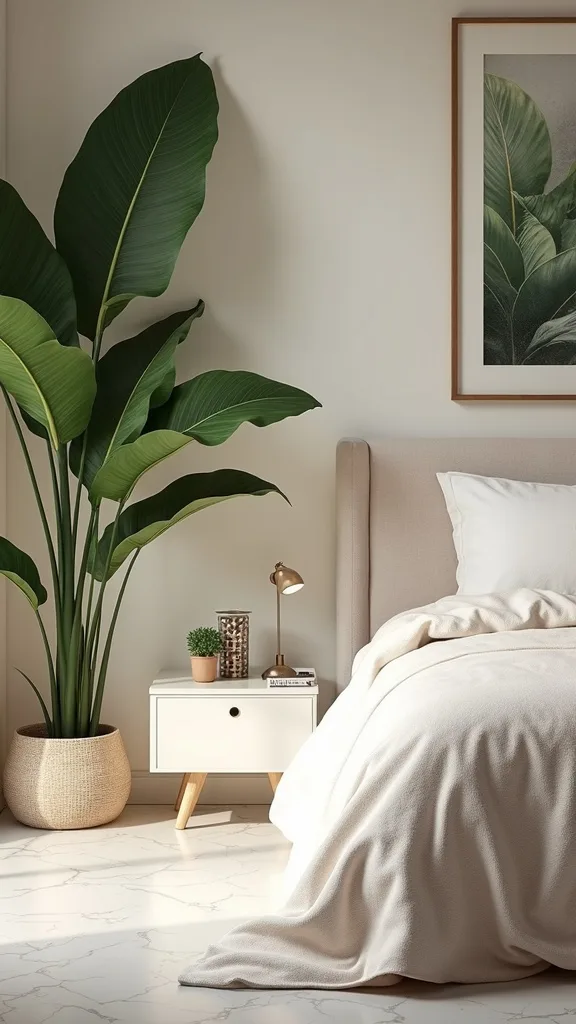
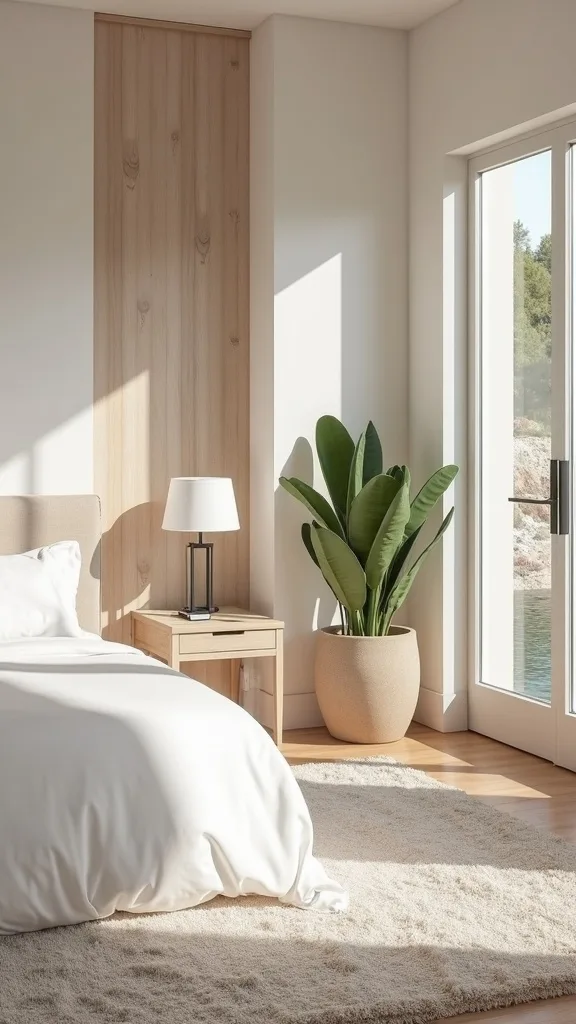
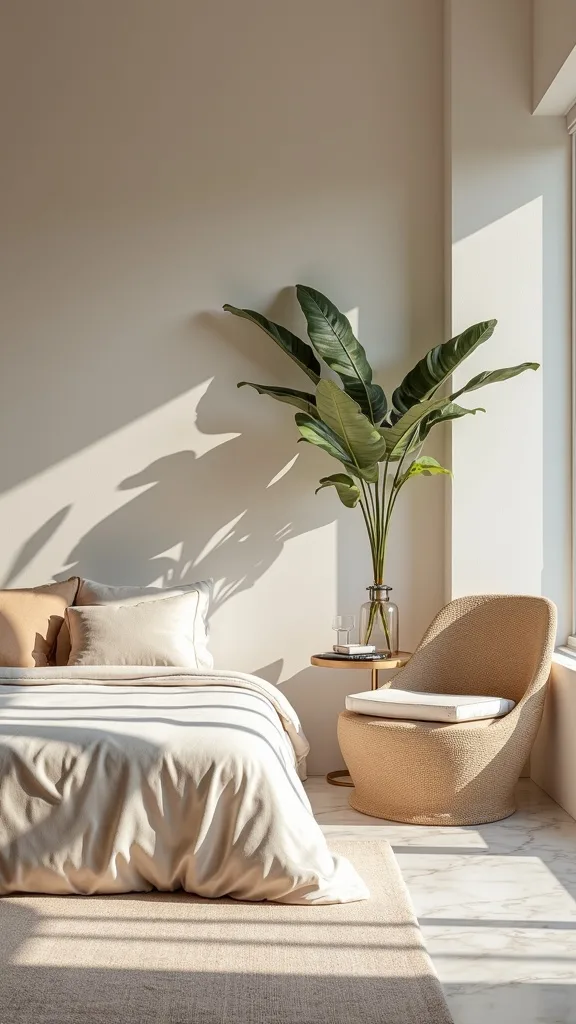
10. Bring in a Palm or Bird-of-Paradise—Without Turning It Into a Jungle
From my experience, one living plant adds more vacation energy than five decorative objects, but only if it’s scaled correctly. I find that a single palm silhouette reads instantly “resort,” especially paired with crisp whites and bamboo.
I always start by choosing one statement plant: a 5–7 ft areca palm or bird-of-paradise in a 10–12″ pot, then I place it 12–18″ away from the wall so the leaves don’t scuff paint. Typically, I water every 7–10 days in summer and rotate the pot a quarter turn every 2 weeks so it grows evenly toward the window.
When I design this look, I hide the plastic nursery pot inside a woven seagrass basket (12–14″ wide) with a waterproof liner. The trade-off is that baskets can trap moisture, so I lift the pot once a week to check for dampness and prevent mildew.
Pro Tip: I’ve found that adding a thin layer of decorative sand or small river stones on top of the soil reduces fungus gnats dramatically in warm months—especially if you’re watering more often.
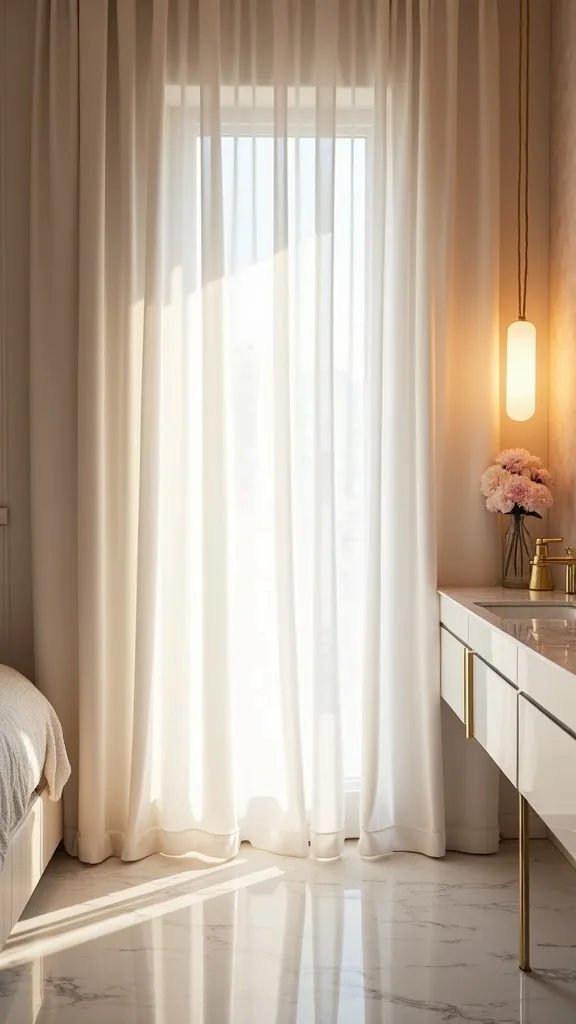
11. Use Sheer Curtains to Filter Light Like a Resort Suite
I always start by softening the windows because harsh daylight can make a bedroom feel exposed rather than serene. From my experience, sheer curtains create that hazy, coastal glow that’s essential for a summer bedroom.
I recommend hanging curtain rods 6–8″ above the window frame and extending them 8–12″ past each side so the panels stack off the glass. I find that 96″ panels work in most rooms, but if your ceilings are 9 ft, 108″ panels look more editorial and reduce that awkward “short curtain” effect.
When I design this look, I layer sheers with blackout panels so I can choose mood: airy by day, cocooned at night. Typically, blackout adds $30–$80 per window, but it improves sleep quality for most people, especially if sunrise hits your bed before 7 a.m.
Pro Tip: I’ve found that ironing the bottom 18″ of sheer panels (instead of the whole length) gives them a crisp fall where you see it most, and it saves me 20–30 minutes per window.
12. Add a Ceiling Fan That Looks Like It Belongs in a Villa
In my opinion, a ceiling fan is one of the most practical “resort” upgrades for summer, but the style has to be right or it feels builder-basic. I find that a fan with natural-toned blades instantly supports vacation home decor while making hot nights more comfortable.
I always recommend a 52″ fan for most bedrooms up to about 225 sq ft, and I keep at least 8″ clearance from the ceiling for proper airflow. Typically, I install it so the blades sit 8–9 ft above the floor, and I test the wobble on medium speed for 2–3 minutes before calling it done.
When I design this look, I choose matte white housing with light oak or bamboo-look blades, and I skip the built-in cool LEDs unless they offer warm white light (2700K–3000K — the cosy, yellowish tone you see in most homes). The trade-off is that “designer” fans cost $180–$450, but they replace both airflow and a dated ceiling fixture in one move.
Pro Tip: I’ve found that adding a 6″ downrod (instead of flush-mounting) reduces that annoying “strobe shadow” on the walls when the fan spins in front of a bedside lamp.
13. Create a Mini Bar Cart Moment for Vacation Vibes
I find that resort living is about small rituals—sparkling water, sunscreen, a linen spray—so I like giving those items a dedicated home. From my experience, a compact bar cart makes a bedroom feel like a hotel bedroom style suite without adding mess.
I recommend a cart that’s 24–30″ wide and under 34″ tall so it tucks into a corner or near a dresser. I always start by styling the top shelf with 4–6 items max: a small ice bucket, 2 glasses, a carafe, and a tray for packets, then I reserve the lower shelf for backup water and a folded 20″ x 30″ beach towel.
When I design this look, I choose white metal, light wood, or rattan to keep it airy. Typically, the trade-off is that open carts show clutter quickly, so I use matching bottles and decant snacks into 2–3 lidded jars for visual calm.
Pro Tip: I’ve found that adding a slim adhesive drawer (about 8″ wide) under the top shelf is a game-changer for hiding chargers and bottle openers—your cart looks styled, not stocked.
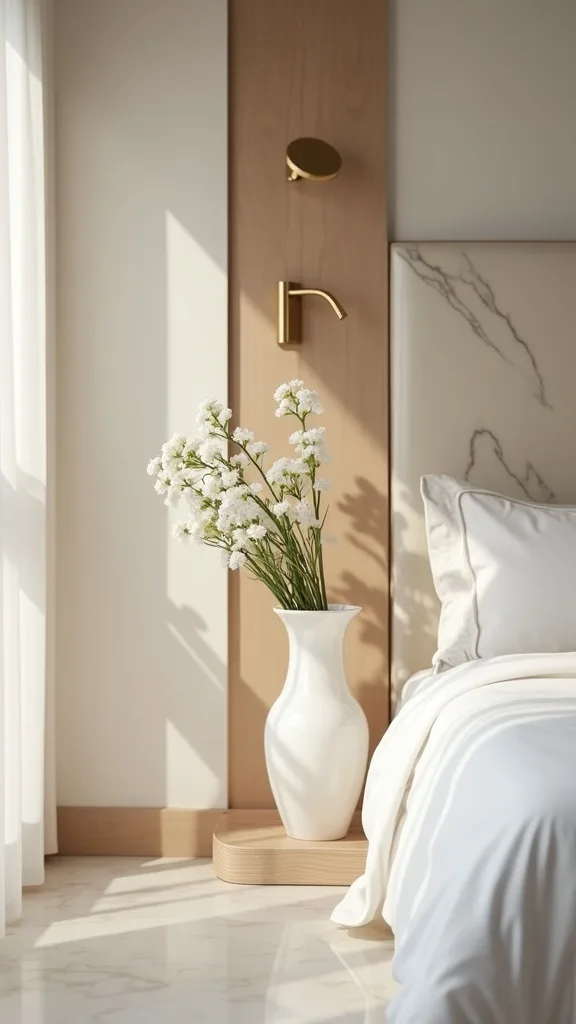
14. Upgrade Your Sheets to Crisp, Breathable “Resort White”
I always start by upgrading what touches your skin, because that’s where the resort feeling becomes real. From my experience, breathable sheets are the difference between a pretty summer bedroom and one you actually want to linger in.
I recommend percale cotton for crispness or linen for that relaxed, airy drape, and I typically buy 2 full sets so I can rotate weekly without laundry stress. I find that a flat sheet with a 4″ cuff looks the most hotel-like, especially when I tuck it tightly at the foot and leave the sides looser for comfort.
When I design this look, I stick to white or soft ivory and add a single sand-colored throw at the foot (about 50″ x 60″). The trade-off is that pure white shows makeup and self-tanner, so I keep a stain spray in the closet and treat spots within 24 hours for the best chance of lifting them.
Pro Tip: I’ve found that drying white sheets for only 20–25 minutes, then finishing on a bed or drying rack, keeps them crisp without that “overbaked” feel that can make percale sound noisy at night.
15. Add a Textured Rug That Feels Like Barefoot Luxury
From my experience, stepping onto a plush or woven rug is one of the most underrated resort sensations. I find that the right rug turns the space around the bed into a soft landing zone that supports luxury resort bedroom energy.
I always recommend sizing up: for a queen bed, a 8′ x 10′ rug usually gives the most balanced border, while a 6′ x 9′ can work if you’re tight on space. Typically, I aim for 18–24″ of rug showing on the sides and foot, and I use a 1/4″ thick rug pad so it doesn’t creep when you walk around in socks.
When I design this look, I choose a low-pile wool, a wool-jute blend, or a soft jute with a tighter weave (easier on bare feet). The trade-off is that jute can shed, so I vacuum with suction only (no beater bar) once a week in summer when windows are open more.
Pro Tip: I’ve found that rotating the rug 180° every 3 months prevents that “shadow path” where you step out of bed—especially if you use body oils or lotion at night.
16. Keep the Palette to 3 Neutrals + 1 Tropical Accent
I find that a resort room feels expensive because it’s restrained, not because it’s packed with decor. In my opinion, the most reliable formula for resort bedroom ideas is 3 neutrals—white, sand, and warm wood—plus 1 tropical accent color.
I always start by choosing the accent (sage, palm green, or deep ocean blue), then I repeat it exactly 2–3 times: for example, a 14″ x 36″ lumbar pillow, a 24″ x 36″ art print, and a small glazed vase. Typically, I keep the accent under 10% of the room’s visible color so it reads like a vacation hint, not a theme.
When I design this look, I use matte finishes and natural fibers—linen, cotton, rattan—because shine can feel fussy in a summer bedroom. The trade-off is that matte shows fingerprints more easily on painted furniture, so I choose washable finishes or keep high-touch pieces in wood.
Pro Tip: I’ve found that if your bamboo leans yellow, choosing a bluer green (like eucalyptus) keeps the palette sophisticated; a yellow-green can make the whole room skew “tropical souvenir shop.”
17. Style a Dresser Top Like a Resort Console
I always start by clearing the dresser completely, because resort rooms never feel like they’re mid-project. From my experience, a dresser top becomes instantly editorial when it follows a simple, repeatable structure.
I recommend a “triangle” arrangement: one tall item (a 24–30″ mirror or framed art), one medium (a 12–16″ lamp), and one low (a 10–12″ tray). I find that leaving at least 30% of the surface empty is what makes it feel like hotel bedroom style, even if the dresser is only 54–60″ wide.
When I design this look, I add a shallow catchall for keys and SPF, plus a small reed diffuser (3–4 oz) in a clean scent like bergamot. Typically, fragrance is personal, so I keep it subtle and avoid anything too sweet, which can feel heavy in summer.
Pro Tip: I’ve found that placing a thin felt runner under your tray (cut to about 8″ x 12″) stops rattling when you open drawers—tiny sound detail that makes the room feel more “suite” than “house.”

18. Use a Statement Headboard in Light Wood or Linen
From my experience, the headboard is where a bedroom either feels like a resort or like a standard setup. I find that a tall, simple headboard in linen or light wood brings instant luxury resort bedroom structure.
I always recommend a headboard that’s at least 52–60″ tall for a queen, and I like it to extend 2–4″ wider than the mattress on each side for a more architectural look. Typically, I mount it so the bottom sits 1–2″ above the floor (or rests firmly), and I check that it’s centered within 1/4″—small alignment issues show up fast with symmetrical nightstands.
When I design this look, I choose oatmeal linen upholstery or a pale oak frame, then I keep bedding mostly white so the headboard reads as a calm focal point. The trade-off is that linen upholstery can spot, so I spray it with a fabric protector and spot-clean within 48 hours if something splashes.
Pro Tip: I’ve found that adding a 1″ foam layer behind a thin upholstered headboard (if it feels too flat) makes it look far more expensive in photos and real life—especially under side lighting.

19. Add a Pair of Matching Lamps for Symmetry and Calm
I find that symmetry is the quiet secret of hotel bedroom style, because it signals order the moment you walk in. From my experience, matching lamps do more for the resort vibe than mixing trendy bedside objects.
I always recommend lamps that are 24–28″ tall on standard nightstands, with shades 8–10″ wide for balanced proportion. I place them so the shade bottom sits roughly at chin height when I’m sitting in bed—typically 36–40″ from the mattress—so the light feels flattering and doesn’t glare.
When I design this look, I choose ceramic, travertine, or woven bases in warm neutrals, and I use matching bulbs in warm white light (2700K–3000K — the cosy, yellowish tone you see in most homes). The trade-off is that matching pairs can cost more upfront ($120–$300 for two), but they save time because you stop second-guessing the composition.
Pro Tip: I’ve found that using slightly tapered shades (not drum shades) keeps the bedside area feeling lighter—drums can visually “cap” bamboo nightstands and make them look shorter than their 24–28″ height.
20. Curate the Scent: Linen Spray + Diffuser in a Summer Profile
I always start by thinking about scent because vacation memories are sensory, not just visual. From my experience, a subtle linen spray and diffuser make a bedroom feel like vacation home decor the second you open the door.
I recommend one diffuser (3–4 oz) on the dresser and one linen spray (4–8 oz) for bedding, and I use them lightly—2–3 sprays max—so it never feels overpowering. Typically, I refresh the diffuser reeds every 7–10 days by flipping them, and I replace the bottle every 6–8 weeks in summer when airflow is higher.
When I design this look, I lean into notes like bergamot, neroli, sea salt, or eucalyptus. The trade-off is that some people are scent-sensitive, so I keep everything optional and avoid heavy vanilla or strong florals that can linger on fabric.
Pro Tip: I’ve found that spraying linen mist onto the underside of the duvet (not the top) gives the same fresh effect but reduces the chance of visible spotting on bright white covers.
21. Create a Reading Nook That Feels Like a Cabana Corner
I find that a resort bedroom feels indulgent because it offers more than just a bed. From my experience, even a small reading nook gives that “suite” feeling and makes a summer bedroom more usable during daylight hours.
I always recommend a chair that’s 28–34″ wide with a 16–18″ seat height, plus a 12–16″ round side table for a drink. Typically, I place the nook 24″ away from the bed edge so it doesn’t pinch circulation, and I add a floor lamp that’s 58–64″ tall for layered light.
When I design this look, I choose a slipcovered chair in white performance fabric or a woven rattan lounge chair with a 20″ x 20″ linen cushion. The trade-off is that rattan can creak and snag delicate knits, so I add a soft throw to make it feel cozy and quiet.
Pro Tip: I’ve found that angling the chair 15–20 degrees toward the bed (instead of square to the wall) makes the nook feel intentional and “designed,” like you’d see in a boutique hotel.
22. Use a Large Mirror to Bounce Daylight Like a Coastal Suite
I always start by looking for ways to multiply natural light, because that’s what makes resort rooms feel airy even at noon. From my experience, a large mirror is the most reliable shortcut to that bright, relaxed hotel bedroom style.
I recommend a mirror at least 24″ x 60″ (or a 30″ round) and I place it opposite a window when possible. I find that hanging it with the center at 57–60″ from the floor looks balanced, and I use wall anchors rated for 50+ lbs if it’s a heavier wood frame.
When I design this look, I choose thin frames in matte black, warm oak, or bamboo to echo the bedside texture. The trade-off is that mirrors show fingerprints, so I keep a microfiber cloth in the top drawer and do a quick wipe every 1–2 weeks.
Pro Tip: I’ve found that tilting a full-length mirror forward by just 1–2 degrees (using small felt bumpers behind the top corners) reduces ceiling glare and reflects more of the room’s calming midline—bed, art, and canopy.
23. Edit the Nightstand Clutter to 3 Essentials
I find that the most convincing resort bedroom ideas are often about what I remove, not what I add. From my experience, clutter on the nightstand is the fastest way to lose that vacation calm.
I always start by emptying the nightstand and choosing only 3 essentials: lamp, water, and a small dish for jewelry or earplugs. Typically, I keep charging cords under control with a 6-ft braided cable and an adhesive cable clip placed 2″ below the tabletop so the cord drops straight down instead of snaking across the surface.
When I design this look, I hide everything else—hand cream, meds, remotes—inside a lidded box (about 8″ x 10″) on the lower shelf or in the top drawer. The trade-off is that you’ll spend an extra 5 minutes resetting the space each night, but it pays you back in a calmer morning.
Pro Tip: I’ve found that using a magnetic charging cable tip (left in the phone) reduces bedside fumbling in the dark—your nightstand stays serene because you’re not constantly dragging cords across it.
24. Add a Soft Throw That Reads “Poolside Towel,” Not “Winter Blanket”
In my opinion, the throw is where you can lean into vacation without changing the whole room. I find that a light, textured throw gives the bed that layered resort look while still feeling right for a summer bedroom.
I always recommend a throw around 50″ x 60″ or 60″ x 80″ depending on bed size, and I drape it across the bottom third of the duvet for a relaxed finish. Typically, I fold it into a 16–18″ wide band so it looks intentional, then I offset it slightly (about 6″) so it doesn’t feel too formal.
When I design this look, I choose cotton waffle weave, Turkish-style cotton, or a linen blend in sand, ivory, or pale stripe. The trade-off is that lighter throws show makeup and self-tanner, so I wash them every 2–3 weeks in summer and air-dry to keep the texture.
Pro Tip: I’ve found that a waffle weave throw looks most “resort” when it’s slightly oversized—if it ends exactly at the mattress edge, it can look like a bath towel rather than a deliberate styling layer.
25. Finish With One “Luxury” Detail: Hardware, Carafe, or Fresh Flowers
I always start by choosing one small luxury detail because it’s the final note that makes the room feel curated rather than copied. From my experience, one intentional upgrade can elevate all your other vacation home decor decisions.
I recommend picking one: swap dresser pulls for brushed brass (10–12 pulls in a typical bedroom set), add a bedside carafe set, or commit to fresh flowers weekly. Typically, I spend $25–$60 on hardware, $20–$40 on a carafe set, or $12–$25 per week on flowers, and I choose based on what will actually fit my routine.
When I design this look, I love white orchids or simple greenery in a 6–8″ ceramic vase, because it echoes the canopy’s softness and keeps the palette clean. The trade-off is upkeep—flowers require replacing every 5–7 days—so if that’s not realistic, I’d rather invest in hardware once and enjoy it daily.
Pro Tip: I’ve found that if you do flowers, trimming stems under running water and adding 1/4 teaspoon of bleach to the vase (for about 4 cups of water) keeps the water clear longer—an unglamorous trick that preserves the luxury illusion.
Final Thoughts
I find that the most memorable resort bedrooms aren’t complicated—they’re edited, breathable, and quietly intentional. When I design this look at home, I focus on what the room makes me do: exhale, slow down, and treat my mornings like I’m somewhere sunlit and far away.
From my experience, the highest-impact changes are almost always textiles and lighting: a generously sized linen duvet, warm white lamps, and sheers that soften the day. Then I layer in bamboo, a canopy moment, and tropical art in a way that feels collected—because that’s what keeps the room sophisticated instead of themed.
I always recommend choosing just 3–5 ideas from this list and doing them well, rather than trying to overhaul everything at once. Start with the bed, give yourself one weekend, and let your bedroom become the place where summer vacation vibes live year-round.
What I’d Do Differently
When I first tried this, I went too literal with the “tropical” part—I bought 6 small palm prints, a bright green pillow, and a patterned throw, and within 48 hours the room felt more like a themed guest room than a luxury resort bedroom. The specific mistake was scale and repetition: I had too many small accents competing instead of one confident statement. The correct approach, from my experience, is to pick two oversized prints (like 24″ x 36″), keep bedding mostly white, and let texture do the heavy lifting—bamboo, linen, and a soft canopy. Typically, when the art is larger and the palette is quieter, the whole room reads curated rather than cluttered.
I also wish I’d known how much lighting temperature mattered before I started. I had cool bulbs that made my “resort white” paint look slightly blue at night, and it took me one quick swap to warm white light (2700K–3000K — the cosy, yellowish tone you see in most homes) to fix it. If you do nothing else this weekend, choose your duvet scale, warm up the bulbs, and hang the art—then build the rest slowly and enjoy the process.
Products I Recommend for This Project
Here are some of my favourite products to help you bring these ideas to life:
- NICETOWN White Sheer Linen Look Curtains (96-inch) — I find these give that soft resort window glow while still looking tailored.
- Utopia Bedding Duvet Insert (King, 106×96) — I recommend sizing up like this for a hotel-style drape on a queen bed.
- SimpleHouseware 3-Tier Rolling Utility Cart (White) — I use this to create a mini “suite” beverage and sunscreen station in a small corner.
- Command Large Picture Hanging Strips — I like these for hanging lightweight frames cleanly, especially when I’m testing art placement before committing.
- Philips LED A19 Warm Glow Bulbs (dimmable, 2700K) — I always recommend warm white bulbs like these to keep whites creamy and resort-soft at night.