This post contains affiliate links. As an Amazon Associate, I earn from qualifying purchases at no extra cost to you.
Are you looking for kitchen lighting ideas that make your counters easier to work on without turning your kitchen into a showroom? Do you want to upgrade pendant lights kitchen-style for summer, but still keep it affordable and doable in a weekend?
I always start by thinking in layers: task lighting where I chop, ambient lighting for the whole room, and accent lighting for mood. In this post, I’m sharing the exact pendant light styles, under cabinet lighting options, and LED kitchen lights I reach for when I want real-world impact without a full renovation.
In my opinion, this is perfect for anyone with a builder-basic kitchen, a dark corner by the sink, or an island that feels more like a shadow zone than a gathering spot.
From my experience, the fastest win comes from pairing natural texture (like rattan) with warm LEDs—because it softens glare and makes evenings feel inviting. I’ll also walk you through spacing, heights, and the little “why does this look off?” details that I’ve learned after installing more kitchen light fixtures than I can count.
Below are 25 Kitchen Lighting Ideas & Pendant Light Styles that help you mix pendant lights kitchen looks with under cabinet lighting and LED kitchen lights for a layered, summer-ready upgrade.
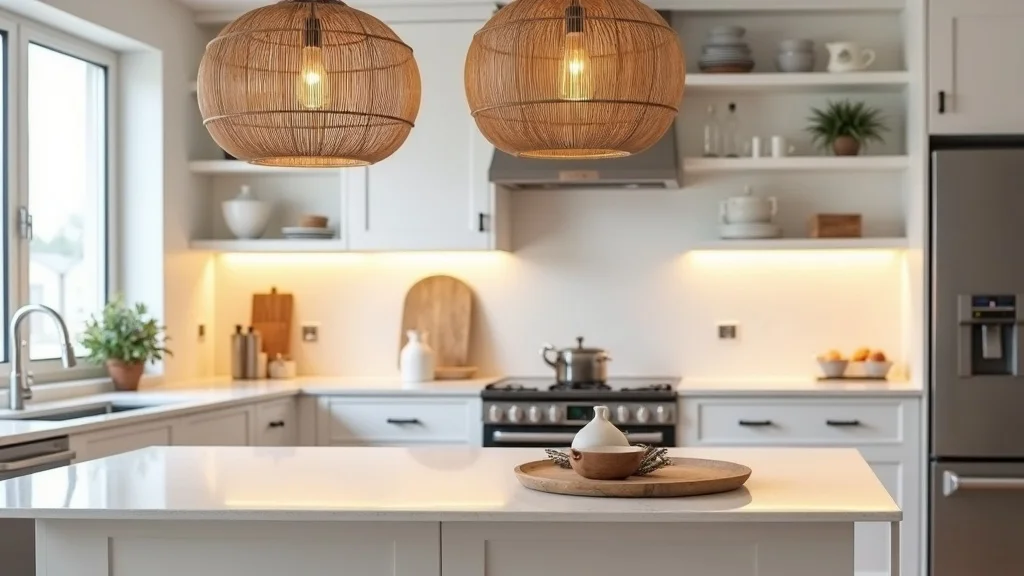
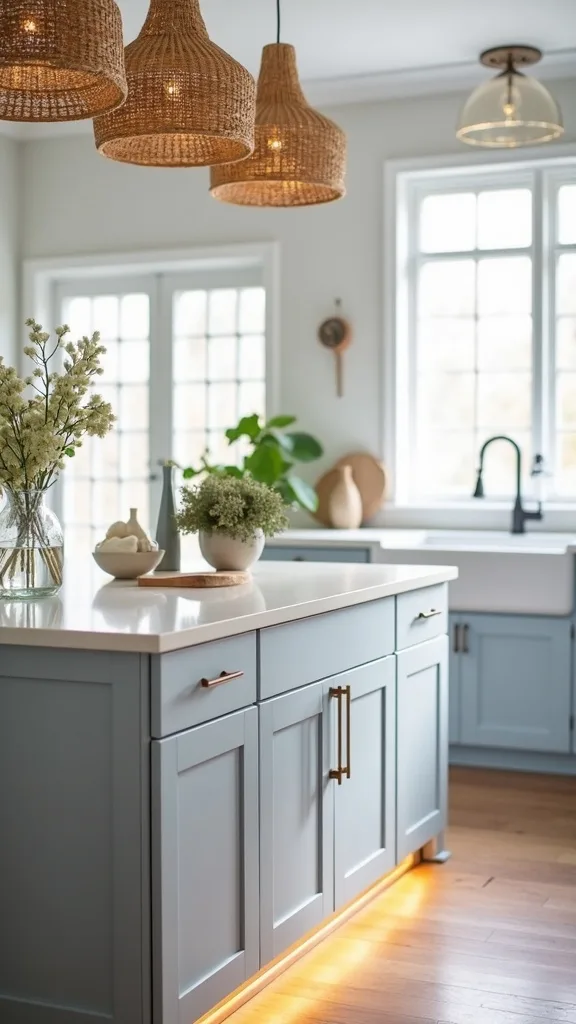
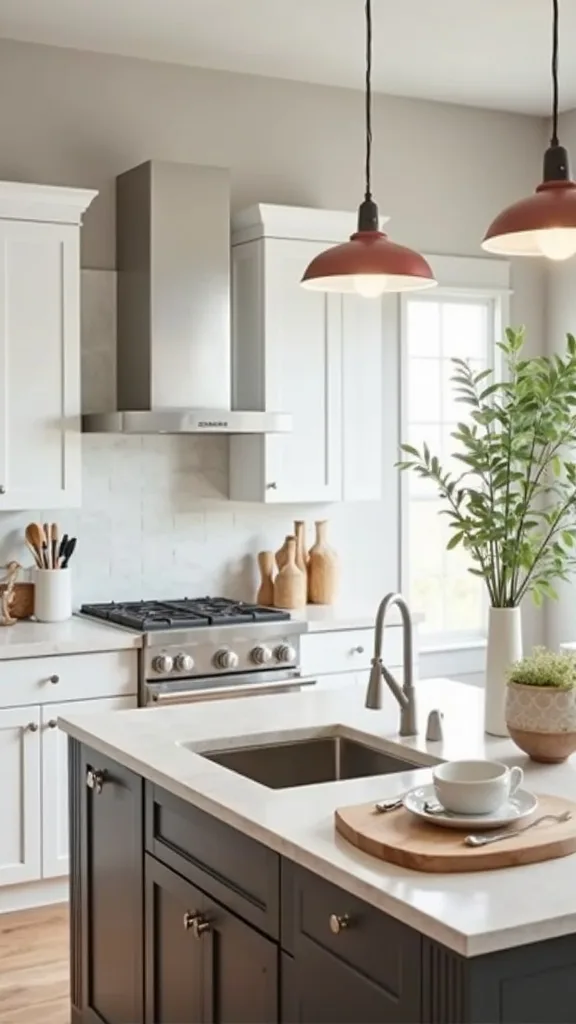
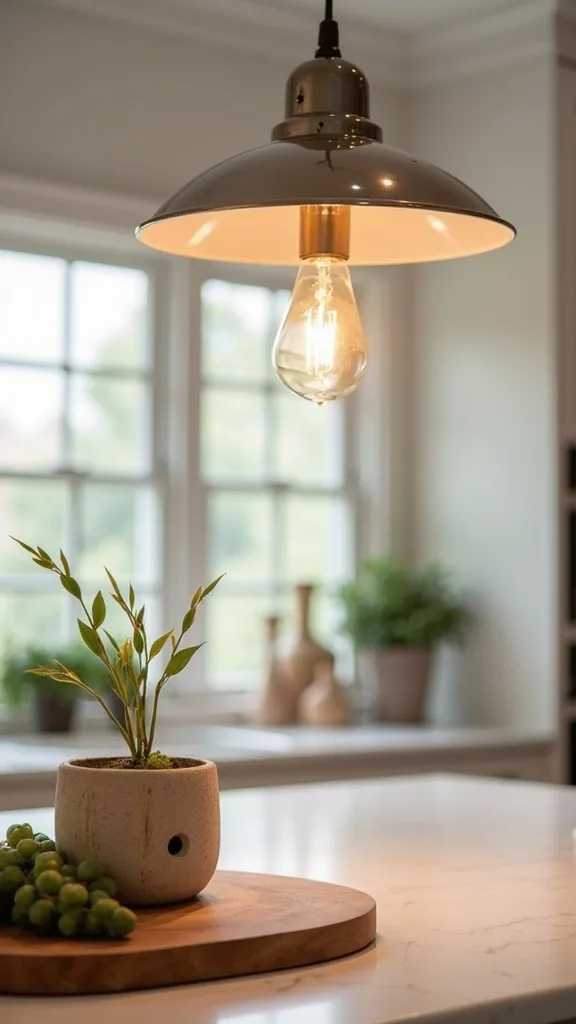
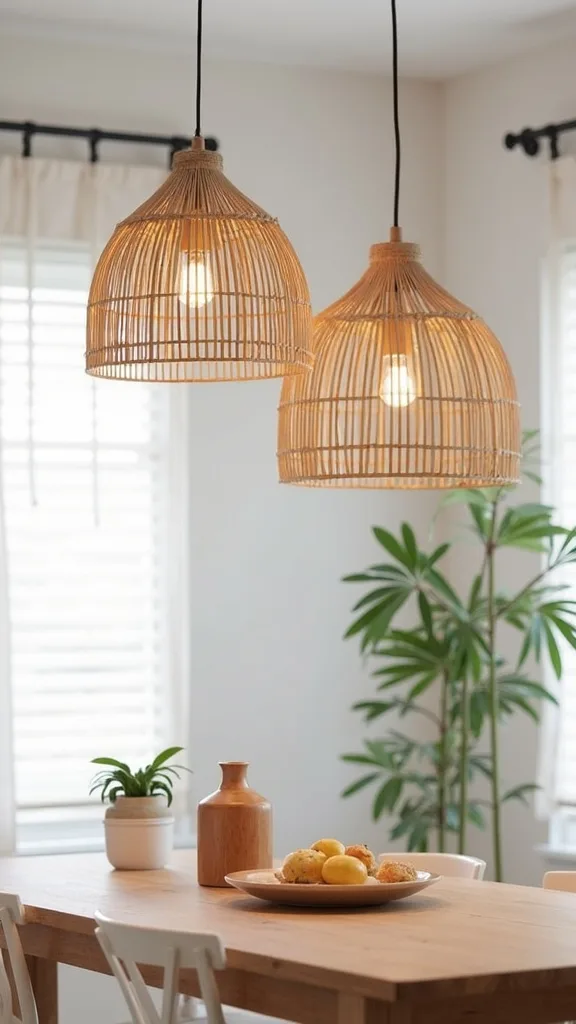
1. Rattan Pendant Cluster Over the Island + Warm LED Under-Cabinet Strips
I always start by pairing a rattan pendant cluster over the island with warm LED under cabinet lighting because it gives me both glow and true task light in the exact places I use every day. In most kitchens, that mix reads “summer airy” without needing new counters or paint.
When I design this look, I hang 2–3 pendants over a 6–8 ft island, keeping the bottoms about 30–34 inches above the countertop and spacing them roughly 24–30 inches apart. Then I add 16–20 ft of LED strip under the uppers, aiming for warm white light (2700K–3000K — the cosy, yellowish tone you see in most homes) so the rattan doesn’t look gray at night.
I find that woven rattan shades (12–16 inch diameter) look balanced with matte black or aged brass sockets, and I like a dimmable LED driver so I can drop brightness (measured in lumens) after dinner.
Pro Tip: From my experience, rattan throws “shadow lace” on the ceiling—so I always test one pendant with a 60W-equivalent LED bulb before committing to a 3-light cluster, and I place the under-cabinet strips 1–1.5 inches behind the cabinet face frame to hide diode dots on glossy quartz.
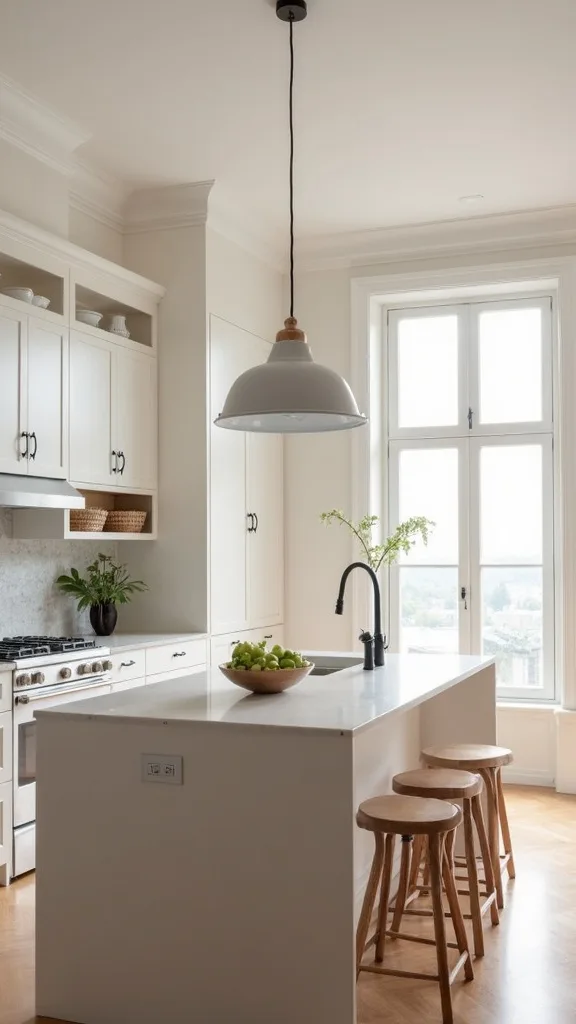
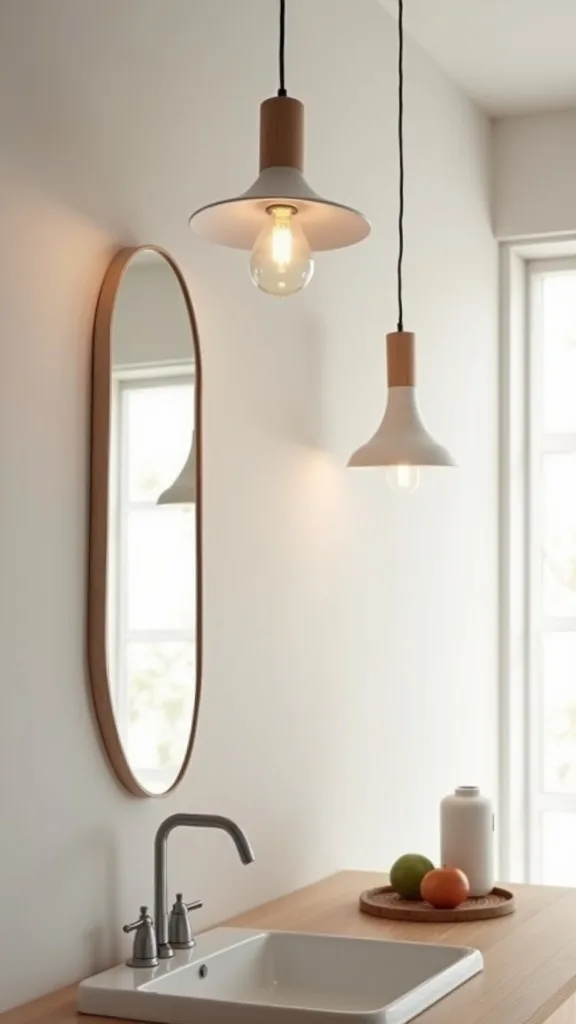
2. Single Oversized Pendant for a Small Island
I find that one oversized pendant can solve a lot of small-kitchen problems because it creates a clear focal point without visual clutter. In my opinion, it’s one of the most budget-friendly kitchen lighting ideas when you don’t want to buy three matching fixtures.
When I tried this in a 5 ft island setup, I chose a 18–22 inch wide shade and centered it precisely, keeping the bottom 32 inches above the countertop. Typically, I use a dimmer switch rated for LED kitchen lights so I can run it bright for prep and soft for late-night snacks.
I always recommend a metal dome (powder-coated white) if you want bounce, or a woven shade if you want warmth—just know woven materials absorb a little light, so you may need a brighter bulb (measured in lumens). I’ve found that a frosted A19 LED bulb avoids harsh hotspots in open-bottom pendants.
Pro Tip: From my experience, oversized pendants look “off” when they’re too close to the sink run—so I keep at least 18 inches of horizontal clearance from the sink edge to prevent glare reflecting off water and stainless steel.
3. Two Pendants Instead of Three for a Tighter Budget
From my experience, two pendants can look just as intentional as three, especially when I’m working with a 5–6 ft island and a strict budget. I like this approach because it cuts fixture cost by about 30–40% while still giving that “pendant lights kitchen” upgrade.
I always start by measuring the island length and placing the pendant centers about 18 inches in from each end, which usually lands them 30–36 inches apart. Then I hang them 30–34 inches above the countertop and use matching 60W-equivalent LED bulbs in warm white light (2700K–3000K — the cosy, yellowish tone you see in most homes) so the light feels consistent.
I find that simple 10–12 inch glass globes or 12–14 inch rattan shades keep the look light for summer. If I’m mixing metals, I stick to one finish for the canopy (like matte black) and repeat it on cabinet pulls.
Pro Tip: I’ve found two pendants look most balanced when the gap between them is slightly smaller than the gap from each pendant to the nearest island edge—so I aim for a 28–32 inch center gap and about 16–18 inches to the edges.
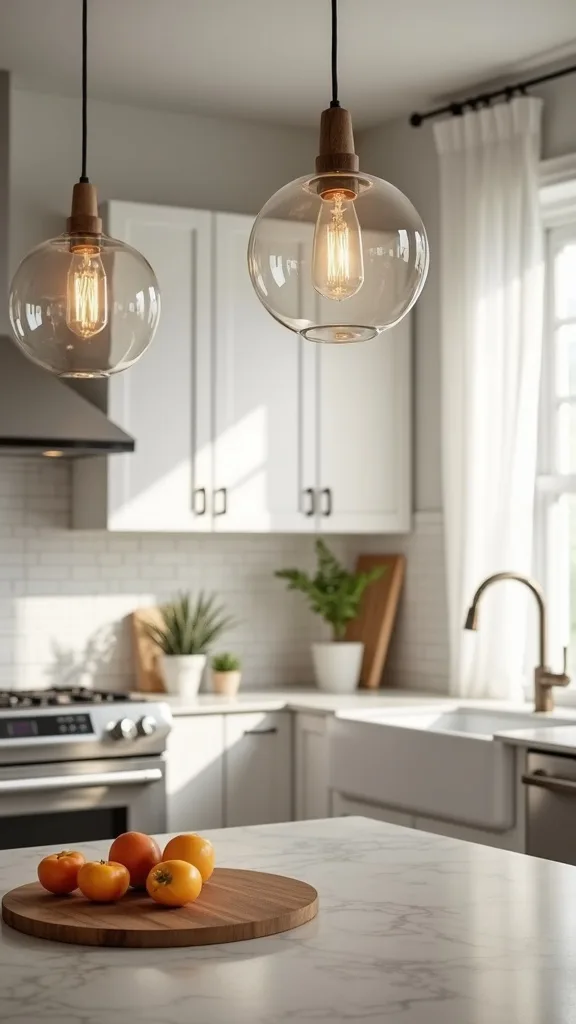
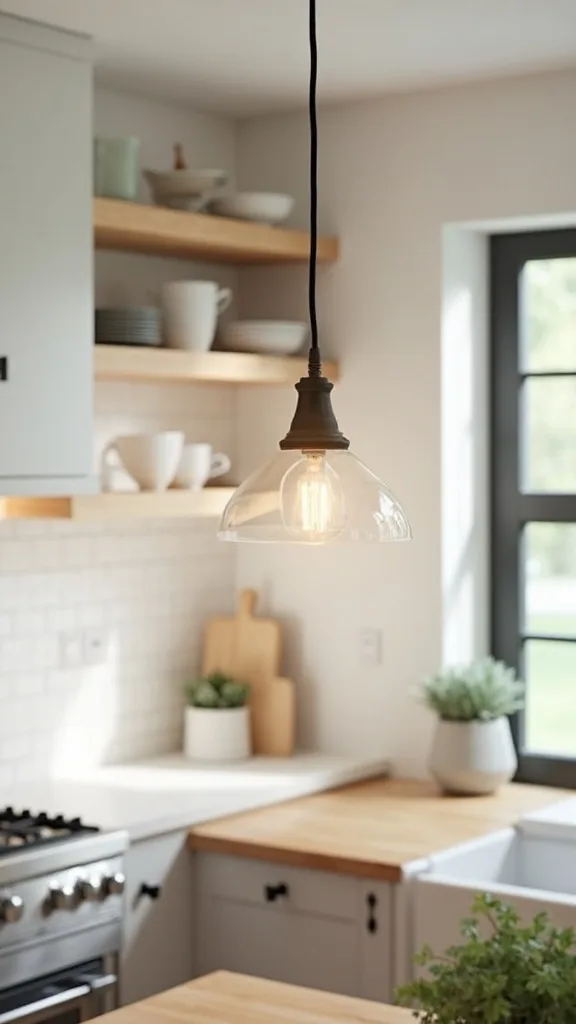
4. Clear Glass Pendants to Keep Sightlines Open
I find that clear glass pendants are my go-to when a kitchen already feels busy, because they add sparkle without blocking views. In most cases, this is the easiest way to update kitchen light fixtures while keeping the room airy for summer.
When I design this look, I use 3 pendants with 8–10 inch glass shades over a 7–8 ft island, hung 30–33 inches above the counter. I always choose warm white light (2700K–3000K — the cosy, yellowish tone you see in most homes) bulbs and keep the brightness (measured in lumens) moderate—around 800–1100 lumens per pendant—so the glass doesn’t feel glaring.
I recommend seeded glass if you want a little texture, but I’ve found smooth clear glass is easier to wipe down (especially near a cooktop). Aged brass or satin nickel hardware typically looks cleaner than shiny chrome if you have mixed appliances.
Pro Tip: From my experience, fingerprints show up fast on clear glass—so I keep a microfiber cloth and a 50/50 vinegar-water spray under the sink, and I avoid open-bottom shades directly over the range where grease mist can settle within 2–3 weeks.
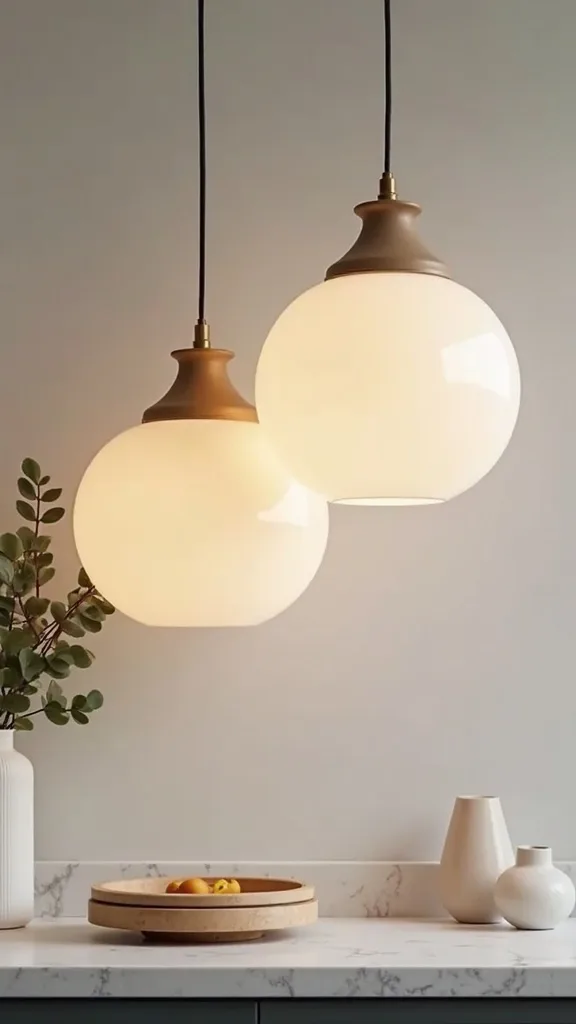
5. Milk Glass Pendants for Soft, Even Glow
In my opinion, milk glass is one of the most forgiving pendant lights kitchen choices because it diffuses light and hides the bulb silhouette. I’ve found it especially helpful in rentals where I can’t add recessed cans but still want a calmer look.
I always start by choosing 2–3 milk glass shades in the 10–14 inch range and hanging them 30–34 inches above the island surface. Typically, I pair them with LED kitchen lights in warm white light (2700K–3000K — the cosy, yellowish tone you see in most homes) and a dimmer so I can shift from “prep mode” to “hangout mode” in seconds.
I recommend a simple schoolhouse shape if you like transitional style, or a taller cone if you want a slightly modern line. From my experience, matte black or brushed brass stems keep milk glass from feeling too vintage unless you want that vibe.
Pro Tip: I find that milk glass can look dingy if your walls are a cool gray—so I test a 12×12 inch paint sample board under the pendant at night, and if it reads dull, I swap to a slightly brighter bulb (measured in lumens) before blaming the fixture.
6. Linear Island Pendant for Clean, Modern Coverage
I always recommend a linear island pendant when I want even light across the whole prep surface without juggling multiple shades. From my experience, it’s one of the most practical kitchen lighting ideas for families who actually use the island for homework and meals.
When I tried this, I used a 36–48 inch linear fixture over a 7 ft island, centered and hung 30–32 inches above the countertop. I find that choosing a dimmable integrated LED (brightness measured in lumens) around 3000–4500 lumens total typically replaces the need for extra pendants, but it can cost more upfront than buying two basic shades.
I like matte black frames with opal diffusers for a clean look, or a warm brass frame if your cabinet hardware is gold-toned. If you’re mixing with under cabinet lighting, I keep both sources in warm white light (2700K–3000K — the cosy, yellowish tone you see in most homes) so the layers don’t fight.
Pro Tip: I’ve found linear fixtures look crooked even when they’re level if the island isn’t perfectly square—so I align the fixture to the main walking path (not the cabinet seam), then adjust the canopy 1/4–3/8 inch to “optically center” it.
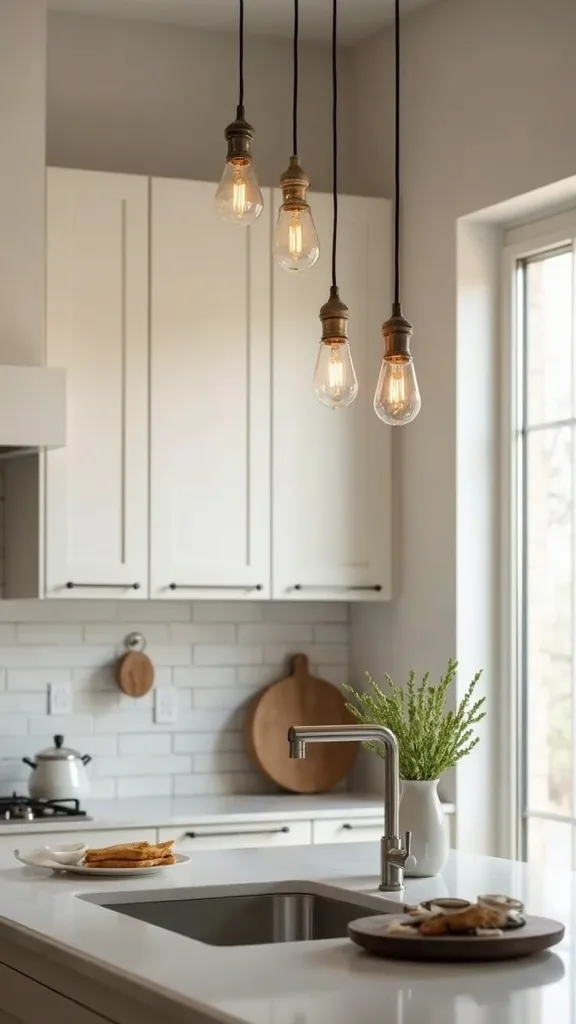
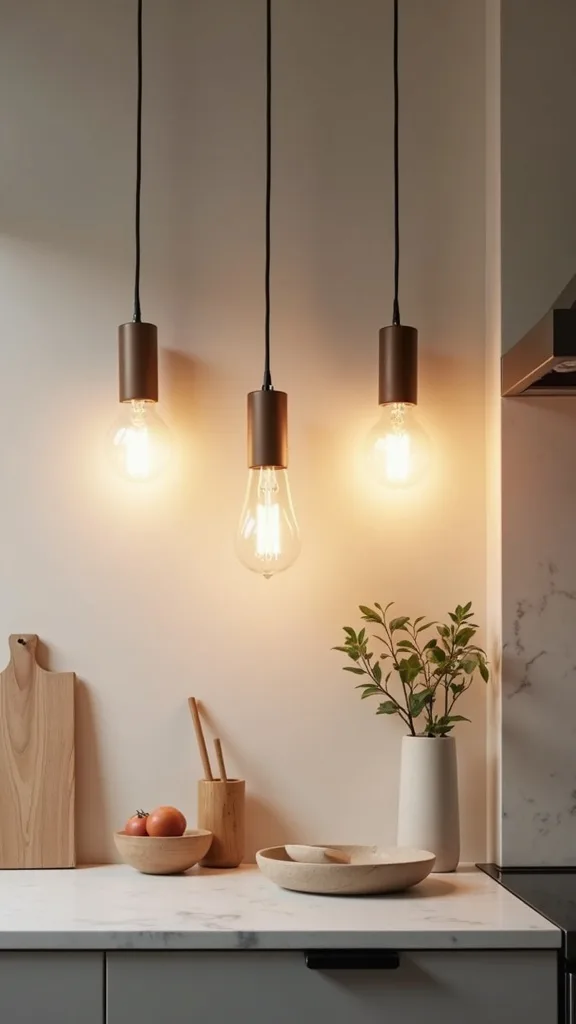
7. Mini Pendants Over a Coffee or Beverage Station
I find that adding mini pendants over a coffee nook is a small change that makes mornings feel intentional, especially in summer when I’m making iced drinks nonstop. In my opinion, it’s one of the most satisfying kitchen light fixtures upgrades because it’s localized and affordable.
I always start by identifying a 24–36 inch wide stretch of counter and hanging 1–2 mini pendants with 6–8 inch shades, keeping them about 28–30 inches above the counter. Typically, I wire them to a separate switch or a smart plug so I can turn them on for 15 minutes in the morning without lighting the whole kitchen.
I recommend clear ribbed glass if you want sparkle, or small rattan shades if you want the boho look to echo larger pendant lights kitchen areas. I’ve found warm white light (2700K–3000K — the cosy, yellowish tone you see in most homes) keeps the station cozy even with white countertops.
Pro Tip: From my experience, steam from kettles can haze glass shades—so I place pendants at least 12 inches away from the kettle’s usual spot and choose a shade with a wider opening for easier wipe-down.
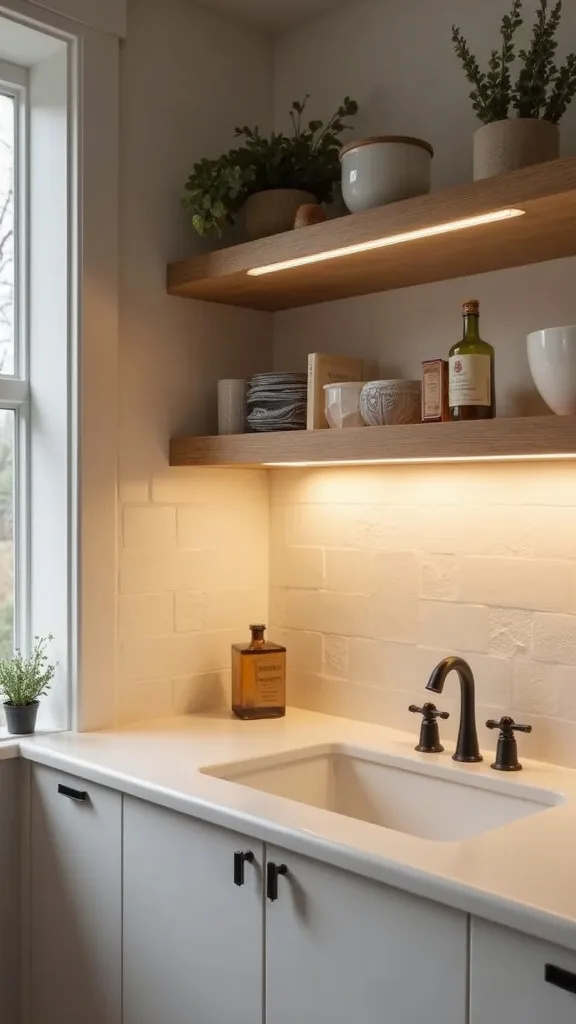
8. Under-Cabinet LED Strips for Shadow-Free Prep
I always recommend under cabinet lighting first when someone tells me their kitchen feels dark, because it fixes the exact problem: your body blocking the ceiling light while you chop. From my experience, it’s the most “why didn’t I do this sooner?” upgrade.
When I design this, I measure each upper run and usually buy 16–32 ft of LED strip, then cut at marked intervals and connect with solderless clips. I place the strip 1–1.5 inches behind the cabinet face frame and aim for warm white light (2700K–3000K — the cosy, yellowish tone you see in most homes) so food looks appetizing instead of bluish.
I find that aluminum LED channels with a frosted diffuser cost about $20–$35 extra, but they hide hotspots and protect the strip from steam. For power, I typically use a plug-in driver if there’s an outlet in the cabinet, or a hardwired driver if I’m already updating kitchen light fixtures.
Pro Tip: I’ve found the cleanest look comes from drilling a 3/8-inch hole at the back corner of each cabinet and running wire through, then labeling each run with painter’s tape before you stick anything—because peeling and re-sticking strips usually weakens adhesion within 24 hours.

Cost & Materials Estimate
I typically see a layered lighting refresh (pendants + under-cabinet LEDs + controls) land between $120 and $850 depending on whether you hardwire and how premium your fixtures are.
| Item | Estimated Cost | Where to Buy |
|---|---|---|
| 2–3 rattan or glass pendant lights (hardwired) | $90–$360 | Wayfair |
| LED strip kit for under cabinets (16–32 ft, dimmable) | $25–$95 | Amazon |
| Aluminum LED channels with diffusers (6–10 pieces) | $22–$60 | Home Depot |
| LED-compatible dimmer switch (1–2 switches) | $18–$65 | Lowe’s |
| Warm white LED bulbs (6-pack, dimmable) | $12–$28 | IKEA |
| Electrician help (optional, 1–2 hours) | $150–$350 | Home Depot |
Total estimated cost: $120–$850 I find you can save the most by choosing simpler pendants and doing plug-in under-cabinet LEDs, but I’d splurge on dimming and diffusers because they make everything feel intentional.
9. Under-Cabinet LED Pucks for Quick Installation
From my experience, LED puck lights are the fastest under cabinet lighting option when you want results today and don’t want to fuss with cutting strips. I find that they’re especially handy in older kitchens with lots of cabinet breaks.
I always start by spacing pucks 12–18 inches apart, usually using 3–6 pucks for a typical 8 ft counter run. Most kits are plug-in, so I route the cord to a hidden outlet inside the upper cabinet and add a simple adhesive cord channel to keep it tidy.
I recommend choosing warm white light (2700K–3000K — the cosy, yellowish tone you see in most homes) and checking that the kit is dimmable if you plan to pair it with pendant lights kitchen areas. In my opinion, a brushed nickel finish disappears under most cabinets, but white housings are less noticeable if your cabinet underside is painted white.
Pro Tip: I’ve found puck lights can create “polka-dot” pools on reflective stone—so I stagger them slightly toward the backsplash by about 1 inch, which blends the beams and makes the counter read evenly lit.
10. Toe-Kick LED Lighting for a Nighttime Path
I find that toe-kick lighting is one of the most underrated kitchen lighting ideas because it makes the room safer at night without blasting your eyes. In most cases, it also adds that high-end “layered” feel even if your main kitchen light fixtures are basic.
When I tried this, I ran 10–16 ft of LED strip along the toe-kick, about 1 inch back from the edge so the diodes don’t show. I always put it on a motion sensor that stays on for 30–60 seconds, which is perfect for midnight water runs.
I recommend warm white light (2700K–3000K — the cosy, yellowish tone you see in most homes) for comfort, and I’ve found an IP65-rated strip (splash-resistant) holds up better near the sink and dishwasher. If you have dark floors, you may want slightly higher brightness (measured in lumens) so it doesn’t disappear.
Pro Tip: From my experience, toe-kick strips peel off when mopped—so I mount them inside an aluminum channel and secure the channel with 3/4-inch screws into the cabinet base (not the thin toe-kick skin), which prevents sagging over 6–12 months.
11. Warm White LEDs to Make Summer Evenings Feel Cozy
In my opinion, the quickest way to make a kitchen feel welcoming is choosing the right color temperature, because “too white” light can make even cute decor feel sterile. I always reach for warm white light (2700K–3000K — the cosy, yellowish tone you see in most homes) for summer nights when the kitchen becomes the hangout spot.
I always start by swapping bulbs in the main fixture and pendants first—usually 4–6 bulbs total—so the whole room matches. Then I adjust under cabinet lighting to the same range and test at 8–10 pm when outside light is gone, because that’s when mismatched LEDs look most obvious.
I’ve found that frosted LED bulbs reduce glare in clear glass pendants, while filament-style LEDs look nicer in open cages but can cost $2–$6 more per bulb. Typically, I avoid cool white in kitchens unless the room gets very little daylight and you prefer a crisp look.
Pro Tip: From my experience, mixing 2700K pendants with 4000K under-cabinet strips makes food look oddly gray—so I buy one extra bulb and one extra strip sample first, test them together for 48 hours, and only then commit to the full set.

12. Add a Dimmer Switch for Instant Mood Control
I always recommend adding a dimmer because it gives you two kitchens in one: bright for cooking and soft for conversation. From my experience, it’s the most cost-effective “luxury” feel you can add to kitchen light fixtures.
Typically, I install an LED-compatible dimmer (rated for the bulb type) in about 20–40 minutes, but I’ll hire an electrician if the wiring is older or the box is crowded. I find that setting pendants to about 30–40% in the evening keeps the island inviting while under cabinet lighting does the real work.
I recommend a Lutron-style rocker dimmer for ease, and I always check that the bulbs are “dimmable” on the package—non-dimmable LEDs can flicker or buzz. If you’re using integrated LED fixtures, I’ve found some need a specific dimmer model, which costs a bit more upfront but saves frustration later.
Pro Tip: I’ve found the smoothest dimming happens when you match bulb brands within the same fixture—so I don’t mix a bargain bulb with a premium bulb in a 3-light pendant bar, because the lowest setting will usually flicker on the odd one out.
13. Smart Bulbs in Pendants for Schedules and Scenes
I find that smart bulbs are perfect when you want flexibility but don’t want to rewire anything, especially in a summer kitchen upgrade where time matters. In my opinion, they’re a practical add-on for pendant lights kitchen setups because you can set routines without touching a switch.
I always start with 2–3 smart LED bulbs in the island pendants and set a schedule: on at 6:30 pm, off at 11:30 pm. Typically, setup takes 10–15 minutes in the app, and I create two scenes—“Prep” at full brightness (measured in lumens) and “Dinner” at about 35%.
I recommend choosing warm white light (2700K–3000K — the cosy, yellowish tone you see in most homes) for most kitchens, and I’ve found Wi-Fi bulbs are simplest if you don’t already own a hub. The trade-off is smart bulbs cost more per bulb, but they can save you from installing multiple dimmers.
Pro Tip: From my experience, smart bulbs in enclosed glass shades can overheat and shorten lifespan—so I avoid fully enclosed pendants or I choose bulbs specifically rated for enclosed fixtures and keep the schedule from running at 100% for 6+ hours nightly.
14. Recessed LED Retrofit Cans for Even Ambient Light
I’ve found recessed retrofits are the cleanest way to fix a kitchen that feels patchy or cave-like, because they spread ambient light evenly. From my experience, this is one of the more impactful kitchen lighting ideas, but it’s a little more “project” than swapping pendants.
When I tried this, I replaced 4–6 old can trims with LED retrofit modules in about 1–2 hours, turning off the breaker and following the manufacturer steps carefully. Typically, I space cans about 4–5 ft apart and keep them 2–3 ft from the wall to avoid harsh scallops on upper cabinets.
I recommend choosing a selectable color temperature model so you can set warm white light (2700K–3000K — the cosy, yellowish tone you see in most homes) to match your pendant lights kitchen area. The trade-off is recessed lighting can feel “flat” alone, which is why I still pair it with under cabinet lighting for depth.
Pro Tip: I find that recessed lights look brightest but least glary when I choose a deeper baffle trim (often labeled “regressed”)—it tucks the light source up by about 1/2–3/4 inch so you don’t see the LED when you’re seated at the island.
15. Flush-Mount Ceiling Fixture for Low Ceilings
I always recommend a flush-mount when the ceiling is under about 8 ft and pendants would feel like head-bump hazards. In my opinion, it’s the most practical ceiling choice for small kitchens where every inch matters.
Typically, I choose a 13–18 inch diameter flush mount and aim for 2000–3000 lumens total brightness (measured in lumens) so the room doesn’t rely only on under cabinet lighting. I find installation takes 30–60 minutes if the existing box is solid, but I’ll budget extra time if I need to patch paint around the old fixture footprint.
I like a fabric drum shade for softness or an opal glass dome for easy cleaning—especially near the stove. From my experience, warm white light (2700K–3000K — the cosy, yellowish tone you see in most homes) keeps the ceiling glow pleasant, while cool light can make low ceilings feel clinical.
Pro Tip: I’ve found a “floating” flush mount (one with a 1–2 inch gap from the ceiling) makes the ceiling look taller because it washes light upward—so I choose that style when I’m trying to avoid a cramped feel.
16. Semi-Flush Mount for a Little More Style Without the Drop
From my experience, semi-flush fixtures are the sweet spot when you want a decorative statement but can’t commit to long pendants. I find that they work beautifully in a kitchen with an 8–9 ft ceiling and a central dining nook.
I always start by choosing a fixture that drops only 6–12 inches, then I place it so the bottom sits at least 84 inches above the floor in a walkway. Typically, I look for a dimmable LED option or use 3–4 bulbs with warm white light (2700K–3000K — the cosy, yellowish tone you see in most homes) to keep the vibe consistent with under cabinet lighting.
I recommend a simple lantern shape for farmhouse-adjacent kitchens or a globe cluster for a more modern look. The trade-off is semi-flush mounts can cast stronger shadows than recessed lights, so I pair them with LED kitchen lights under the uppers for task work.
Pro Tip: I’ve found semi-flush fixtures look “lost” in larger kitchens unless the diameter is at least 16–20 inches—so I measure the room width and avoid anything under 14 inches in an open-concept space.
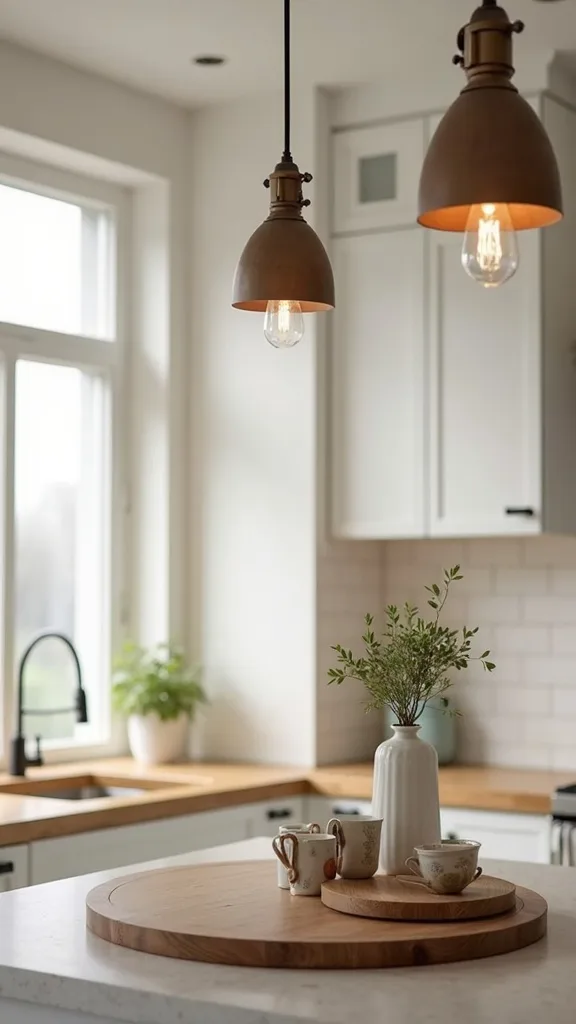
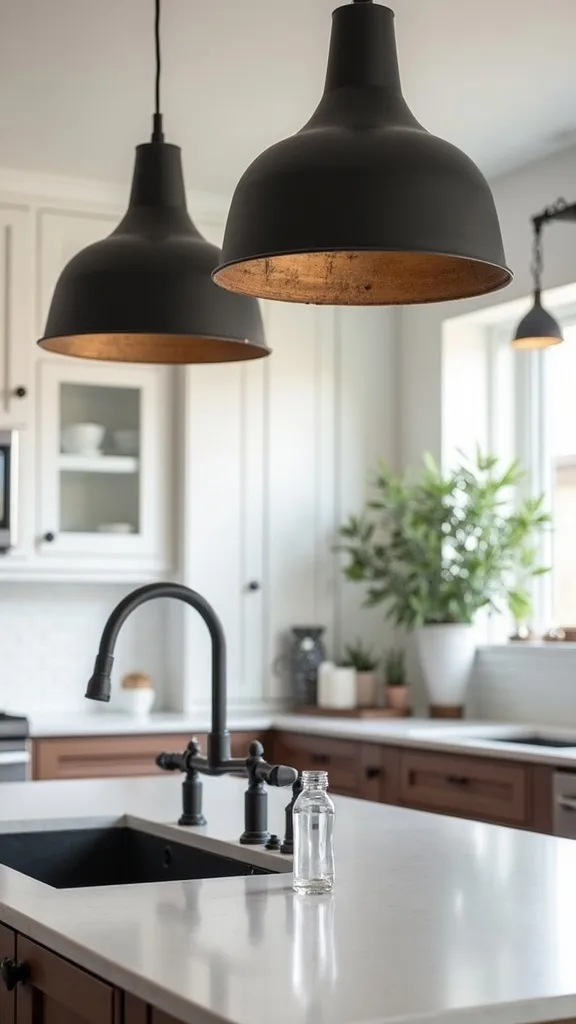
17. Matte Black Pendants to Tie in Appliances and Hardware
I find that matte black pendants instantly make a kitchen feel more pulled together, especially if you already have black faucets or cabinet pulls. In my opinion, it’s one of the simplest pendant lights kitchen updates that reads modern without being trendy in a risky way.
When I design with matte black, I usually choose 2–3 pendants with 10–14 inch shades and hang them 30–34 inches above the island. I always keep the bulbs warm white light (2700K–3000K — the cosy, yellowish tone you see in most homes), because black shades can feel heavy if the light is too cool.
I recommend powder-coated metal because it wipes clean, and I’ve found a white interior shade reflects more light onto the counter than an all-black interior. The trade-off is black shows dust faster, so I plan a quick wipe-down every 2–4 weeks in summer when windows are open.
Pro Tip: From my experience, matte black looks most intentional when I repeat it exactly 2–3 times—so if I add black pendants, I’ll echo it in one other place (like barstools or a faucet) and avoid adding a fourth competing metal finish.
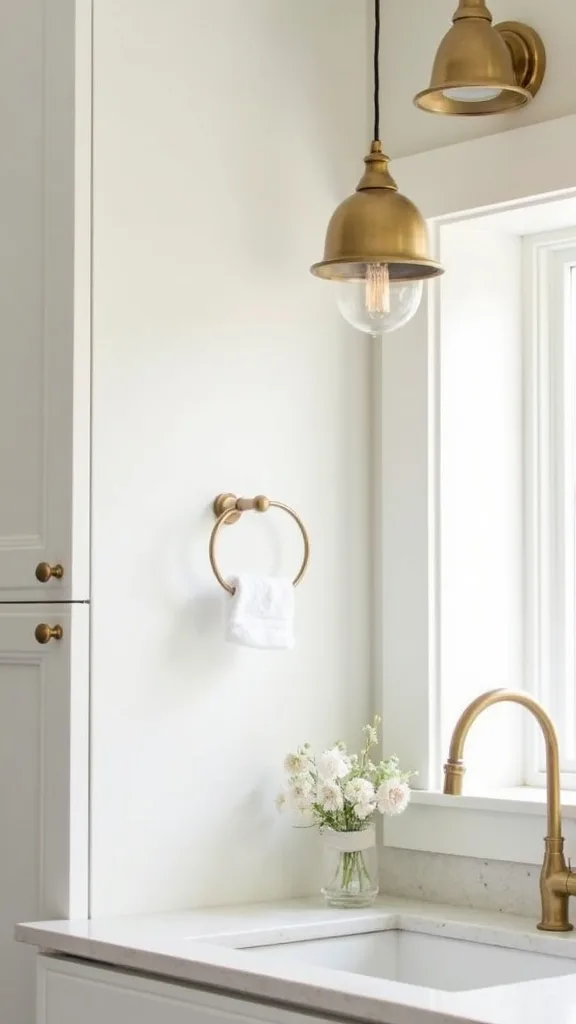
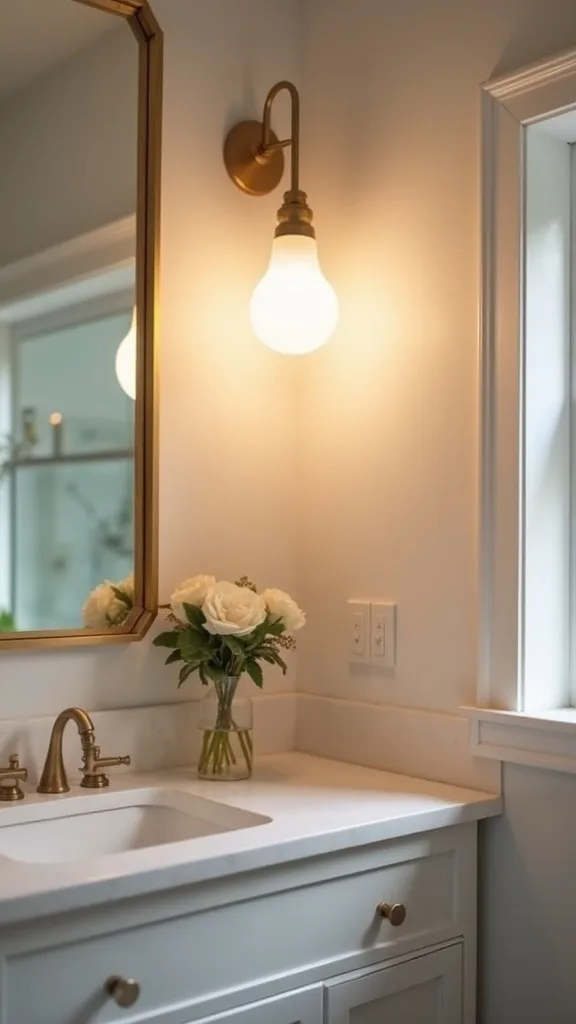
18. Aged Brass Pendants for Warmth With White Cabinets
I’ve found aged brass is a cheat code for making white kitchens feel warmer, especially during a summer refresh when everything else is bright. In my opinion, it’s a smart way to upgrade kitchen light fixtures without changing cabinets.
I always start by matching the brass tone to existing hardware—more honey-gold if your pulls are warm, more muted if you have brushed nickel nearby. Over an island, I’ll hang 2–3 brass pendants (10–12 inch shades) at 30–34 inches above the countertop and use warm white light (2700K–3000K — the cosy, yellowish tone you see in most homes) so the metal glows instead of looking greenish.
I recommend lacquered brass if you don’t want patina, but I find unlacquered finishes age beautifully—just know they can spot if you touch them with wet hands. Typically, I pair brass with creamy whites and natural wood for a relaxed look.
Pro Tip: From my experience, brass can read “too shiny” under strong LEDs—so I choose bulbs with a frosted finish and keep pendant brightness (measured in lumens) closer to 800–1000 per pendant, letting under cabinet lighting carry the task load.
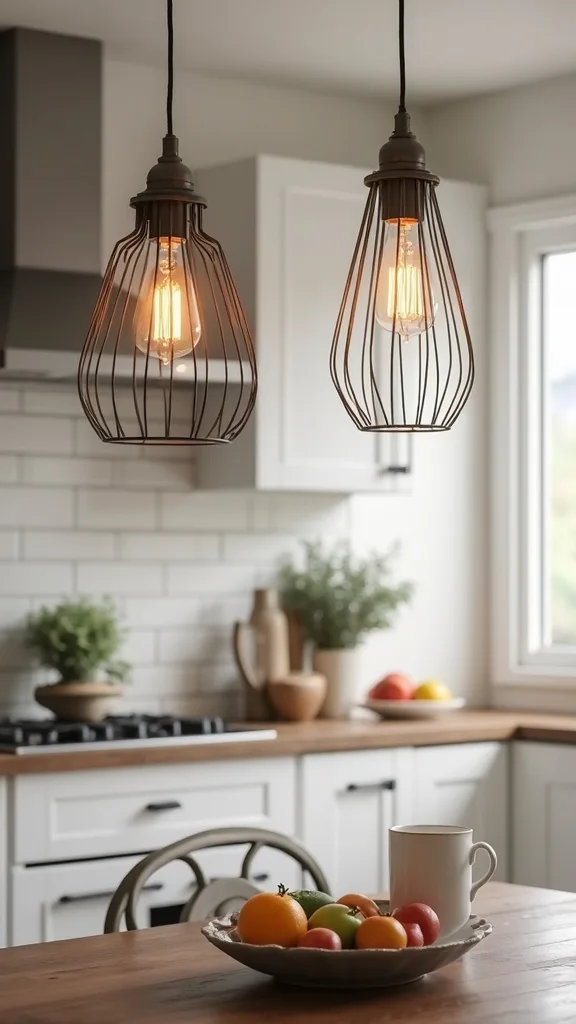
19. Industrial Cage Pendants for Texture Without Bulk
I find cage pendants add texture and definition without blocking sightlines, which is helpful if you want an industrial touch but still want the kitchen to feel open. From my experience, they’re also forgiving in busy family kitchens because you’re not constantly polishing glass.
I always start by selecting a cage that’s 10–14 inches wide and using 2–3 over the island, hung 30–34 inches above the counter. Typically, I use filament-style LED bulbs in warm white light (2700K–3000K — the cosy, yellowish tone you see in most homes) and keep brightness (measured in lumens) around 600–800 per bulb so the exposed bulb doesn’t glare.
I recommend matte black cages for a classic industrial vibe or dark bronze if you want something softer. The trade-off is exposed bulbs show dust, so I plan to wipe them every 3–4 weeks, especially if you cook with oils often.
Pro Tip: I’ve found cage pendants can cast distracting striped shadows on countertops—so I choose a cage with wider spacing (at least 1 inch between bars) and I avoid placing them directly over glossy stone where the shadow pattern becomes twice as noticeable.
20. Scandinavian Wood + White Pendants for a Light Summer Feel
In my opinion, Scandinavian-style pendants are perfect for a summer kitchen upgrade because they look clean, bright, and not fussy. I’ve found the wood detail keeps the space from feeling cold, even with lots of white.
When I design this look, I choose 2–3 pendants with 12–16 inch white shades and a light oak accent, then hang them 30–34 inches above the island. I always pair them with under cabinet lighting—usually a 16 ft strip—so the counters stay shadow-free while the pendants provide the “pretty” layer.
I recommend matte white metal because it reflects light well, and I keep bulbs warm white light (2700K–3000K — the cosy, yellowish tone you see in most homes) so the oak reads honey-toned rather than gray. Typically, I avoid very cool LEDs here because they can make the wood look washed out.
Pro Tip: From my experience, wood accents look most cohesive when I repeat the same undertone within 2–3 feet—so I’ll echo the oak with a cutting board or stools, and I avoid mixing it with red-toned cherry nearby.
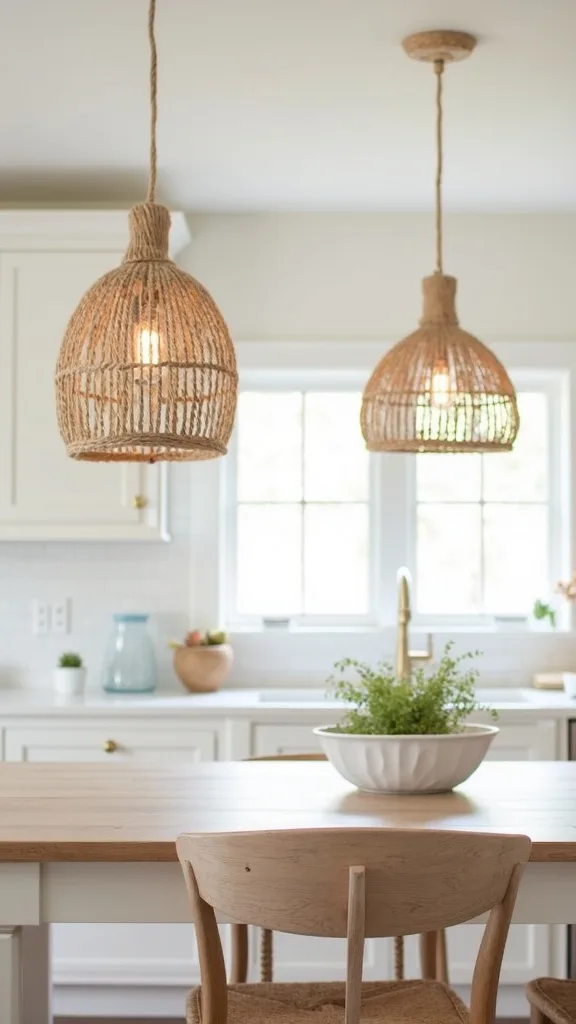
21. Boho Rattan Dome Pendants for a Soft Statement
I find rattan dome pendants give me that relaxed boho vibe without committing to a full remodel, and they’re especially charming in summer when daylight is strong. From my experience, they also hide minor ceiling imperfections better than shiny fixtures.
I always start with scale: for an island, I like 2 domes at 16–18 inches wide or 3 domes at 12–14 inches wide. I hang them 30–34 inches above the countertop and use warm white light (2700K–3000K — the cosy, yellowish tone you see in most homes) so the weave looks golden at night.
I recommend pairing rattan with simple white cabinets and black or brass hardware, and I’ve found adding under cabinet lighting keeps the space functional because rattan shades can absorb a bit of brightness (measured in lumens). The trade-off is rattan needs gentle cleaning—no soaking.
Pro Tip: I’ve found rattan can warp slightly in humid kitchens—so I keep it at least 24 inches from the cooktop and I dust it with a soft paintbrush every 2 weeks to prevent grease-laced dust from embedding in the weave.
22. Coastal Rope or Seagrass Pendants for Texture on a Budget
From my experience, rope and seagrass pendants are a budget-friendly way to get that coastal texture without buying all new decor. I find they work especially well if you already have light wood floors or sandy-toned rugs.
I always start by choosing 2–3 pendants in the 12–16 inch range and hanging them 30–34 inches above the island, then I keep spacing around 24–30 inches between centers. Typically, I pair them with LED kitchen lights in warm white light (2700K–3000K — the cosy, yellowish tone you see in most homes) so the fibers don’t look dull.
I recommend a pendant with a diffuser if the weave is open, because it softens the bulb glare and looks nicer from a seated angle. The trade-off is natural fiber shades can shed a little at first, so I plan a quick vacuum pass during the first 1–2 weeks.
Pro Tip: I’ve found coastal fibers look cheaper when the cord is glossy black—so I swap to a natural linen-wrapped cord kit (usually $12–$20) to make the whole pendant read more cohesive and intentional.
23. Battery-Powered LED Puck Lights for Rentals
I always recommend battery puck lights when you’re renting or you just can’t deal with wiring right now, because they give you instant task light with zero commitment. From my experience, they’re one of the most accessible kitchen lighting ideas for a weekend upgrade.
Typically, I place 3–5 pucks under the uppers, spacing them 12–18 inches apart, and I use the included adhesive pads or small screws if allowed. I find rechargeable sets are worth it if you’ll use them daily, but the trade-off is you’ll still need to recharge every 1–3 weeks depending on brightness (measured in lumens) and usage time.
I recommend choosing warm white light (2700K–3000K — the cosy, yellowish tone you see in most homes) and a set with a remote so you can turn them on while your hands are messy. If you’re pairing with pendant lights kitchen fixtures, I keep the color temperature close so it doesn’t look mismatched.
Pro Tip: I’ve found adhesive pucks fall in humid kitchens—so I wipe the cabinet underside with 70% isopropyl alcohol, wait 10 minutes, then press each puck firmly for 30 seconds to get a bond that actually lasts.
24. Highlight Open Shelving With a Tiny LED Light Bar
I find that open shelves can look messy fast, but a slim LED light bar makes them feel styled on purpose. In my opinion, this is a smart way to add accent lighting without changing your main kitchen light fixtures.
I always start by measuring the shelf length—most of mine are 24–36 inches—and choosing a light bar that’s 12–24 inches so it tucks behind bowls and cookbooks. Typically, I mount it to the underside of the shelf with 2–4 small screws or strong 3M tape, then I run the cord through a 3/8-inch hole at the back corner for a clean look.
I recommend warm white light (2700K–3000K — the cosy, yellowish tone you see in most homes) so ceramics and wood look rich. The trade-off is accent lights can create glare on glossy tile, so I angle the bar slightly toward the wall when possible.
Pro Tip: From my experience, shelf lighting looks most high-end when it’s invisible—so I choose a bar with a frosted lens and mount it 1 inch behind the shelf front edge to avoid seeing the individual LED points from across the room.
25. Match All Light Sources for a Truly Layered Look
I’ve found that the difference between “random fixtures” and a designed kitchen is consistency across layers—pendants, ceiling lights, and under cabinet lighting all working together. In my opinion, this is the most important of all kitchen lighting ideas because it makes everything else look more expensive than it was.
I always start by listing every light source and bulb count—usually 2–3 pendants, 1 ceiling fixture, and 16–32 ft of LED strip—then I match them to warm white light (2700K–3000K — the cosy, yellowish tone you see in most homes). Typically, I keep the island brighter (measured in lumens) than the perimeter, then dim down at night so the kitchen feels calm.
I recommend sticking to 1–2 metal finishes across all kitchen light fixtures, and I find repeating one natural texture (like rattan) once or twice is enough. The trade-off is matching everything can take an extra shopping hour, but it saves you from the “why does this feel off?” problem later.
Pro Tip: From my experience, the quickest way to spot mismatched lighting is to take a photo in “night mode” from your phone—if one area looks green or icy, I swap that bulb/strip first before changing fixtures, because color mismatch is usually the real culprit.
Final Thoughts
I find that a summer kitchen upgrade doesn’t need new cabinets to feel fresh—it needs light placed where you actually live. When I design layered lighting, I’m always chasing that mix of function (clear counters) and comfort (a warm glow that makes people linger).
From my experience, the most reliable combo is simple: choose pendant lights kitchen-style that fit your island scale, then add under cabinet lighting so prep work is genuinely easier. If you can add a dimmer or smart schedule, you’ll feel the difference within the first week—especially on evenings when you want the kitchen to feel calm instead of clinical.
I always recommend starting with one zone—usually the island or the sink run—then building out as budget allows. Once you see how much better your kitchen feels with the right LED kitchen lights and cohesive kitchen light fixtures, it’s hard to go back.
What I’d Do Differently
When I first tried this, I made one specific mistake: I mixed color temperatures because I bought whatever LED strip was on sale and didn’t compare it to my pendant bulbs at night. In the daytime, it looked fine, but after 8 pm the under cabinet lighting read icy-blue while the pendants were warm, and my white backsplash suddenly looked slightly green. I kept thinking I’d chosen the wrong tile, when the real issue was mismatched light. The correct approach (from my experience) is to pick your target first—warm white light (2700K–3000K — the cosy, yellowish tone you see in most homes) is what I use in most kitchens—then match every bulb and strip to that range before you mount anything permanently.
I also wish I knew how much fixture placement affects comfort: dropping pendants just 2 inches too low made sightlines awkward when we sat at the island, and raising them back up fixed it instantly. If you’re starting now, I recommend testing heights with painter’s tape marks for 24 hours, then committing—grab a tape measure and try your first lighting layer this weekend.
Products I Recommend for This Project
Here are some of my favourite products to help you bring these ideas to life:
- Lutron Diva LED+ Dimmer Switch (DVCL-153P) — I use this when I want smooth dimming with most dimmable LED bulbs and fewer flicker headaches.
- GE Relax HD LED Light Bulbs, Soft White (60W Equivalent) — I like these for warm white light (2700K–3000K — the cosy, yellowish tone you see in most homes) that feels cozy in pendants.
- Govee White LED Strip Lights (Warm White) — I reach for these when I want an easy under cabinet lighting install with reliable adhesive and simple controls.
- Litever Aluminum LED Channel System with Milky Diffuser — I find this makes LED strips look more high-end by hiding hotspots and protecting the strip from steam.
- Enbrighten Plug-In LED Under Cabinet Light Bar (Warm White) — I recommend this for renters or quick upgrades when you want bright task lighting without hardwiring.