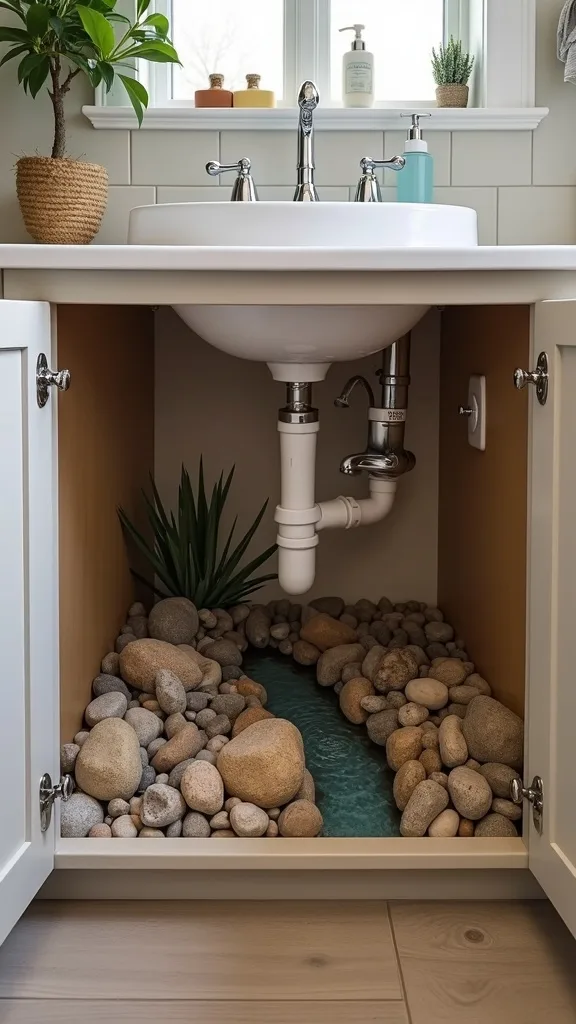
This post contains affiliate links. As an Amazon Associate, I earn from qualifying purchases at no extra cost to you.
Are you looking for a spring refresh that instantly makes your outdoor space feel more intentional without replanting everything? Do you want to stop mulch from washing into your lawn (or pool) every time a heavy rain hits?
I always start by choosing where river rock landscaping will do the most work: defining borders, protecting soil, and creating a clean visual “frame” around plants and hardscape. In this guide, I’m sharing step-by-step river rock landscaping ideas I use in real yards—flower beds, garden paths, pool surrounds, and even fireplace features—so you can copy the look in a weekend.
From my experience, this is perfect for homeowners who want a low-maintenance upgrade, renters who need a reversible solution (with landscape fabric), and anyone tackling spring landscaping season with a realistic budget.
I’ll walk you through my favourite combinations like river rock and mulch landscaping, modern black river rock landscaping accents, and simple rock garden landscaping layouts that still feel lush. I’ll also share where I’d spend a little more (edging and fabric) because it saves hours of cleanup later.
Below are 25 River Rock Landscaping Ideas that help you build natural, textured outdoor spaces with clear steps, smart measurements, and pro-level finishing touches.
1. Texture-First Zones: Beds, Borders, Pool Edges & Fireplace Accents
When I design this look, I lean into the exact visual theme I love most: river rock used in flower beds, garden borders, pool surrounds and fireplace features creating natural textured outdoor spaces. From my experience, the reason it works is simple—consistent texture ties separate outdoor “rooms” together even when plants are still waking up in spring.
I always start by mapping 4 zones with a hose or marking paint: a river rock flower bed (at least 3 ft x 6 ft), a border strip (4–6 inches wide), a pool-edge band (12–18 inches wide), and a fireplace apron (24–36 inches deep). Then I install landscape fabric with 6-inch overlaps and add 2 inches of 3/8–3/4-inch river rock for beds, bumping to 3 inches near high-splash pool areas.
I find that mixing 2 colors max (like tan river rock + charcoal accent stones) looks intentional; I often pair Vigoro landscape fabric, 8-inch steel edging, and a 5-gallon bucket for easy spreading.
Pro Tip: I always keep the same rock size across all 4 zones, then change only the edging (steel by beds, concrete pavers by pool) because size-matching prevents that “patchwork” look while still letting each area feel custom.
2. Crisp Garden Borders with 8-Inch Steel Edging
I find that a clean border is the fastest way to make river rock landscaping look professional, because it stops stones from migrating into grass after the first mow. In my opinion, steel edging is worth the extra cost upfront because it stays straight for years with minimal fuss.
I always start by cutting a shallow trench 3–4 inches deep and about 2 inches wide along the bed line. Then I set 8-inch tall steel edging (like COL-MET or similar) with stakes every 3–4 ft, keeping the top lip about 1/2 inch above soil so rocks don’t roll out. I add 2 inches of 3/4-inch river rock and rake it level with a landscape rake.
From my experience, warm-toned river rock (tan/cream) looks great against cedar mulch, while gray rock pairs well with modern concrete. I like using a rubber mallet, a 4-ft level, and landscape fabric with 6-inch overlaps under the rock.
Pro Tip: I always angle the edging slightly inward (about 5 degrees) before backfilling, because that tiny lean resists frost heave and keeps the border line crisp after spring temperature swings.
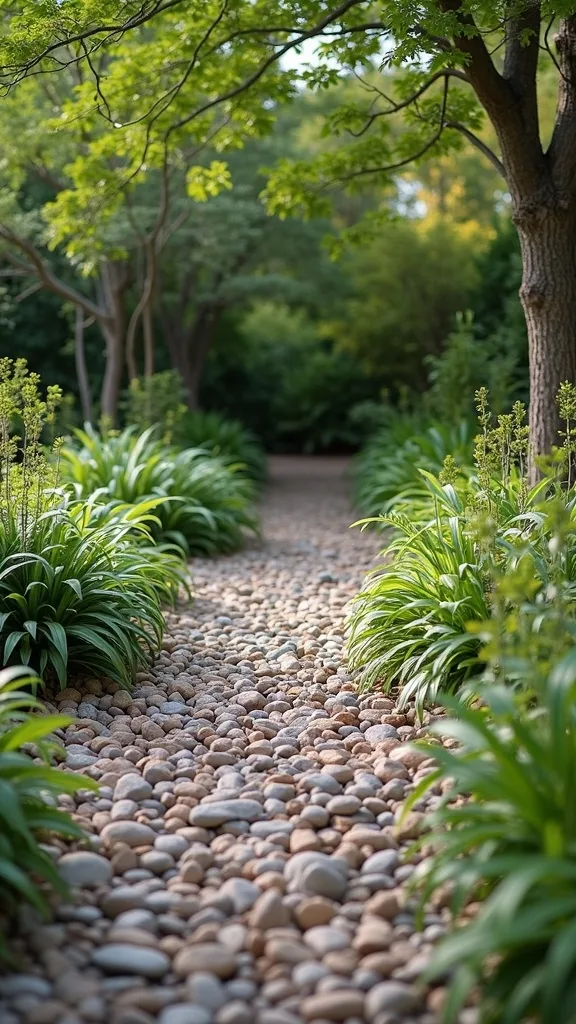
3. River Rock and Mulch Landscaping for Low-Weed Beds
From my experience, the most livable beds use both textures—mulch where plants need breathable coverage and river rock where you want durability and splash control. I find that river rock and mulch landscaping looks layered and intentional, especially in spring when perennials are still short.
I always start by dividing the bed into “plant zones” and “maintenance zones.” I keep mulch 2–3 inches deep within a 12-inch radius of plant crowns, then I place a 18–24-inch-wide river rock band along the bed edge or under drip lines where splashback happens. I install landscape fabric only under the rock band (not under mulch), overlapping fabric seams by 6 inches to reduce weeds.
In my opinion, shredded hardwood mulch (2 cu ft bags) plus 3/8-inch river rock gives the cleanest contrast; I also like using a hand tamper and a leaf blower on low to clear debris off stones.
Pro Tip: I always add a hidden “mulch stop” using a 1×4 cedar board buried so only 1/2 inch shows—this keeps mulch from migrating into the rock band during raking and makes spring cleanup noticeably faster.
4. Modern Black River Rock Landscaping as a Bold Accent Stripe
I’ve found that black river rock landscaping works like eyeliner for the yard—it sharpens edges and makes greenery look brighter without adding more plants. In my opinion, it’s especially effective in spring because fresh chartreuse growth pops against dark stone.
I always start with a narrow, repeatable shape: a 12-inch-wide stripe along a walkway or a 18-inch band at the base of a fence. I lay landscape fabric with 6-inch overlaps, then pour 2 inches of black Mexican beach pebbles (or polished black river stone) and rake until the surface is even. Typically, I keep the stripe at least 6 inches away from lawn edges so the mower doesn’t fling stones.
From my experience, black stone looks best next to light concrete, white gravel, or cedar mulch; I use 4-inch plastic paver edging or 8-inch steel edging to keep the line tight.
Pro Tip: I always rinse black stones with a hose for 2–3 minutes after install—dust can make them look gray at first, and a quick rinse reveals the true deep tone without needing any sealers.
5. River Rock Flower Bed Rings Around Trees (Without Root Damage)
I find that a river rock flower bed ring around a tree looks polished while reducing mower scuffs, but I always treat tree roots gently. From my experience, the “why it works” is that stone creates a clear no-mow zone and helps manage muddy splash during spring storms.
I always start by marking a circle at least 36–48 inches from the trunk (more if the tree is young and growing fast). I remove only 1–2 inches of turf—never deep digging—then I lay landscape fabric in 2 halves with a slit to fit around the trunk, keeping fabric 6 inches away from bark. I add 2 inches of 3/4-inch river rock and edge with 4-inch flexible paver edging.
In my opinion, tan river rock or mixed gray works better than bright white near trees because it hides leaf litter; I keep a 5-gallon bucket nearby to scoop out stones if I need to adjust the ring.
Pro Tip: I always leave a “breathing moat” of bare soil 6–8 inches wide around the trunk—stones piled to the bark can trap moisture and invite rot, and this small gap prevents that while still looking finished.
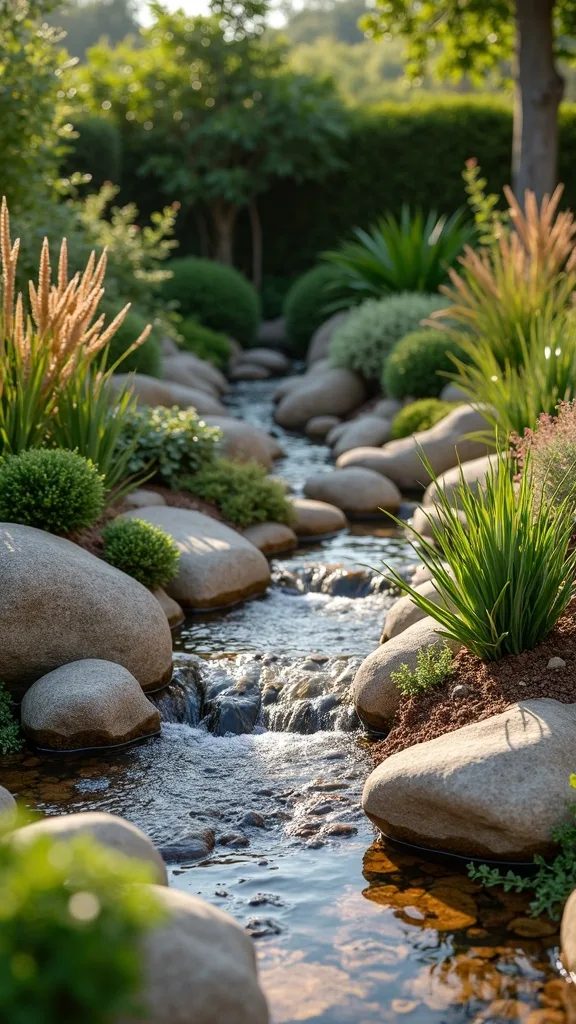
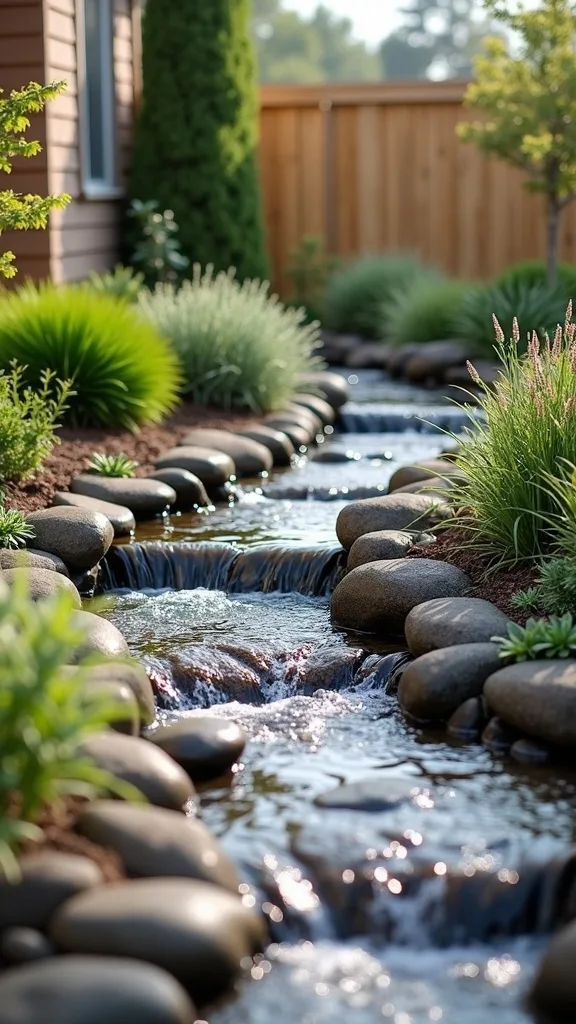
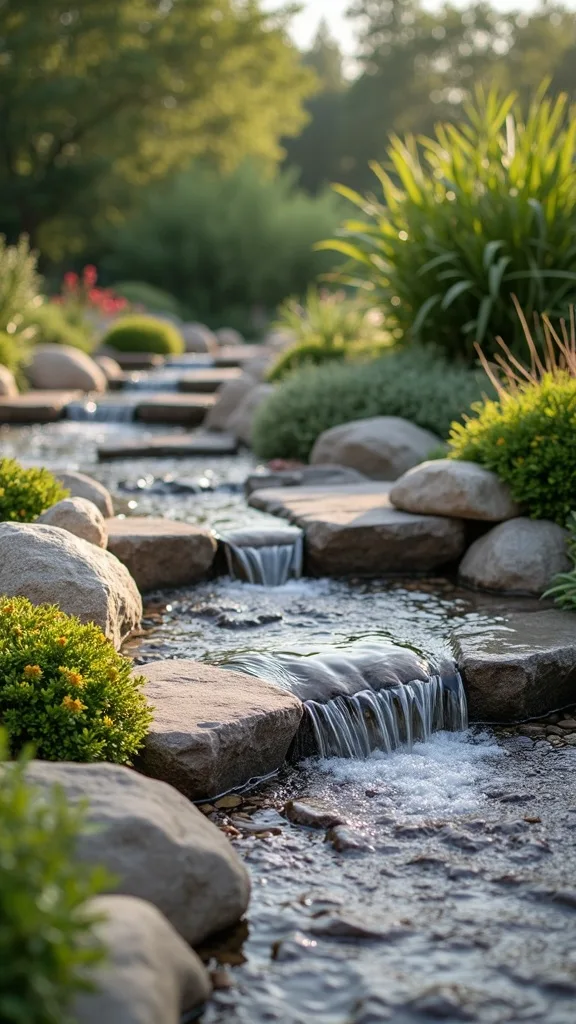
6. Dry Creek Bed for Spring Drainage Control
From my experience, a dry creek bed is one of the most satisfying river rock landscaping ideas because it solves a real problem—water flow—while looking like a natural feature. I find that it’s ideal in spring when runoff is heavy and lawns get soggy.
I always start by watching where water travels during a 10–15 minute rain (or a hose test), then I mark a channel 12–24 inches wide. I dig 4–6 inches deep with a flat shovel, slope it slightly away from structures, and line it with landscape fabric with 6-inch overlaps. I place 2–3 inches of 1–2-inch river rock on top, then add a few larger 3–5-inch stones as “boulders” to make it look natural.
I recommend using gray mixed river rock for a creek look; I also keep a hand tamper to firm the base so stones don’t settle unevenly.
Pro Tip: I always bury a 4-inch perforated drain pipe under the deepest section for 6–10 ft if water volume is high—nobody sees it, but it dramatically reduces standing water after big spring downpours.
7. Rock Garden Landscaping Pocket Beds for Drought-Tolerant Plants
I’ve found that rock garden landscaping feels effortless when I build “pockets” of soil surrounded by river rock, because plants look intentional instead of scattered. In my opinion, spring is the perfect time to set these up since roots establish before summer heat.
I always start with a 4 ft x 8 ft area and plan 5–7 planting pockets, each about 12–16 inches wide. I excavate 3–4 inches, lay landscape fabric, then cut X-shapes where pockets go so plants can access soil. I spread 2 inches of 3/8–3/4-inch river rock, then plant sedum, lavender, or dwarf grasses, keeping each plant 10–14 inches apart for airflow.
From my experience, a mix of gray river rock with a few black accent stones looks modern; I like using a hori-hori garden knife, compost (1 bag per 10 sq ft), and drip emitters (1 gallon per hour) for consistent watering.
Pro Tip: I always top the soil inside each pocket with a 1/2-inch layer of pea gravel before the river rock—this prevents soil from splashing onto the stones and keeps the rock surface cleaner all season.
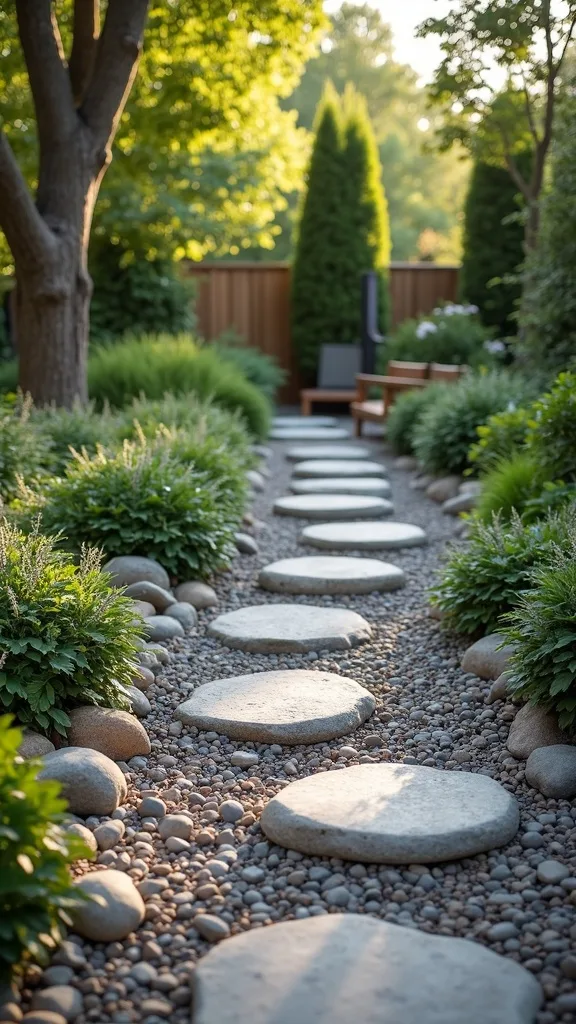
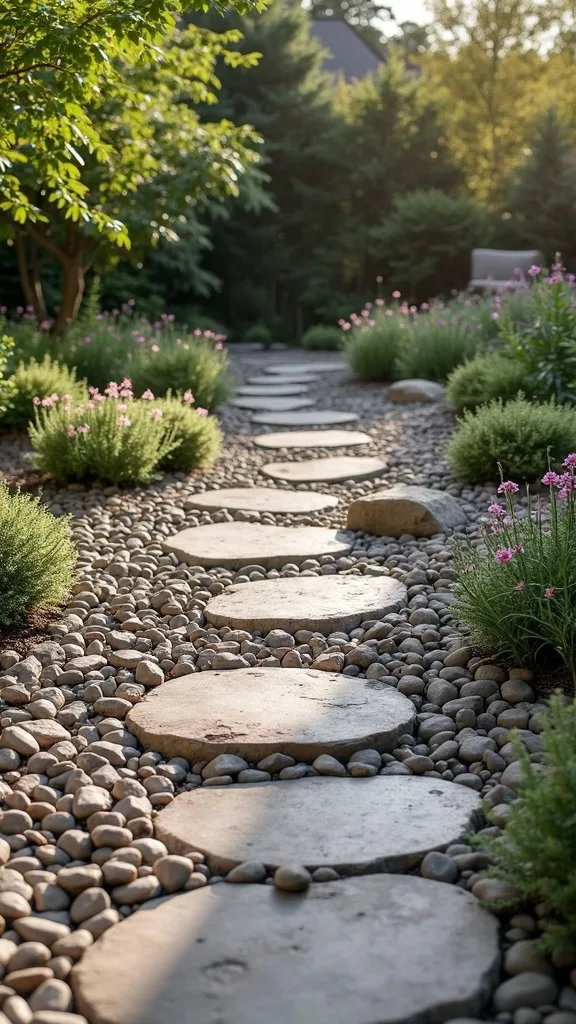
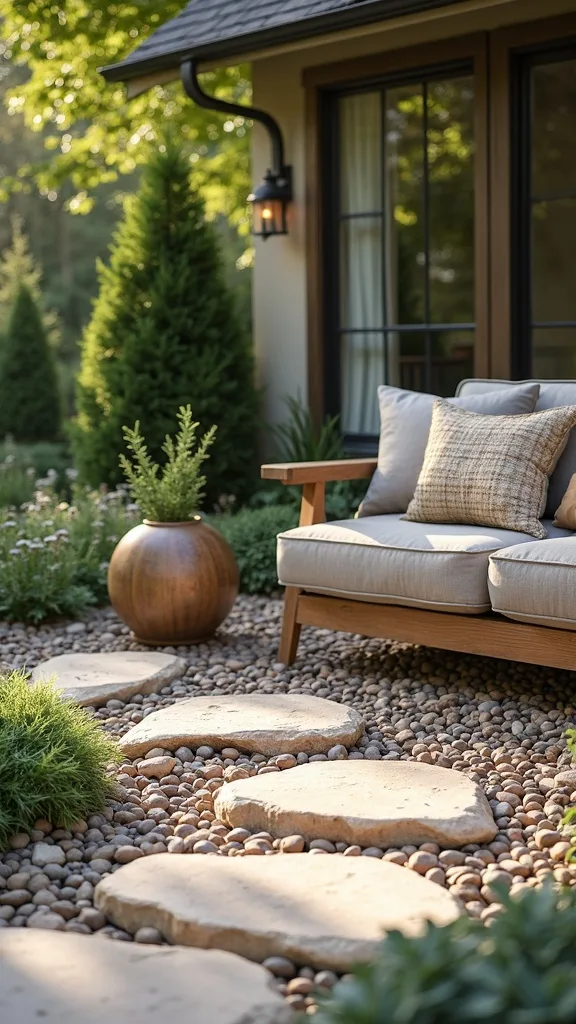
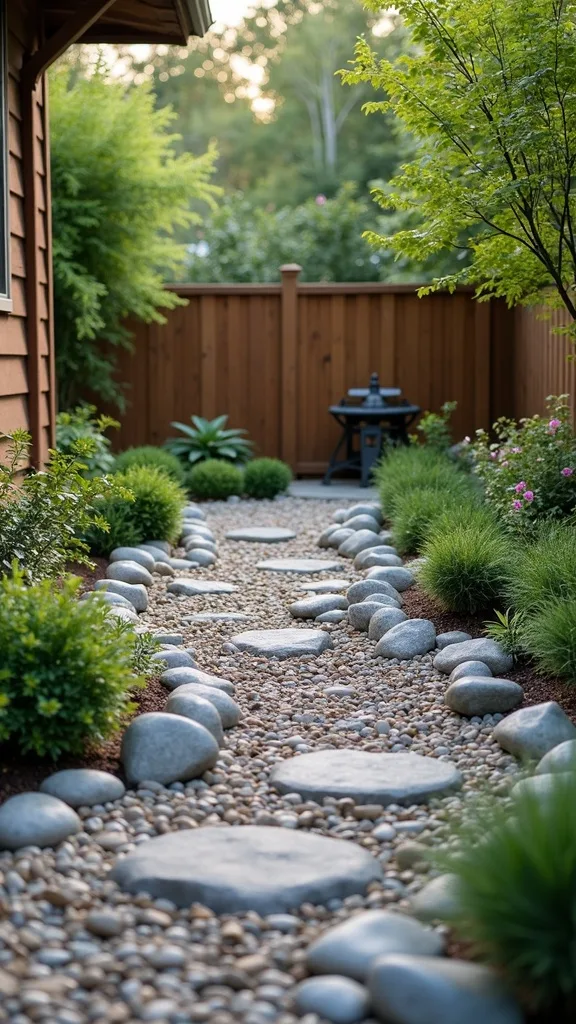
8. River Rock Garden Path with Stepping Stones (No Concrete Needed)
I find that a river rock garden path feels like a mini retreat, and it’s a practical way to keep shoes clean during spring mud season. From my experience, pairing stepping stones with river rock gives traction without the commitment of poured concrete.
I always start by laying out a path 30–36 inches wide using a garden hose. I excavate 3–4 inches, compact the soil with a hand tamper, and add landscape fabric with 6-inch overlaps. Then I place 18×18-inch concrete stepping stones about 18–24 inches apart (heel-to-toe comfortable), and I fill around them with 2 inches of 3/8-inch river rock, raking it level.
I recommend using a mid-tone gray rock because it hides dirt; I also keep a rubber mallet and a 2-ft level to seat each stone flat so it doesn’t wobble.
Pro Tip: I always set stepping stones on small “pads” of paver base (about 1 inch thick) under each stone—this prevents sinking after heavy spring rains and keeps the tops aligned even when the surrounding rock shifts slightly.
Cost & Materials Estimate
For the majority of outdoor spaces, I typically see a river rock landscaping refresh land between $150 and $1,200 depending on square footage, edging choice, and rock size.
| Item | Estimated Cost | Where to Buy |
|---|---|---|
| 0.5 cu ft bags of river rock (10–25 bags) | $6–$12 each ($60–$300 total) | Home Depot / Lowe’s |
| Landscape fabric roll (3 ft x 50 ft) | $18–$35 | Amazon / Home Depot |
| Edging (steel 8 ft sections or 4 in plastic edging, 20–60 ft) | $45–$220 | Home Depot / Lowe’s |
| Landscape pins/staples (100-pack) | $9–$18 | Amazon / Home Depot |
| Paver base (40–50 lb bags, 2–8 bags for paths/aprons) | $7–$12 each ($14–$96 total) | Lowe’s / Home Depot |
Total estimated cost: $150–$1,200 I always recommend saving money by using bagged rock for small zones and splurging on sturdy edging because it prevents years of spillover and rework.
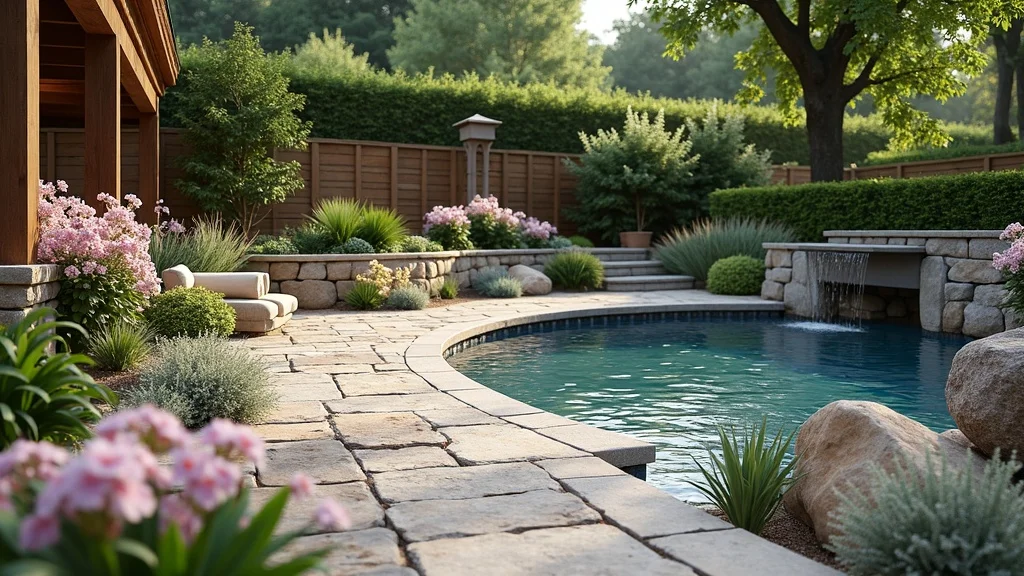
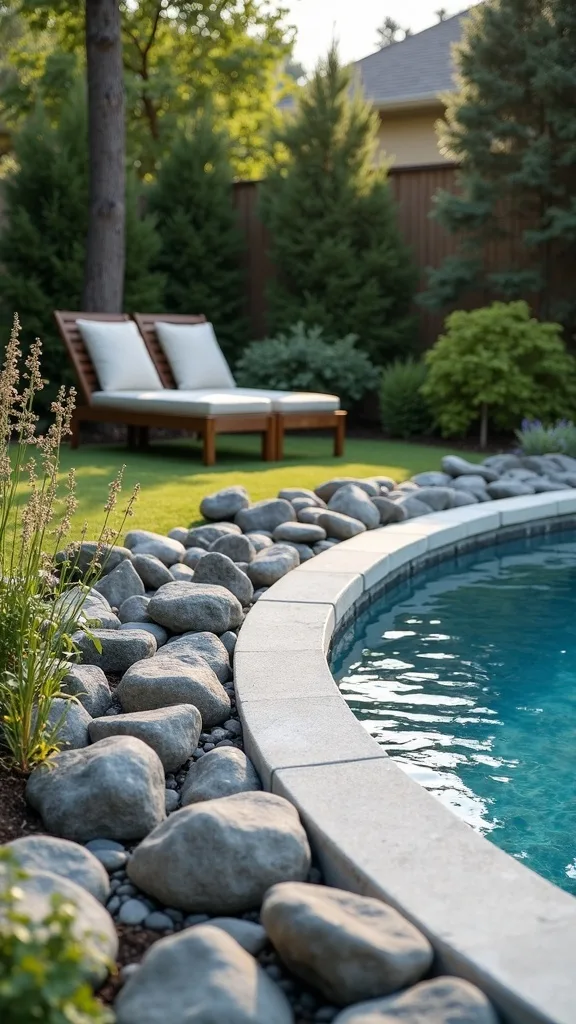
9. River Rock Around Pool for a Clean, Splash-Resistant Border
When I design pool landscaping, I find that river rock around pool areas looks resort-like while solving the constant problem of mulch and soil splashing onto decking. From my experience, the key is choosing a rock size that won’t stick to wet feet.
I always start by creating a 12–18-inch-wide band around the pool fence line or at the edge of planting beds near the deck. I install landscape fabric with 6-inch overlaps, then add 3 inches of smooth 1–2-inch river rock so it’s comfortable and less likely to track. Typically, I keep the rock band 6 inches away from the pool coping to avoid stones dropping into the water during maintenance.
I recommend rounded river stones over crushed rock for comfort; I also like using 4-inch paver edging and a leaf blower on low to keep debris off the stones.
Pro Tip: I always place a hidden strip of 1/4-inch hardware cloth under the fabric at the deck edge for 2–3 ft sections—this discourages moles from tunneling up into the rock band, which can otherwise create annoying dips right where you walk barefoot.
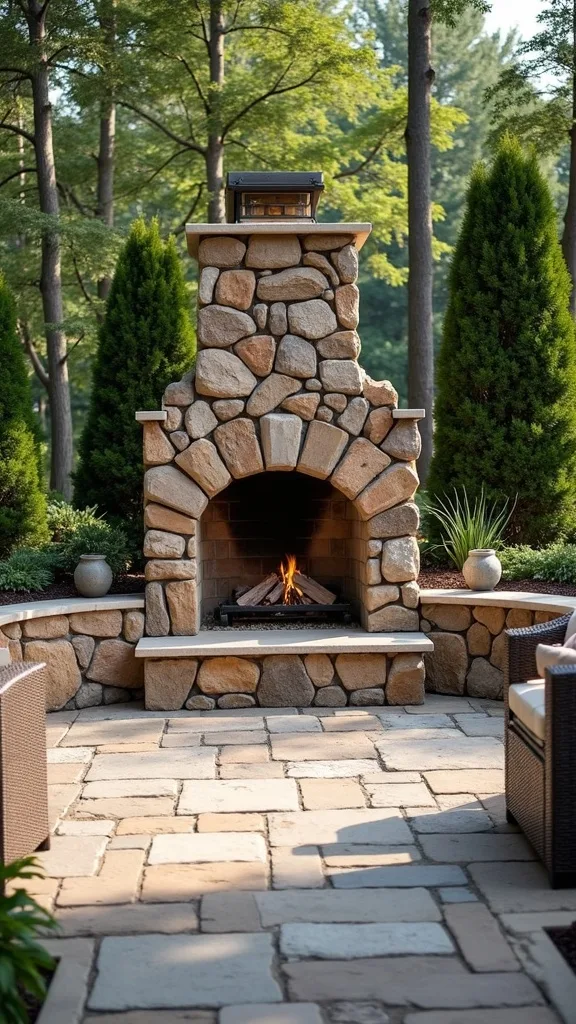
10. Fireplace Feature: River Rock Fireplace Apron Outdoors
I’ve found that an outdoor river rock fireplace apron instantly makes a fire feature feel grounded and safe, especially in spring when yards are still a bit patchy. In my opinion, stone underfoot also reduces the mess of ash and stray embers compared to mulch.
I always start by measuring a safety zone: at least 36 inches out from the fireplace opening and 24 inches on each side (check your local fire code too). I excavate 4 inches, add 2 inches of compacted paver base, then lay landscape fabric and top with 2 inches of 1–2-inch river rock. If the fireplace is gas, I still keep the apron because it protects surrounding plants from heat and foot traffic.
From my experience, gray river rock hides soot better than white; I like adding a border of 4×8-inch concrete pavers to keep the stones contained.
Pro Tip: I always use a darker “soot zone” band—about 12 inches wide—closest to the fireplace made from charcoal river rock, because it disguises inevitable discoloration and keeps the apron looking intentional after multiple fires.
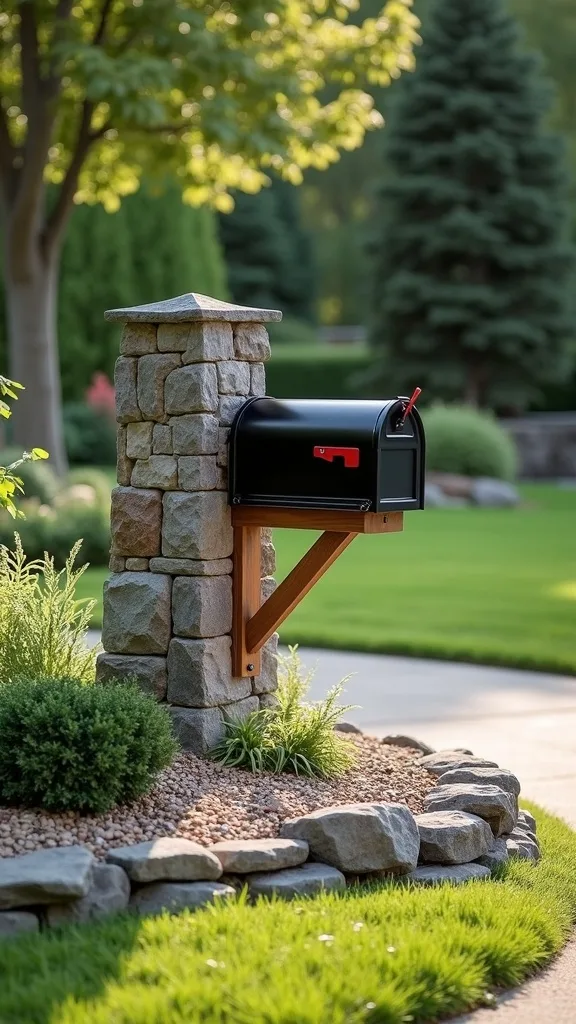
11. Mailbox or Post Base Rock Collar for Easy Trimming
I find that a small rock collar around a mailbox post or pergola post is one of those tiny river rock landscaping ideas that saves time every week. From my experience, it reduces weed whacking and prevents mulch from piling up against wood.
I always start by marking a 24–30-inch circle around the post, then I remove 1–2 inches of turf. I place landscape fabric with a slit cut to fit around the post, keeping the fabric seam overlapped by 6 inches. Then I add 2 inches of 3/4-inch river rock and edge it with 4-inch flexible paver edging so stones don’t scatter.
I recommend using mid-tone mixed river rock because it hides grass clippings; I keep a small hand rake and a 1-gallon pump sprayer for spot-treating weeds at the edges.
Pro Tip: I always leave a 1-inch gap between the rock and any wood post, then fill that gap with coarse sand—this keeps moisture from sitting against the wood while still looking seamless from a standing distance.
12. Downspout Splash Pad with River Rock to Prevent Erosion
From my experience, a downspout splash pad is where river rock landscaping pays for itself, because it stops those ugly muddy craters that show up after 2–3 spring storms. I find that it’s also a great “starter project” if you want a quick win.
I always start by extending the downspout so water exits at least 4–6 ft from the foundation (a flexible extender works). Then I dig a pad about 24 inches wide by 36 inches long and 4 inches deep, line it with landscape fabric, and fill with 3 inches of 1–2-inch river rock. If the area stays wet, I add 1 inch of paver base under the fabric for stability.
I recommend using larger, heavier stones here because they don’t wash away as easily; I like gray or tan rock since it looks natural against soil.
Pro Tip: I always tuck a flat stepping stone under the downspout exit before adding rock—water hits the stone first, spreads out, and dramatically reduces the “divot” effect that can happen even with heavy river rock.
13. Raised Planter Top-Dress with River Rock for a Clean Finish
I find that topping raised planters with river rock makes them look intentional and keeps soil from splashing onto decks during watering. In my opinion, it’s especially helpful in spring when I’m watering more often to establish new plants.
I always start by leaving 2 inches of headspace at the top of the planter when I fill with soil. Then I add a 1–1.5-inch layer of small 3/8-inch river rock as a top-dress, keeping stones 1 inch away from tender stems. Typically, I do this on planters that are at least 12 inches deep so roots have room and the rock layer doesn’t steal too much volume.
From my experience, smooth mixed river rock looks great with black metal planters; I keep a small scoop, gloves, and a handheld broom to catch stray stones on the deck.
Pro Tip: I always switch to drip irrigation (1 gallon per hour emitters) when I top-dress with rock—overhead watering can bounce off stones and miss the root zone, while drip keeps moisture consistent and reduces fungus risk.

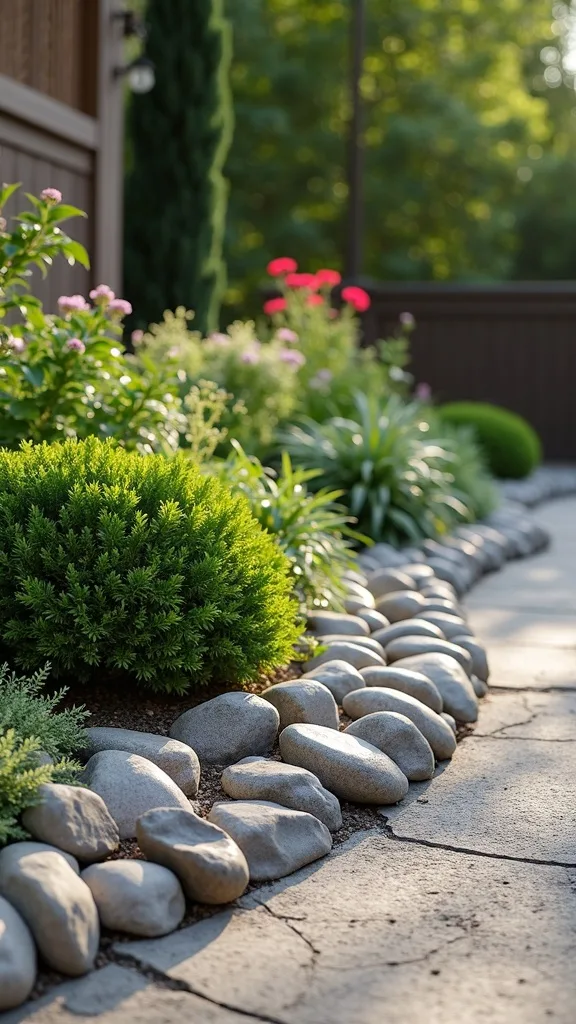
14. River Rock Flower Bed Edge as a “No-Splash” Plant Protector
I’ve found that a narrow river rock edge inside a flower bed keeps delicate plants cleaner, because soil doesn’t splash onto leaves during spring rains. In my opinion, it’s one of the easiest ways to make a bed look maintained even before everything fills in.
I always start by creating a 8–12-inch-wide inner border along the front of the bed, about 2 inches lower than the surrounding soil. I lay landscape fabric in that strip only, overlapping seams by 6 inches, then I add 2 inches of 3/8-inch river rock. Typically, I keep this rock edge at least 4 inches away from plant crowns to avoid trapping moisture.
I recommend pairing the rock edge with dark shredded mulch behind it for contrast; I like using a half-moon edger, a hand rake, and a 5-gallon bucket for quick touch-ups.
Pro Tip: I always curve the inner rock edge slightly tighter than the outer bed line—this creates a subtle “shadow line” that makes the bed look deeper and more designed, even if you only planted 3–5 perennials.
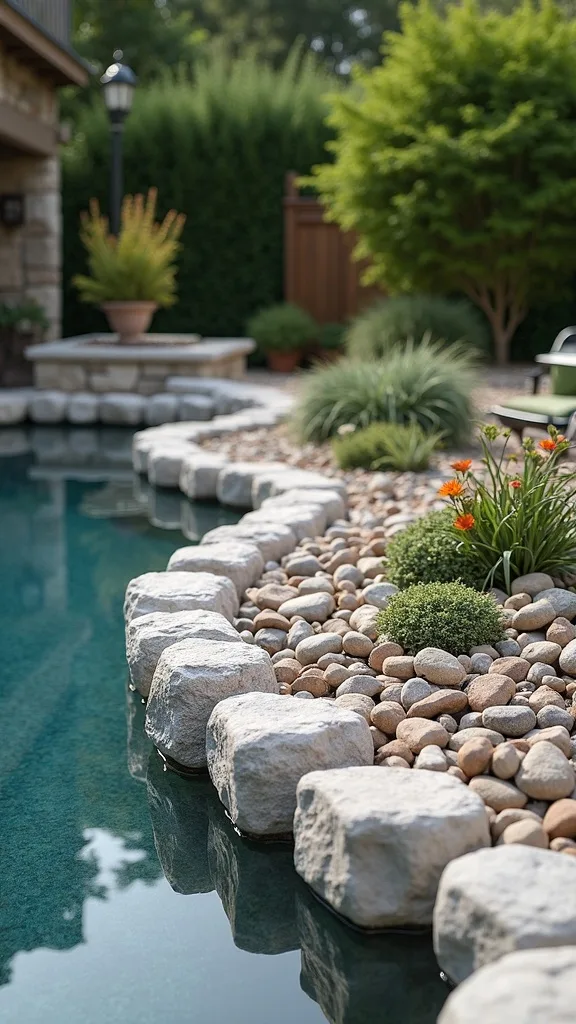
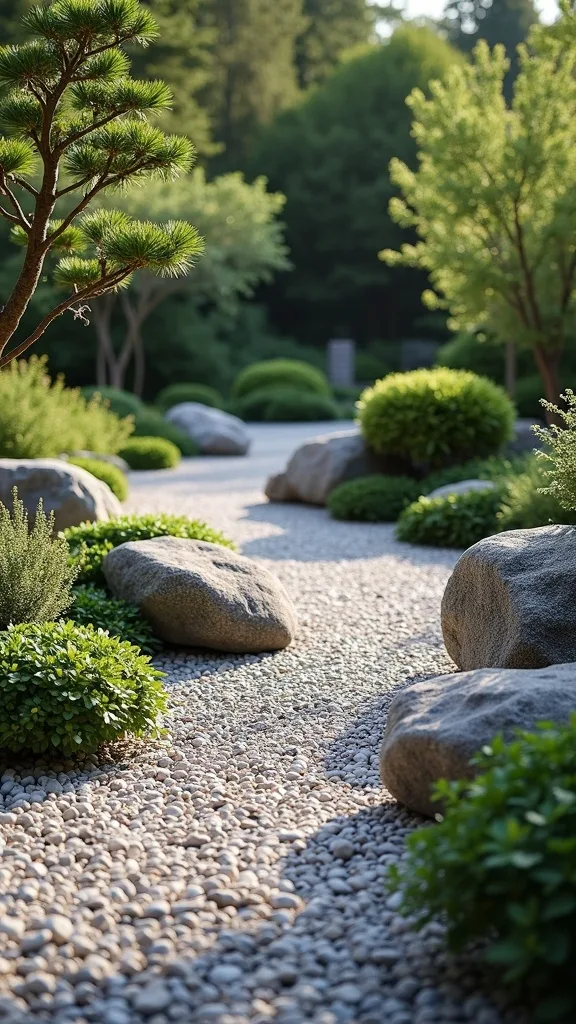
15. Boulder + River Rock Focal Point for a Natural Corner Feature
From my experience, a single boulder surrounded by river rock creates a focal point that feels like it’s always been there, which is perfect for awkward corners. I find that it’s a smart alternative to buying a large shrub that might struggle in poor soil.
I always start by choosing one boulder in the 16–24-inch range (small enough to place, big enough to matter). I set it by digging a cradle so 1/3 of the boulder sits below grade—usually 4–6 inches—then I backfill tightly. Around it, I spread a 3 ft x 3 ft field of 2 inches of mixed 3/4-inch river rock, with landscape fabric underneath and 6-inch overlaps.
In my opinion, gray boulders look cohesive with gray river rock; I’ll add 2–3 drought-tolerant plants like blue fescue spaced 12 inches apart for softness.
Pro Tip: I always rotate the boulder until its “best face” tilts slightly toward the main viewing angle (like your patio chair) because the rock’s grain and shadows read dramatically different depending on the tilt.

16. Patio Perimeter Rock Trench to Stop Mud Splash
I find that a narrow river rock trench around patios is a quiet hero—less mud on pavers, fewer weeds at the edge, and a cleaner transition into the yard. From my experience, it’s especially noticeable in spring when soil is soft and splashy.
I always start by digging a trench 6–8 inches wide and 3–4 inches deep along the patio edge. I lay landscape fabric with 6-inch overlaps, then I add 2–3 inches of 3/4-inch river rock and rake it level. Typically, I keep the top of the rock about 1/2 inch below the patio surface so stones don’t roll onto seating areas.
I recommend gray or tan river rock depending on your pavers; I also like adding a line of 4-inch plastic edging on the lawn side if the trench borders grass.
Pro Tip: I always pitch the trench slightly away from the patio—about 1/4 inch drop per foot—because it encourages water to drain into the yard instead of pooling against the paver edge and loosening the base over time.
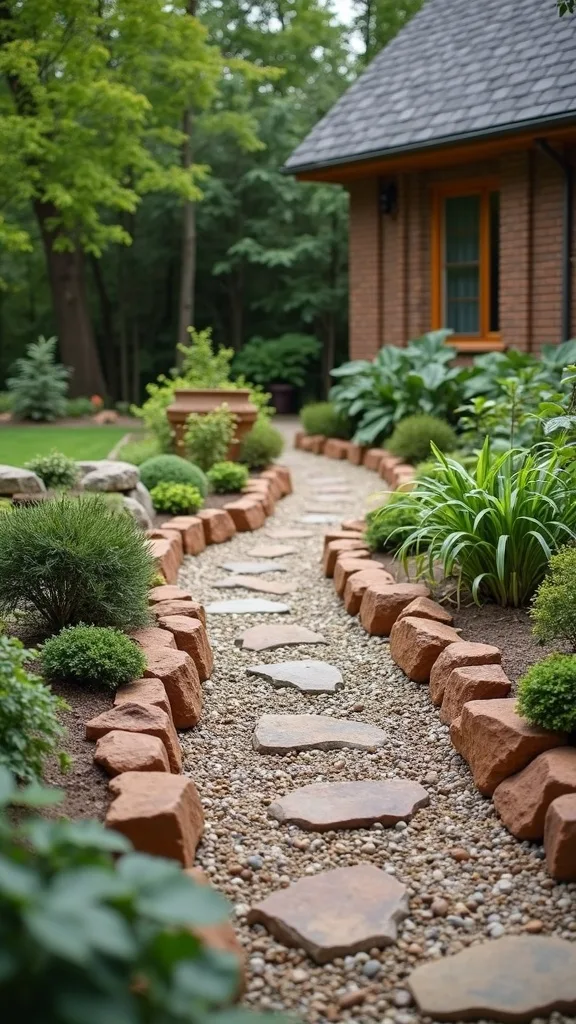
17. Cottage-Style River Rock Garden Border with Brick Soldiers
When I design a cottage look, I find that brick “soldiers” (bricks set on edge) plus river rock feels timeless and tidy. From my experience, it’s a great compromise: brick gives structure, and river rock adds natural texture.
I always start by setting a single row of standard bricks (about 8 inches long) on edge in a 4-inch-deep trench, using paver base under them for stability. Then I fill the bed side with a 6–10-inch-wide strip of 2 inches of 3/8-inch river rock, keeping the rest of the bed mulched at 2–3 inches. Typically, I space brick joints tight (1/8–1/4 inch) so the line reads clean.
I recommend warm red brick with tan river rock; I use a rubber mallet, mason line, and polymeric sand to lock the bricks in place.
Pro Tip: I always run a bead of exterior construction adhesive on the hidden sides of the first and last brick in each straight run—those end bricks are the first to wobble after freeze-thaw, and this small step keeps the border looking crisp.
18. Zen-Inspired River Rock Garden with Raked Patterns
I’ve found that a small Zen-style river rock garden brings calm to a patio corner, and it’s surprisingly doable with simple tools. In my opinion, spring is ideal because you can set it up before outdoor entertaining starts.
I always start with a contained rectangle, like 4 ft x 6 ft, framed with 4×4 cedar or steel edging. I lay landscape fabric with 6-inch overlaps, add 2 inches of small 3/8-inch river rock, and place 3 larger stones (6–10 inches each) as focal points. Then I use a wide landscape rake to pull gentle curves and lines, re-raking in 10 minutes whenever it gets disturbed.
I recommend sticking to one rock color family (gray or tan) for a calmer look; I also keep a leaf blower nearby to remove petals without messing up the patterns.
Pro Tip: I always mist the rock lightly with water before raking—slightly damp stones hold crisp rake lines longer, especially in breezy spring weather when dry pebbles tend to shift back into place.
19. River Rock “Moat” Around Raised Beds to Reduce Rot and Weeds
From my experience, a river rock moat around raised beds keeps wood drier and makes weeding feel less endless. I find that it also creates a clean walking strip that doesn’t turn into mud after watering.
I always start by leaving a 12–18-inch gap between the raised bed wall and the lawn or fence line. I excavate 3–4 inches, lay landscape fabric with 6-inch overlaps, and fill with 2–3 inches of 3/4-inch river rock. Typically, I keep the rock level 1 inch below the top of the surrounding soil so it doesn’t spill into grass.
I recommend using heavier 3/4-inch stones here because foot traffic can scatter smaller pebbles; I also like adding 16×16-inch stepping stones every 3–4 ft if you’ll be carrying watering cans.
Pro Tip: I always set a narrow strip of copper mesh at the bed edge under the rock for 6–8 ft runs—slugs dislike crossing it, and it’s a discreet way to protect spring seedlings without visible pellets.
20. Slope-Safe River Rock Bed with Hidden Grid Support
I find that river rock on a slope can look incredible, but it needs extra support so it doesn’t creep downhill over time. From my experience, the “why” is gravity plus rain—spring storms will move loose stones faster than you expect.
I always start by limiting the slope application to areas under about a 3:1 grade (roughly a 33% slope) for easier maintenance. I excavate 3–4 inches, install landscape fabric with 6-inch overlaps, then add a gravel stabilization grid (like a 2-inch-deep honeycomb panel) pinned with 6-inch landscape spikes every 2–3 ft. Then I fill the grid with 2 inches of 3/4-inch river rock and rake it smooth.
I recommend using mixed gray stone because it hides minor movement; I use a trenching shovel, landscape pins, and work gloves rated for abrasion.
Pro Tip: I always end the slope bed with a “catch curb” of buried pavers at the bottom—set 2 inches proud—because it stops the slow downhill creep and gives you a clean line to sweep against.

21. River Rock Around Outdoor Furniture Legs to Prevent Sinking
In my opinion, nothing ruins spring patio season faster than chair legs sinking into soft soil, and I’ve found river rock solves it in a way that still looks natural. I find that this idea fits the outdoor-furniture category perfectly because it protects your seating zone.
I always start by defining a small pad where the furniture sits—typically 6 ft x 8 ft for a bistro set or 10 ft x 12 ft for a lounge area. I excavate 3–4 inches, compact the soil, lay landscape fabric with 6-inch overlaps, and add 2–3 inches of 3/4-inch river rock. If I’m placing a fire pit table, I keep a 24-inch clearance ring around it for safe movement.
I recommend using smooth, rounded stones for barefoot comfort; I also like adding 16×16-inch pavers under the front two legs of heavier chairs for extra stability.
Pro Tip: I always place furniture on the rock pad for 48 hours, then lift and re-level—stones settle under weight, and that second-day tweak prevents the subtle wobble that shows up after your first long outdoor dinner.
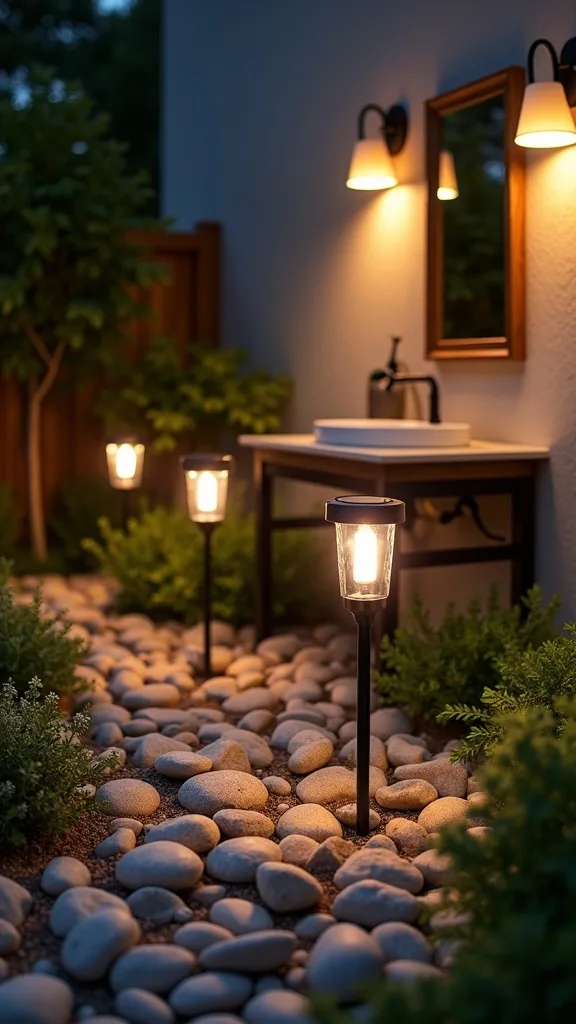
22. River Rock Garden Border Lighting with Solar Stakes
I find that adding soft light is what turns river rock landscaping from “nice” to actually usable at night, especially in spring when evenings are cool and inviting. From my experience, solar stake lights are the easiest entry point because there’s no wiring trench.
I always start by placing lights 6–8 ft apart along a river rock border, keeping them 4 inches inside the edging so they don’t get bumped by mowers. I choose warm white light (2700K–3000K — the cosy, yellowish tone you see in most homes) so the stones look natural, not harsh. Typically, I install 8–12 lights for a 50–70 ft run, depending on how bright the fixtures are.
I recommend weather-rated solar lights with metal stakes and clear lenses; I keep a cordless drill (for pilot holes in hard soil) and a tape measure to keep spacing consistent.
Pro Tip: I always tilt solar heads 10–15 degrees toward the rock surface, not straight up—this “grazing” angle highlights texture and hides the fixture itself, which makes the border look more high-end.
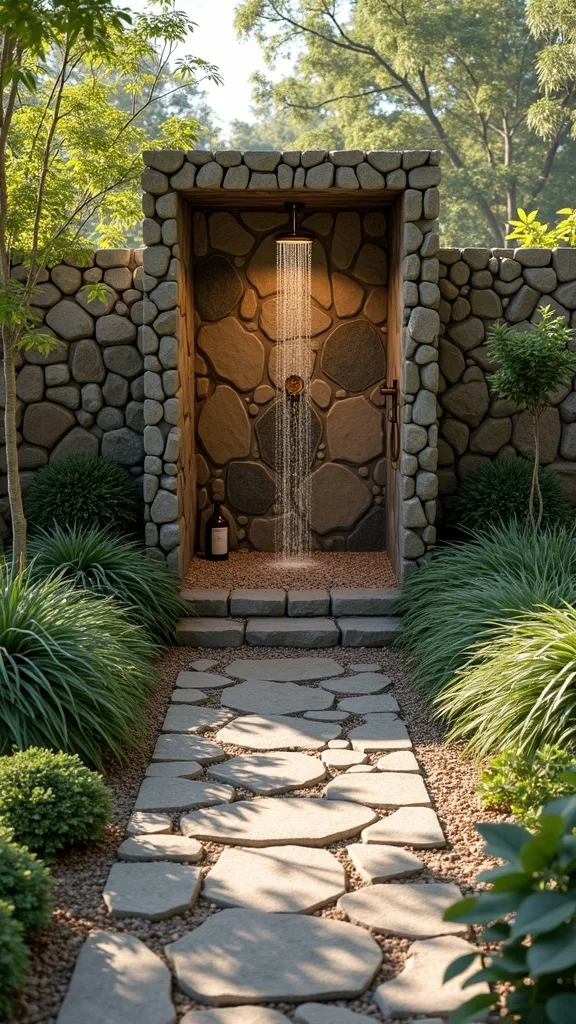
23. River Rock Shower Ideas for an Outdoor Rinse Zone
When I tried setting up an outdoor rinse spot, I found that river rock shower ideas are both practical and surprisingly stylish—especially near a pool or garden. In my opinion, smooth stones underfoot feel spa-like, but I always plan for drainage first.
I always start with a base at least 36 inches x 36 inches and dig 6–8 inches deep. I add 3 inches of paver base, then 2 inches of drainage gravel, and top with 2 inches of smooth 1–2-inch river rock; typically, I keep the surface slightly crowned so water runs off instead of pooling. If I’m using a freestanding outdoor shower, I anchor it to a 16×16-inch concrete paver so it doesn’t wobble.
I recommend using rounded river stones (not sharp gravel) and a simple teak mat nearby for comfort; I also like a handheld sprayer with a quick-connect hose fitting.
Pro Tip: I always install a hidden “sock” filter (a mesh sleeve) over the drain outlet or dry well inlet—river rock traps hair and debris, and that removable sleeve saves you from digging up the base later.
24. Pet-Friendly River Rock Run (With Paw-Safe Stone Size)
I’ve found that river rock can work for pet zones if I choose the right size and keep it contained, because muddy paws in spring are a real struggle. In my opinion, the goal is a surface that drains fast but doesn’t hurt paws.
I always start with a defined run—like 3 ft x 12 ft along a fence—and I excavate 3–4 inches. I lay landscape fabric with 6-inch overlaps, then I add 2 inches of smooth 1–2-inch river rock (I avoid sharp crushed stone). Typically, I add a 12-inch-wide strip of artificial turf or a rubber pet mat at the entry point so pets transition comfortably.
I recommend mid-tone stones that hide dirt; I keep a scoop shovel and a hose nearby for quick rinses, and I use 4-inch edging to keep rocks from spreading into grass.
Pro Tip: I always test the rock temperature on a sunny day—if it’s too hot for my hand after 10 seconds, I add a shade sail or switch to lighter-colored stones, because dark rock can heat up quickly and make the area unusable for pets.
25. Spring Refresh Checklist: Re-Edging, Top-Up, and Clean in One Afternoon
I find that river rock landscaping looks its best when I treat spring like a reset button—quick, focused maintenance beats a full redo. From my experience, most yards only need a top-up and a clean, not a complete replacement.
I always start by spending 30 minutes re-edging: I tap edging back into place, reset any pavers, and pull stones back into the bed with a bow rake. Then I top up thin spots with 1–2 extra bags (0.5 cu ft each) per 10 sq ft to bring coverage back to 2 inches. Finally, I blow off leaves and petals using a leaf blower on low for 10–15 minutes, and I spot-treat weeds with a pump sprayer instead of disturbing the whole bed.
I recommend keeping spare fabric pins, a small hand rake, and one matching bag of rock in storage so repairs take 5 minutes, not a full Saturday.
Pro Tip: I always do the final blow-off when the rocks are dry (usually the next afternoon after rain), because wet stones grab debris and you’ll end up chasing leaf bits—dry rock releases mess fast and keeps your spring refresh truly “one-and-done.”
Final Thoughts
I always remind myself that spring landscaping season isn’t about doing everything at once—it’s about choosing 1–2 high-impact zones and finishing them cleanly. From my experience, river rock landscaping looks the most natural when I repeat the same stone size in multiple spots, then vary only the borders, plant shapes, or accent colors.
I find that the biggest payoff comes from doing the unglamorous steps well: 6-inch fabric overlaps, solid edging, and the right depth (usually 2 inches, or 3 inches in splash zones). Typically, that little bit of extra prep costs more upfront, but it saves hours of sweeping, weeding, and re-leveling later.
When you’re ready, I recommend picking one idea from the list—like a downspout splash pad or a crisp border—buying the rock for that single area, and finishing it in one afternoon. I’ve found that once you see how much cleaner your outdoor space feels, the next zone becomes a fun project instead of a chore.
What I’d Do Differently
When I first tried this, I made a very specific mistake: I skipped edging on a 10 ft border because I thought the river rock was “heavy enough” to stay put. Within 2 weeks of mowing and one spring thunderstorm, I had stones scattered into the grass and a weird, wavy bed line that looked messy from the curb. The fix wasn’t complicated, but it was annoying—I had to rake everything back, lift the rock, and install 4-inch flexible paver edging anyway. From my experience, river rock landscaping only looks clean when something physically stops the stones, especially where lawn meets rock.
I also wish I’d known how much rock depth matters: 1 inch looks okay on day one, but it tends to show fabric and bald spots fast, while 2 inches stays visually full for the majority of spaces. In my opinion, the smartest approach is to start with one small zone (like a 24×36-inch downspout pad), nail the layering, and then scale up with confidence—pick your first spot and start this weekend.
Products I Recommend for This Project
Here are some of my favourite products to help you bring these ideas to life:
- Vigoro Premium Weed Control Landscape Fabric (3 ft x 50 ft) — I like it because it’s easy to cut cleanly and holds up well under 2–3 inches of stone.
- COL-MET Steel Landscape Edging (4 in x 20 ft kit) — I recommend it when I want crisp, long-lasting borders that don’t buckle after spring rains.
- Gardzen 6-Inch Landscape Staples (100-Pack) — I use these to pin fabric every 12–18 inches so it doesn’t shift while I spread rock.
- BLACK+DECKER 3-in-1 Electric Leaf Blower/Vac/Mulcher (BV6000) — I find it’s perfect on low power for clearing petals and leaves off river rock without blasting stones everywhere.
- Hooyman Landscape Bow Rake (14-Inch) — I always reach for a bow rake to level rock to a consistent 2-inch depth and pull stones back into borders fast.