This post contains affiliate links. As an Amazon Associate, I earn from qualifying purchases at no extra cost to you.
Are you looking for vintage bathroom ideas that feel collected and sophisticated rather than themed? Do you want a retro bathroom that still functions like a modern, summer-ready space—cool, bright, and easy to clean?
I always start by deciding what’s truly worth restoring (the pieces with soul) and what should be quietly upgraded (the parts that prevent leaks, mold, and daily frustration). In this article, I’m sharing my go-to restoration moves plus styling choices that deliver an antique bathroom mood without sacrificing comfort.
In my opinion, this is perfect for anyone renovating during summer—when dry weather helps paint and grout cure within 24–72 hours, and when you can live with a bathroom “in progress” for a few weekends.
From my experience, the most convincing rooms pair one hero surface—like a penny tile bathroom floor—with believable metals, warm wood, and lighting that flatters skin. I’ll walk you through polished nickel, pedestal sinks, vintage fixtures, and the little details (like switch plates and towel bars) that make the whole thing feel intentional.
I always recommend reading through once, then choosing 5–7 ideas that suit your layout and budget. Below are 25 Vintage Bathroom Restoration & Retro Ideas that…
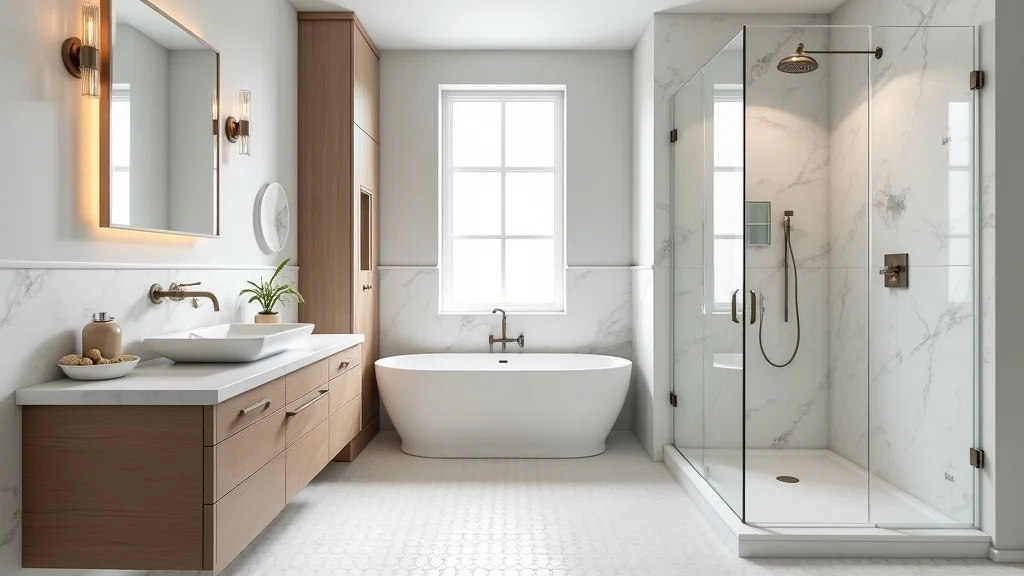
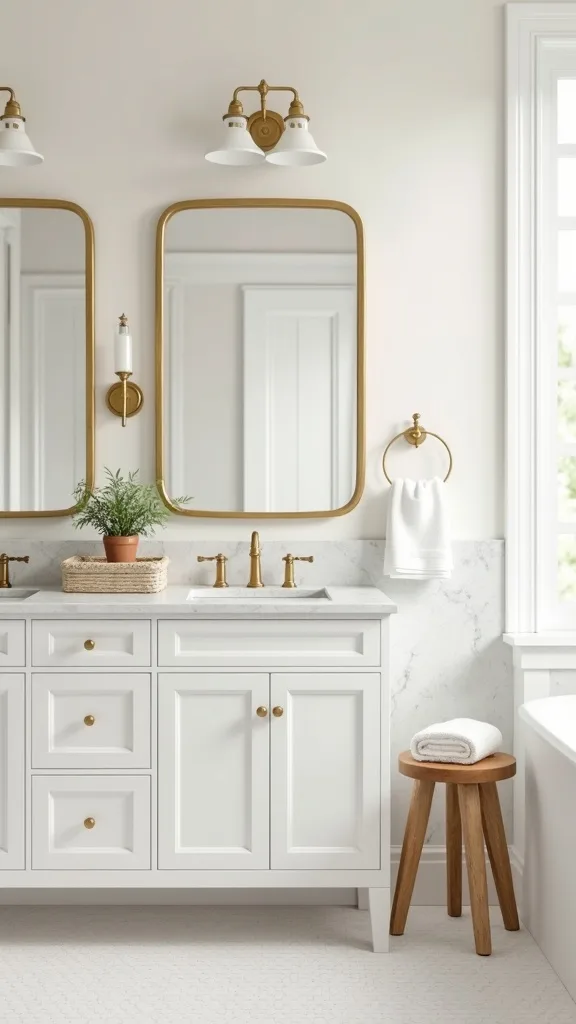
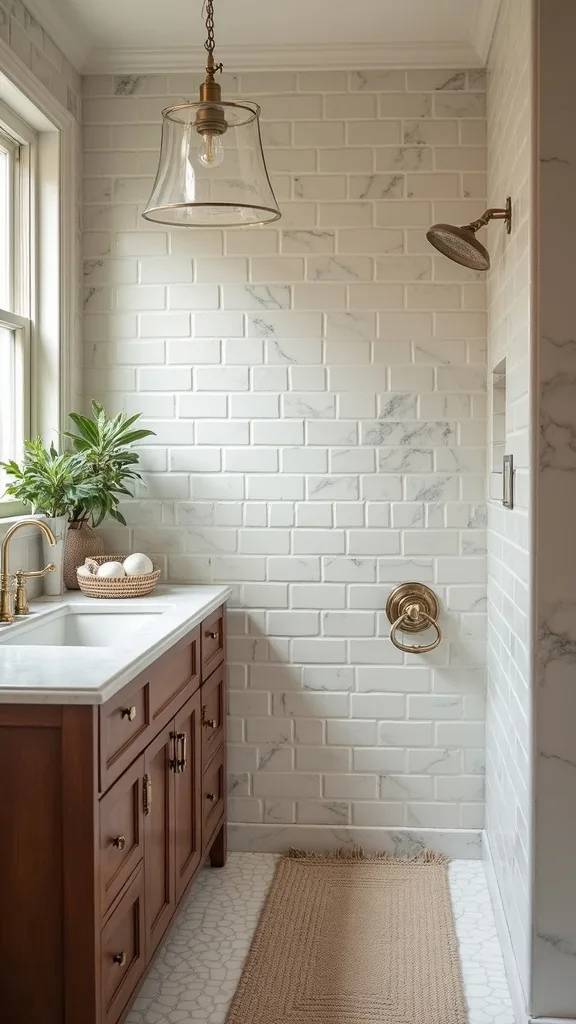
1. Build the whole story around polished nickel, penny rounds, a pedestal sink, and an oak cabinet
I always start by locking in a “heritage quartet”: antique polished nickel fixtures, penny round floor tile, a classic pedestal sink, and an oak medicine cabinet, because four repeating cues usually read as authentic instead of accidental. From my experience, this combination feels crisp in summer light while still giving that true antique bathroom hush.
When I design this look, I map a simple 3-zone plan: vanity wall, wet wall, and the “quiet wall” for storage, then I keep the nickel finishes within 18 inches of each other visually (faucet, sconce, mirror hardware). For the penny tile bathroom floor, I typically use 1-inch penny rounds on 12×12-inch mesh sheets and set a 1/4-inch per foot slope only where the floor meets a curbless shower transition (if you have one), which costs more upfront but prevents puddling.
I find that white or soft-cream grout (not bright white) and a satin clear coat on an 18×24-inch oak cabinet door keep the look warm, not clinical. I also like a 24-inch pedestal sink to avoid crowding.
Pro Tip: I’ve found polished nickel looks most “period-correct” when you mix one unlacquered piece (like a drain) with two lacquered pieces (like sconces) so the patina develops in a believable, uneven rhythm over 6–12 months.

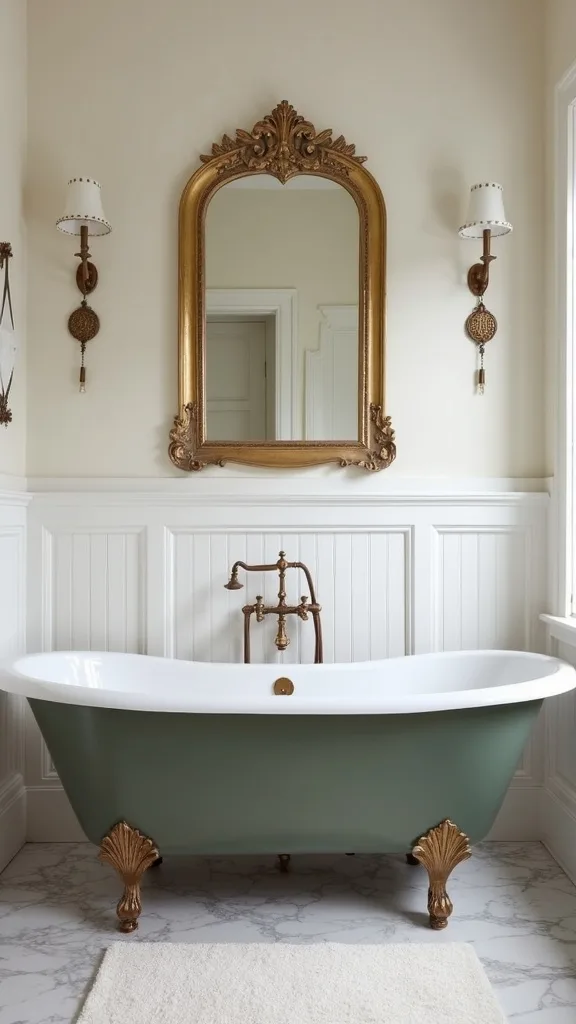
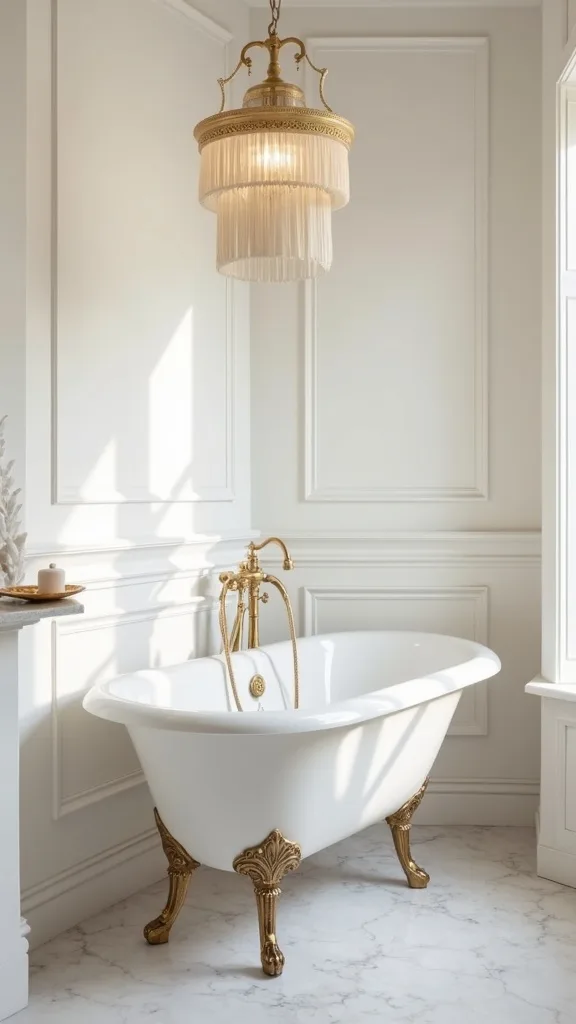
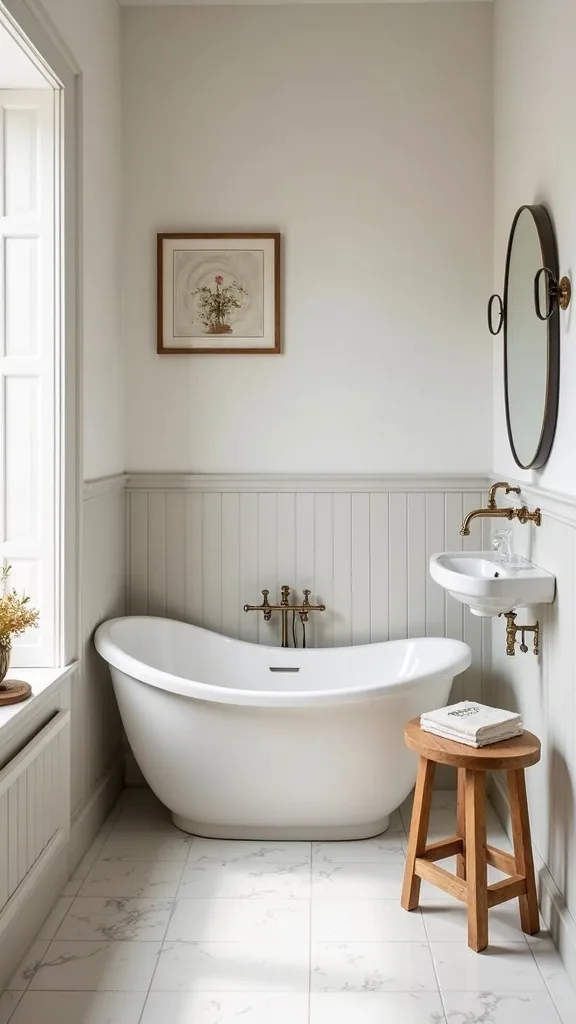
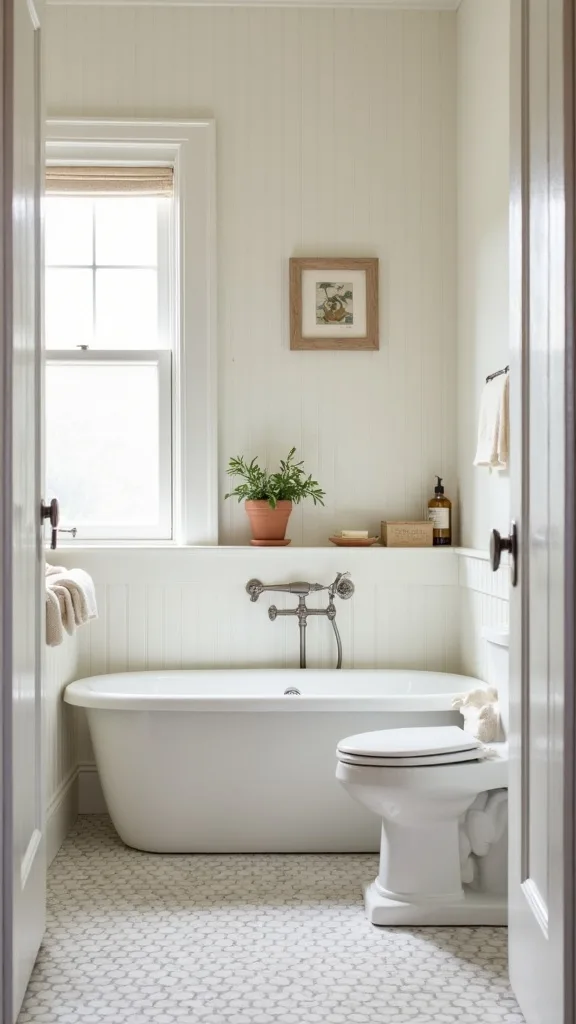
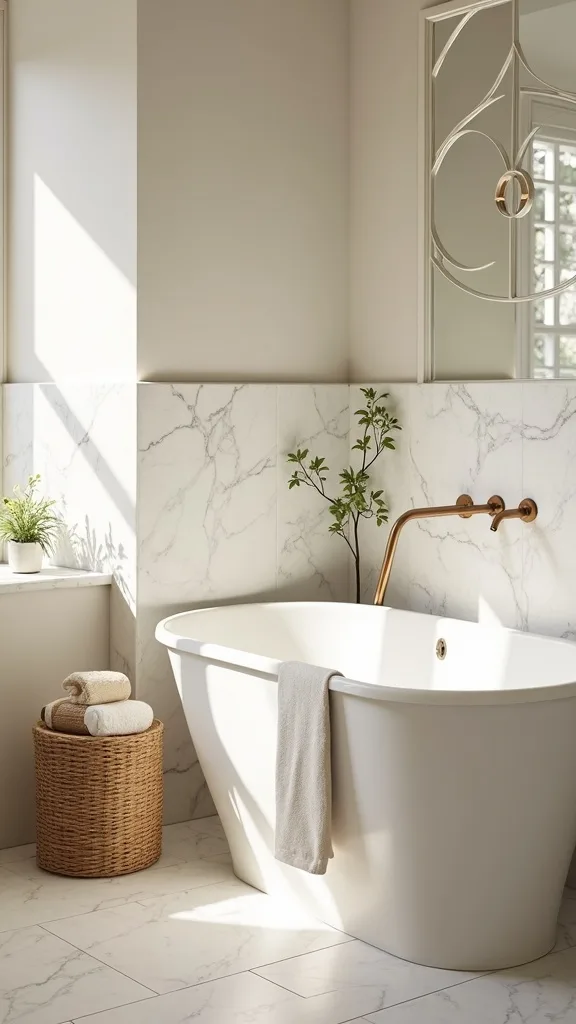
2. Restore a cast-iron tub with an editorial, not shiny, finish
From my experience, a cast-iron tub is the fastest way to make vintage bathroom ideas feel legitimate, because the weight and silhouette read as real history. I find that aiming for “soft sheen” rather than high gloss keeps the room from looking newly staged.
I always start by checking the tub for chips deeper than 1/16 inch and rust halos around the drain, then I decide between a DIY touch-up kit ($35–$60) or professional reglazing ($450–$900) that typically takes 1 day plus 24–48 hours of cure time. When I tried a DIY kit, I masked 2 inches beyond the tub edge and used a foam roller for the final coat to avoid brush ridges. If you’re renovating in summer, I recommend running a box fan in the window for 6–8 hours to help odor dissipate—trade-off: more dust risk, so keep the door closed.
In my opinion, pairing the tub with polished nickel supply lines and a 60×30-inch white shower curtain keeps the look tailored. I also like a small teak bath mat (about 24×16 inches) for warmth against tile.
Pro Tip: I’ve found the most common failure point is the tub-to-tile seam—use a color-matched silicone (not grout) and keep it a consistent 1/8-inch bead so seasonal expansion doesn’t crack your “restored” finish.
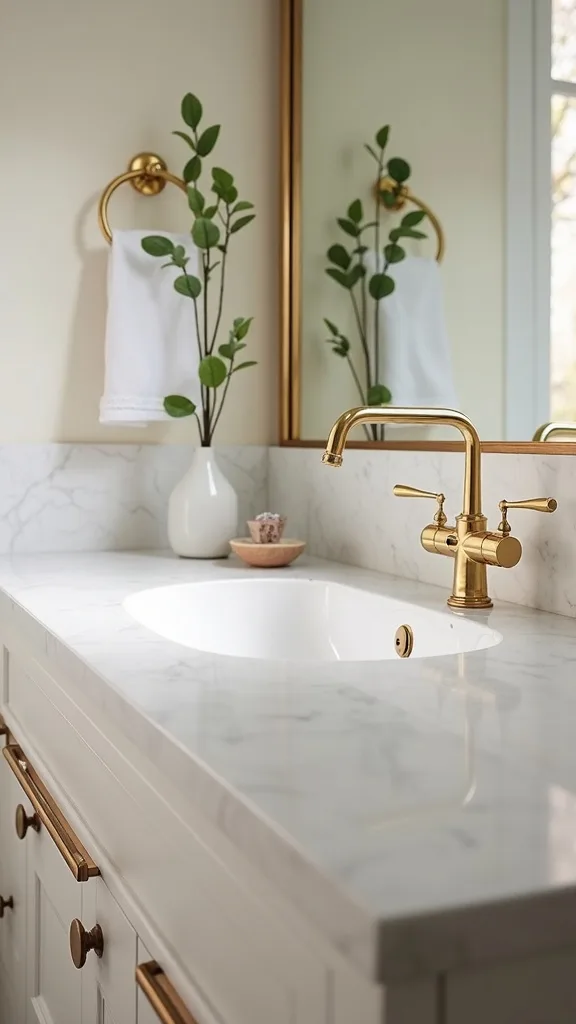
3. Choose vintage fixtures that behave like modern plumbing
I always recommend choosing vintage fixtures that look old but use modern valves, because most homeowners want the romance without daily maintenance. From my experience, this is where a retro bathroom either feels effortless—or turns into a weekly repair project.
I find that a widespread faucet (8-inch centers) in polished nickel gives better handwashing space than a tight 4-inch centerset, especially on a 24–30-inch pedestal sink. When I design this look, I specify quarter-turn shutoff valves and braided stainless supply lines in 12–20 inches so future repairs take 15 minutes instead of a full afternoon. Typically, I budget $180–$450 for a quality faucet and $25–$45 for the valve/supply upgrades; it costs more upfront, but it saves time later.
In my opinion, brands like Kingston Brass (for style) paired with a reputable cartridge system are a practical compromise. I also like matching the shower trim to the faucet within the same finish family to avoid “almost the same” nickel tones.
Pro Tip: I’ve found polished nickel can shift warm or cool depending on bulb color—test your faucet under warm white light (2700K–3000K — the cosy, yellowish tone you see in most homes) before committing to matching sconces.

4. Lay a penny tile bathroom floor that feels tailored, not busy
From my experience, a penny tile bathroom floor looks luxurious when it’s treated like a fabric—continuous, aligned, and calm. I find that the magic is in restraint: the smaller the tile, the more every line matters.
I always start by dry-laying 6–8 sheets of 12×12-inch penny rounds to check dot alignment, then I snap chalk lines that create a true centerline from the door to the sink. Typically, I use a 1/4-inch x 1/4-inch square-notch trowel and set sheets in 3-foot sections so thinset doesn’t skin over in summer heat (often within 10–15 minutes). Trade-off: smaller sections take longer, but they prevent the “lumpy sheet” look that screams DIY.
When I design this look, I choose matte porcelain penny rounds in 1-inch diameter for durability, then I grout with a sanded grout in a soft warm gray. I also like a 4-inch cove base tile if you want a truly vintage edge.
Pro Tip: I’ve found that pressing sheets with a 12×12-inch plywood board (not just your hand) keeps the dots on the same plane and prevents the subtle toe-stub ridges you only notice after the grout cures.
5. Frame the room with a classic tile wainscot and a slim cap
I always start by deciding the wainscot height, because it sets the room’s “waistline” and instantly signals era. From my experience, 42 inches high feels classic in most 8-foot ceilings, while 48 inches can look more grand but may crowd small spaces.
When I tried this in a narrow bath, I used 3×6-inch ceramic subway tile stacked in a running bond, then finished with a 2×6-inch bullnose cap and a 1/8-inch shadow line under the cap for a tailored break. Typically, I plan for 1/16-inch grout joints on the wall for a refined look, but I accept that tighter joints demand flatter walls—trade-off: you may need skim coat or cement board, which adds $80–$200 and 1–2 days.
I find that creamy whites (not icy whites) pair beautifully with oak and polished nickel. For paint above, I like a soft mineral tone in an eggshell finish so steam wipes off easily.
Pro Tip: I’ve found the most convincing “old house” detail is a tiny reveal—leave a consistent 1/8-inch gap where tile meets the cap and fill it with color-matched silicone so it reads like a deliberate trim line, not a caulk fix.
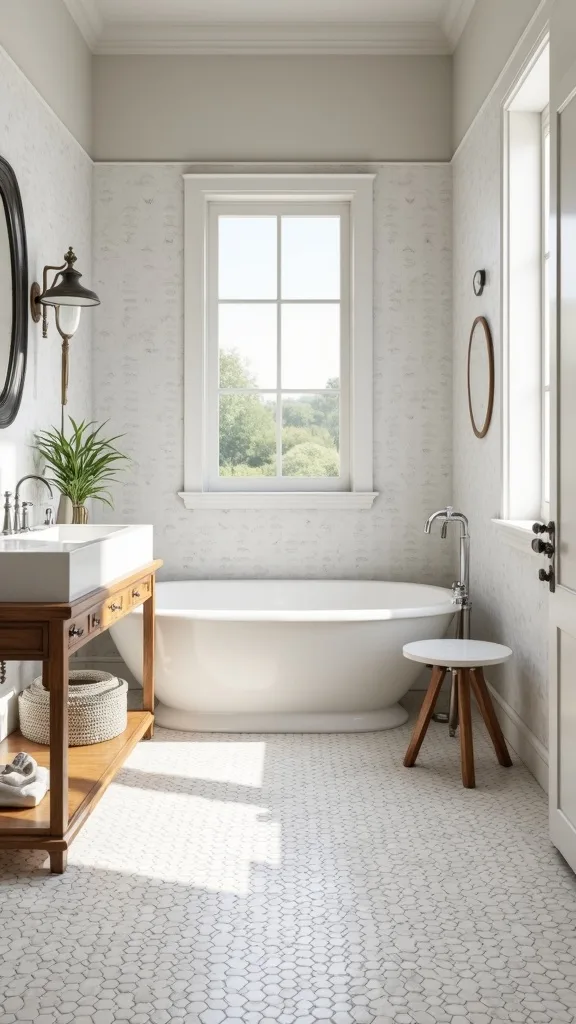
6. Make a pedestal sink feel practical with hidden storage
I find that a pedestal sink is the quickest route to a true retro bathroom silhouette, but I always plan storage before I fall in love with the shape. From my experience, the pedestal’s elegance only works when the countertop clutter disappears.
I always start by measuring the sink footprint and clearance: I like at least 21 inches from the front rim to the nearest obstacle and 30 inches of clear width for comfortable use. Then I add a 24–30-inch wide recessed niche between studs (typically 3.5 inches deep) near the sink for daily items, which saves counter space without adding furniture. Trade-off: cutting drywall and adding blocking takes 2–4 hours, but it prevents the “where do my toiletries go?” spiral.
When I design this look, I pair the pedestal with an oak medicine cabinet (around 20×26 inches) and a slim polished nickel towel ring mounted 48 inches from the floor. I also like a small marble tray (8×4 inches) for soap and a brush.
Pro Tip: I’ve found pedestal sinks look most intentional when the drain and trap are upgraded to a matching polished nickel P-trap—painted PVC often shows from the doorway and breaks the illusion immediately.
7. Refinish an oak medicine cabinet so it reads heirloom, not orange
From my experience, an oak medicine cabinet is the difference between “vintage-inspired” and truly antique bathroom character, but I always tame the tone so it feels editorial. I find that oak can skew orange under warm bulbs if you don’t control the finish.
I always start by removing the door and hardware, then I sand with 120-grit followed by 220-grit, which typically takes 60–90 minutes for a 20×26-inch cabinet. When I tried this, I wiped on a water-based stain in a light walnut tone and sealed with 2 coats of satin polyurethane, allowing 4–6 hours between coats in summer humidity. Trade-off: water-based products dry faster and smell less, but they can raise grain—so I do a quick 320-grit scuff after the first coat.
I find that pairing oak with polished nickel knobs (1.25-inch diameter) keeps the cabinet feeling crisp. A beveled mirror insert also nods to vintage without being fussy.
Pro Tip: I’ve found that adding a thin black felt strip inside the cabinet door stops the “old wood click” when it closes—quiet luxury is part of what makes vintage feel expensive.
8. Use warm white lighting that flatters skin and nickel
I always recommend prioritizing lighting early, because it’s what makes a retro bathroom feel cinematic instead of harsh. From my experience, polished nickel looks more elegant when the light is warm and layered.
I always start by placing sconces at eye level—typically 60–66 inches from the floor to the center of the shade—and spacing them 28–36 inches apart on either side of the mirror if the wall allows. When I design this look, I choose warm white light (2700K–3000K — the cosy, yellowish tone you see in most homes) and aim for 1,200–1,800 total brightness (measured in lumens) across the vanity zone. Trade-off: brighter bulbs are practical for makeup and shaving, but too much cool light can make tile and skin look flat.
I find that opal glass shades and polished nickel backplates are the most convincing vintage pairing. A dimmer switch (about $18–$35) is a small upgrade that changes the room’s mood instantly.
Pro Tip: I’ve found that nickel fixtures photograph greener under LED—choose bulbs with a high color rendering index (often listed as CRI 90+) so whites stay creamy and metals stay true.
Cost & Materials Estimate
I typically see a vintage-leaning bathroom refresh land between $1,200 and $7,800 depending on how much tile and plumbing you change.
| Item | Estimated Cost | Where to Buy |
|---|---|---|
| Porcelain penny round floor tile (40–80 sq ft) | $240–$720 | Home Depot |
| Thinset, grout, sealer, spacers, trowels | $160–$340 | Lowe’s |
| Polished nickel faucet + shower trim set | $320–$1,050 | Wayfair |
| Pedestal sink (24–30 in) + drain/P-trap | $220–$650 | Home Depot |
| Oak medicine cabinet (surface or recessed) | $140–$420 | IKEA |
| Lighting: 2 nickel sconces + dimmer + bulbs | $140–$420 | Amazon |
Total estimated cost: $1,220–$3,600 if you keep the existing tub and layout; I’d splurge on valves and lighting, and save by using classic white tile with a smarter grout choice.
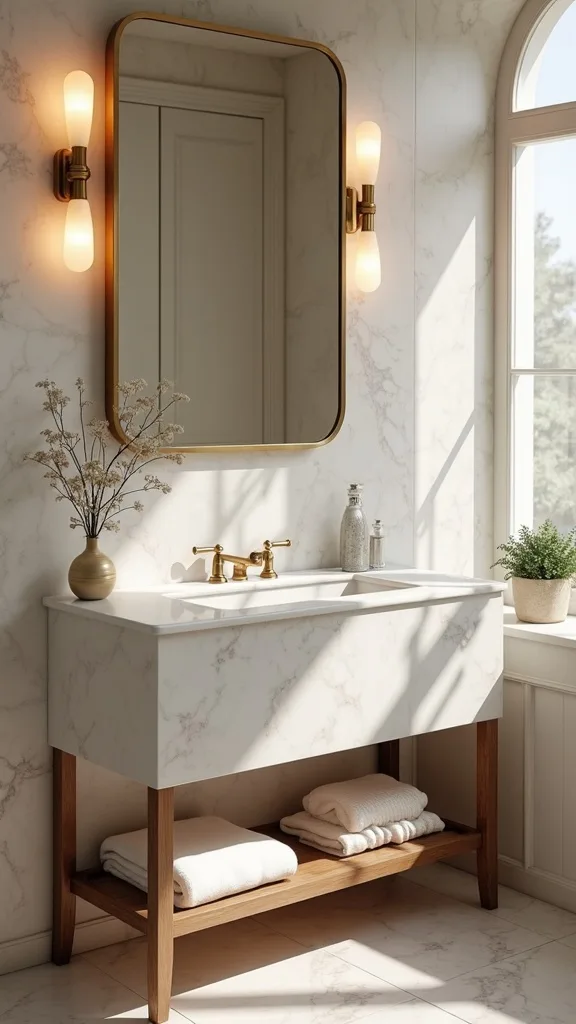
9. Create a period-correct mirror moment with subtle curves
In my opinion, the mirror is where you can whisper “antique” without going full reproduction. I find that a gentle arch or a beveled edge gives vintage bathroom ideas instant credibility.
I always start by matching mirror width to the sink zone: for a 24-inch pedestal sink, I like a 22–24-inch wide mirror, and for a 30-inch vanity, I prefer 28–30 inches. When I tried an arched mirror, I mounted it so the bottom edge sat 5–7 inches above the faucet to keep splash marks manageable. Typically, I use two 50-pound rated D-rings and wall anchors if studs don’t land perfectly—trade-off: anchors are strong, but studs feel more secure, so I use a stud on at least one side whenever possible.
I find that polished nickel mirror clips or a thin nickel frame ties back to vintage fixtures without competing. If oak is prominent, I keep the mirror metal simple.
Pro Tip: I’ve found that adding a 1/8-inch rubber bumper behind the mirror corners prevents micro-rattles from door slams—tiny, but it makes the whole room feel more solid and restored.
10. Pick a paint color that feels like linen, not stark white
I always start by testing paint in the actual bathroom, because steam, tile reflectance, and summer sun can shift color dramatically. From my experience, the most timeless antique bathroom walls look like washed linen rather than bright gallery white.
When I design this look, I sample 3 swatches (each about 12×12 inches) and live with them for 48 hours—morning, afternoon, and under sconces at night. I find that a low-sheen eggshell or satin is the sweet spot for wipeability, and I typically plan on 2 coats plus a cut-in pass, which takes 3–5 hours total drying time between coats in warm weather. Trade-off: flatter finishes hide wall flaws better, but they scuff more easily near towel hooks.
I like warm neutrals with a hint of gray to complement penny tile grout and polished nickel. If you want a bolder retro note, I recommend a muted sea-glass green in the upper wall only.
Pro Tip: I’ve found that painting the ceiling 10–15% lighter than the wall color keeps vintage tilework feeling taller and more “original,” especially in bathrooms with 7.5–8-foot ceilings.
11. Add a picture rail or thin trim to elevate the wainscot
From my experience, a slim trim line is what makes a tile wainscot feel architectural rather than simply practical. I find that this detail elevates vintage bathroom ideas into something that feels designed.
I always start by choosing a profile that’s modest: a 3/4-inch picture rail or a 1-1/4-inch ogee trim usually reads period-appropriate without looking heavy. When I tried this, I installed trim at 44 inches from the floor, leaving a consistent 1/8-inch gap above the tile cap so steam doesn’t trap moisture. Typically, I use a brad nailer with 1-1/4-inch brads and fill holes with stainable wood filler (if it’s oak) or paintable filler (if it’s painted), which adds about 2–3 hours including caulk.
I find that painting the trim the same color as the upper wall keeps it subtle, while a slightly deeper tone makes it more editorial. Polished nickel hooks look sharper when they sit just below this line.
Pro Tip: I’ve found that sealing the bottom edge of wood trim with a thin bead of clear silicone prevents the “shadow stain” that can appear after 6–9 months of steamy showers.
12. Use a vintage-style toilet without sacrificing water efficiency
I always recommend treating the toilet as a style opportunity, because it’s a large visual block in a small room. From my experience, a high-tank look or a rounded-front silhouette can quietly reinforce a retro bathroom theme.
I always start by measuring rough-in distance—typically 12 inches from wall to flange—before I shop, because returns are a headache. When I design this look, I choose a WaterSense-rated model (often 1.28 gallons per flush) with a rounded bowl for tighter layouts; I like at least 24 inches clear in front for comfort. Trade-off: elongated bowls can feel more luxurious, but they often crowd a small bath, so I prioritize circulation.
I find that white porcelain with polished nickel supply and a simple lever keeps it classic. If you’re leaning antique bathroom, I like a wood-toned seat in a sealed finish, but it does require more careful cleaning.
Pro Tip: I’ve found that swapping the standard chrome closet bolts for nickel-finish caps is a tiny upgrade that makes the whole toilet area feel intentionally “restored,” especially against penny tile.

13. Choose shower curtain hardware that reads like vintage fixtures
I find that shower curtain hardware is one of those details that can ruin the illusion if it looks builder-grade. From my experience, matching the metal tone to your vintage fixtures makes the room feel cohesive in a way guests notice—even if they can’t name why.
I always start by mounting the rod high—typically 74–78 inches from the floor—so the curtain falls in a long, tailored line. When I tried a polished nickel ring set, I used 12 rings for a standard 72-inch curtain and made sure the curtain hem hovered 1/2 inch above the floor to prevent mildew. Trade-off: longer curtains look luxurious, but they can drag if your floor isn’t perfectly level, so I hem them with iron-on tape in 20 minutes.
I like a heavy cotton or linen-blend curtain (around 72×84 inches) in white or oatmeal, paired with a clear liner. A simple banded border can echo penny tile without being literal.
Pro Tip: I’ve found that adding a second inner tension rod 2 inches inside the tub line keeps the liner from billowing—your outer curtain stays crisp and your “vintage hotel” look stays intact.

14. Lean into summer renovation with ventilation that protects your restoration
I always start by addressing airflow, because nothing undermines an antique bathroom faster than peeling paint or musty wood. From my experience, summer renovation is the perfect time to upgrade ventilation since the attic and exterior venting are easier to access.
I recommend a bathroom fan sized appropriately for the room—typically 80–110 CFM (cubic feet per minute, meaning how much air it moves) for a 40–80 square foot bath—and I run it for 20 minutes after showers. When I tried swapping a fan, the install took about 2–4 hours, and I chose a quieter model (around 1.0 sones, meaning a softer sound level) so it actually gets used. Trade-off: quieter fans cost more ($120–$250), but they protect grout, oak, and wallpaper long-term.
I find that a simple white grille disappears, letting nickel and tile lead visually. If you want a vintage touch, I like a subtle square grille rather than a swirly one.
Pro Tip: I’ve found that insulating the fan duct with an R-6 sleeve reduces condensation drips that can stain ceilings—especially in humid summers when warm air hits cooler duct runs.

15. Add a small oak stool or stand to soften all the hard surfaces
In my opinion, the most sophisticated vintage bathroom ideas include one humble piece of wood furniture, because it makes tile and porcelain feel lived-in. I find that an oak stool reads as “collected” and pairs naturally with an oak medicine cabinet.
I always start by choosing a compact footprint—around 14–16 inches wide and 18 inches tall—so it tucks beside a tub or under a towel bar. When I design this look, I seal the stool with 2 coats of marine-grade spar varnish, allowing 6–8 hours between coats, because bathrooms are wet zones even with good ventilation. Trade-off: spar varnish has a stronger odor, but it holds up better to splashes and damp towels.
I like styling it with a folded bath sheet and a small tray for matches and a candle (if you use them). A woven basket underneath can hide extra toilet paper without looking like storage.
Pro Tip: I’ve found that adding felt pads plus a thin silicone dot under each foot prevents the stool from “walking” on penny tile when you grab a towel with wet hands.
16. Use vintage-inspired hardware on every touchpoint
I always recommend upgrading the small metal pieces—hooks, pulls, and even the toilet paper holder—because they’re the jewelry of a retro bathroom. From my experience, consistent hardware finishes make budget choices elsewhere feel intentional.
I always start by counting touchpoints: typically 2 towel hooks, 1 towel bar, 1 toilet paper holder, and 1 robe hook for a primary bath. When I tried mixing metals, I kept 80% polished nickel and 20% aged brass; it looked curated, but the trade-off is that it requires discipline so it doesn’t feel random. For placement, I like towel bars at 48 inches high and hooks at 60 inches, with at least 6 inches between hooks so towels dry faster.
I find that solid brass hardware with a nickel finish wears better than lightweight zinc alloy, though it costs more ($18–$45 per piece). A simple stepped or fluted profile nods to vintage fixtures without being ornate.
Pro Tip: I’ve found that mounting towel hooks into blocking (or using 75-pound anchors) matters more in bathrooms—wet towels are heavier, and a single torn-out hook can crack tile grout lines near the fastener.
17. Introduce an antique bathroom palette with textiles, not permanent finishes
From my experience, the easiest way to experiment with an antique bathroom palette is through towels and rugs, because you can change them in 10 minutes. I find that this approach keeps your renovation flexible if you’re still deciding on tile or paint.
I always start with two towel sets: 2 bath towels and 4 hand towels in one core color, then 1 accent color for a seasonal twist. In summer, I like a faded eucalyptus or dusty blue; in winter, I swap in tobacco or oxblood. Typically, I choose a bath rug around 20×32 inches with a low pile under 1/2 inch so it dries quickly—trade-off: plush rugs feel luxe, but they hold moisture longer.
When I design this look, I choose cotton with a weight around 600–800 GSM (grams per square meter, meaning towel thickness) so it feels substantial. I also like adding a subtle stripe that echoes penny rounds without being literal.
Pro Tip: I’ve found that pre-washing towels twice before styling prevents lint from collecting in penny tile grout lines—especially with darker grout where fuzz shows up immediately.
18. Style the countertop like a vintage hotel: fewer, heavier objects
I find that countertop styling is where a bathroom either feels editorial or cluttered. From my experience, the most convincing vintage bathroom ideas borrow from old hotels: fewer items, but each one looks intentional and weighty.
I always start by limiting myself to 5 objects max on the sink: soap, a brush cup, a tray, a small vase, and one “personal” item. When I tried this, I used a 6×10-inch marble tray and a 10–12 oz amber glass soap dispenser so the scale felt substantial next to a pedestal sink. Typically, I keep daily products in the oak medicine cabinet and restock once a week—trade-off: you spend a little time resetting, but the room stays serene.
I like amber apothecary bottles with simple black labels, and I prefer a real ceramic cup over plastic. Polished nickel accents tie everything back to vintage fixtures.
Pro Tip: I’ve found that adding a thin clear silicone dot under the tray corners stops it from skating on porcelain—tiny friction equals a calmer, more “luxury” daily experience.
19. Use beadboard selectively for cottage-era texture
I always start by asking whether the room needs softness, because tile-on-every-surface can feel cold. From my experience, beadboard brings a gentle, cottage-era rhythm that supports a retro bathroom without stealing the show.
When I design this look, I install moisture-resistant beadboard panels (typically 3/8 inch thick) on one wall—often behind the toilet—rather than everywhere. I like running it to 48 inches high, capped with a 1×2-inch trim, and painting it in satin for wipeability. Typically, panel installation and caulking take 4–6 hours, plus 2 coats of paint with 2–3 hours between coats. Trade-off: beadboard adds texture, but it introduces seams, so caulk discipline matters.
I find that creamy whites or pale stone tones look most authentic with oak and polished nickel. If you want more drama, a muted charcoal beadboard can feel very early-1900s.
Pro Tip: I’ve found that sealing the bottom edge of beadboard with a thin line of paintable silicone prevents mop water from wicking up and swelling the panel—especially important on a penny tile bathroom floor.
20. Add a discreet modern outlet upgrade that doesn’t break the era
I always recommend updating outlets during a restoration, because safety and convenience are part of living well in a vintage-inspired space. From my experience, you can add modern function without visually shouting “2026.”
I always start by swapping to a GFCI outlet (ground-fault protection, meaning it shuts off if moisture creates a shock risk) near the sink, typically within 36 inches of the basin. When I tried this, I chose a white GFCI with a screwless wall plate and installed it in about 30–45 minutes after turning off the breaker—trade-off: screwless plates look cleaner, but they can pop if the box isn’t flush, so I shim the box if needed. I also like adding a second outlet 48 inches high inside the medicine cabinet for a toothbrush charger, which takes about 1–2 hours if wiring access is easy.
I find that keeping plates simple and matching wall color helps them disappear. Polished nickel switch plates can work, but only if you have enough nickel elsewhere to justify them.
Pro Tip: I’ve found that a “tall” GFCI in an old shallow box often sits proud—using a box extender ring (usually $3–$8) makes the plate lie flat and keeps the upgrade looking original.
21. Choose grout color like you choose lipstick: test it in real light
From my experience, grout is the make-or-break detail in a penny tile bathroom, because it covers so much surface area. I find that the right grout color makes the floor feel like a single tailored field instead of a swarm of dots.
I always start by testing 2–3 grout shades on a spare 12×12-inch tile sheet and letting them dry for 24 hours, because grout almost always dries lighter. When I tried this, I compared warm gray versus ivory and noticed ivory looked cleaner but showed hair and makeup powder more easily—trade-off: lighter grout feels classic, but it demands more maintenance. Typically, I seal cement-based grout 72 hours after installation and re-seal every 12–18 months, which takes about 30 minutes with a foam applicator.
I find that a mid-tone warm gray hides daily life while still feeling vintage. If you’re using polished nickel, I like grout that leans warm so the metal doesn’t look blue.
Pro Tip: I’ve found that using a grout release product on matte penny rounds speeds cleanup dramatically—without it, haze can cling in the tiny valleys between dots and dull the floor’s crispness.
22. Bring in an antique bathroom accent with art that can handle humidity
I find that art is the secret ingredient that makes a bathroom feel like a room, not a utility zone. From my experience, the right piece can push vintage bathroom ideas into a more cultured, collected place.
I always start by choosing smaller frames—typically 8×10 inches or 11×14 inches—so they don’t overpower tight walls. When I tried hanging art near a shower, I used a sealed frame with a glass front and kept it at least 24 inches away from direct spray; I also hung it 58–62 inches from the floor to center it at eye level. Trade-off: real paper and vintage prints can warp in humidity, so I often use high-quality reproductions in sealed frames for peace of mind.
I like botanical sketches, old architectural details, or black-and-white portraits that echo the era without being kitschy. A thin oak frame can tie back to the medicine cabinet beautifully.
Pro Tip: I’ve found that adding a silica gel packet behind the frame backing (hidden inside) reduces moisture buildup—especially in summer—so the print stays flat and the frame stays pristine.
23. Use a narrow console shelf as a vanity alternative in small baths
I always recommend a console-style sink or narrow shelf when a pedestal feels too minimal, because it adds function while keeping a vintage silhouette. From my experience, this is one of the most practical small space vintage bathroom ideas.
When I design this look, I use a wall-mounted marble or quartz shelf around 30–36 inches wide and 8–10 inches deep, mounted 32–34 inches high so it aligns with sink ergonomics. Typically, I install heavy-duty brackets rated for 100 pounds and leave 2 inches of clearance from the sink edge for easy wiping. Trade-off: wall-mounted shelves require solid studs or blocking, but they free up floor space and make penny tile shine.
I find that pairing the shelf with a 24-inch pedestal sink keeps the look airy, while a small oak basket underneath adds warmth. Polished nickel brackets can echo your vintage fixtures without looking industrial.
Pro Tip: I’ve found that sealing the shelf’s underside edge (even if it’s stone) prevents water from wicking into drywall—most drips happen under the lip, not on top, and that’s where damage starts.
24. Mix true antique pieces carefully so the room doesn’t feel like a set
In my opinion, the most elegant antique bathroom rooms include one genuinely old piece, but I always balance it with cleaner modern lines so it doesn’t feel like a museum. From my experience, one antique is charm; five antiques can become visual noise.
I always start with a single anchor—like a 1920s oak mirror frame or a vintage apothecary jar—and I give it breathing room of at least 12 inches on all sides. When I tried using an antique sconce pair, I rewired them with modern sockets and mounted them on a standard 4-inch junction box; the rewiring took about 1–2 hours per sconce and cost $25–$40 in parts. Trade-off: authentic antiques can be finicky, so I only use them where maintenance won’t be constant.
I find that keeping the rest of the metals polished nickel keeps the room coherent. A single aged brass or bronze accent can work, but I keep it small.
Pro Tip: I’ve found that antiques look more believable when you don’t over-clean them—leave a little patina in crevices, but wax the high-touch areas so they feel pleasant in the hand.
25. Finish with a summer-ready scent and ritual that makes the room feel lived in
I always start by imagining how I want the bathroom to feel on a hot July morning, because summer renovation should end in ease. From my experience, the final layer of retro bathroom style is sensory—light, scent, and a small daily ritual.
When I design this look, I add one candle or diffuser on a tray and keep it 10–12 inches away from towels for safety. I also like a small bud vase (about 6–8 inches tall) with eucalyptus or garden stems, refreshed every 5–7 days—trade-off: fresh stems are a tiny weekly chore, but they make the room feel like a boutique hotel. Typically, I keep one plush robe on a hook at 60 inches high so it dries properly and doesn’t drag.
I find that clean, herbal scents pair well with polished nickel and oak—think rosemary, bergamot, or lavender. A crisp hand soap in an amber bottle keeps the look grounded in that antique bathroom mood.
Pro Tip: I’ve found that placing a small dish of baking soda inside the oak medicine cabinet (hidden behind products) prevents “old wood” odors from intensifying in humid summer weeks, keeping the cabinet smelling as refined as it looks.
Final Thoughts
I find that the most successful vintage bathroom ideas don’t chase perfection—they chase coherence. When I restore a bathroom, I’m always looking for that quiet alignment between surfaces you see (penny rounds, oak, nickel) and upgrades you feel (better valves, better light, better air).
From my experience, it’s completely normal to want everything at once, but I always recommend choosing one hero decision for each category: one signature tile, one signature metal, one signature wood tone, and one signature light. Typically, that keeps the budget from ballooning while still delivering the editorial, lived-in sophistication that makes a retro bathroom feel timeless.
If you start with the heritage quartet and then layer in just a handful of thoughtful details, I’ve found the room begins to feel like it has always belonged to your home. I’d love for you to pick your first 2 upgrades this weekend and let the rest unfold with intention.
What I’d Do Differently
When I first tried this, I got seduced by the look of a penny tile bathroom floor and rushed the layout—specifically, I didn’t dry-lay enough sheets to catch a subtle “drift” in the dot alignment. About 3 rows in, the pattern started to snake toward the tub by almost 3/8 inch, and I convinced myself grout would hide it. It didn’t. In most cases, penny rounds magnify tiny mistakes because there are so many grout lines, and once the thinset cures, fixing it means pulling sheets and potentially damaging the mesh-backed dots. The correct approach is slower: I now dry-lay at least 6–8 sheets, snap a centerline from the doorway, and set tile in 3-foot sections so I can micro-adjust before anything locks in.
I also wish I’d known how much polished nickel changes under different bulbs and daylight; I now test hardware next to a warm white light (2700K–3000K — the cosy, yellowish tone you see in most homes) before I buy the rest of the set. If you start with one confident “heritage quartet” decision and then build outward, you’ll get the vintage mood without the mid-project regret—pick your first two materials today and move forward with intention.
Products I Recommend for This Project
Here are some of my favourite products to help you bring these ideas to life:
- Schluter Kerdi Waterproofing Membrane Roll — I use this when I want vintage surfaces with modern leak protection behind the scenes.
- MAPEI Ultracolor Plus FA Grout — I find it gives a tighter, cleaner look on small-format tile with better stain resistance than many basic grouts.
- Aqua Mix Sealer’s Choice Gold — I reach for this to help protect cement-based grout from makeup, soap, and summer humidity.
- Leviton Decora Smart Dimmer Switch — I like this for dialing in that evening, vintage-hotel glow without rewiring your whole lighting plan.
- GE Relax HD LED Bulbs (Warm White 2700K) — I use these to keep skin tones flattering and polished nickel from looking cold or green.