This post contains affiliate links. As an Amazon Associate, I earn from qualifying purchases at no extra cost to you.
Are you looking for cheap fence ideas that actually look finished—and not like a temporary construction zone? Do you want to carve out privacy, protect a garden, or keep pets safe without spending $3,000–$8,000 on a full professional install?
I always start by deciding what the fence needs to do first: block views, mark a boundary, keep dogs in, or protect seedlings from rabbits. In this guide, I’m sharing my go-to cheap fence ideas budget homeowners can tackle in spring, with realistic materials, measurements, and the little upgrades that make budget fences feel intentional.
In my opinion, this is perfect for anyone doing Spring Backyard Projects—especially renters (where allowed), first-time homeowners, or anyone trying to stretch a weekend budget of $150–$800.
When I design this look, I mix affordable structure (metal posts, wire panels, pallets) with “softening” layers like bamboo rolls, outdoor fabric, or climbing vines—because that’s how I get privacy fast without building an expensive wall. I’ll also share cheap privacy fence ideas and a few smart setups that work specifically as cheap fence ideas for dogs.
Below are 25 Cheap Fence Ideas on a Budget that help you shape your outdoor space with practical steps, realistic costs, and spring-ready results.
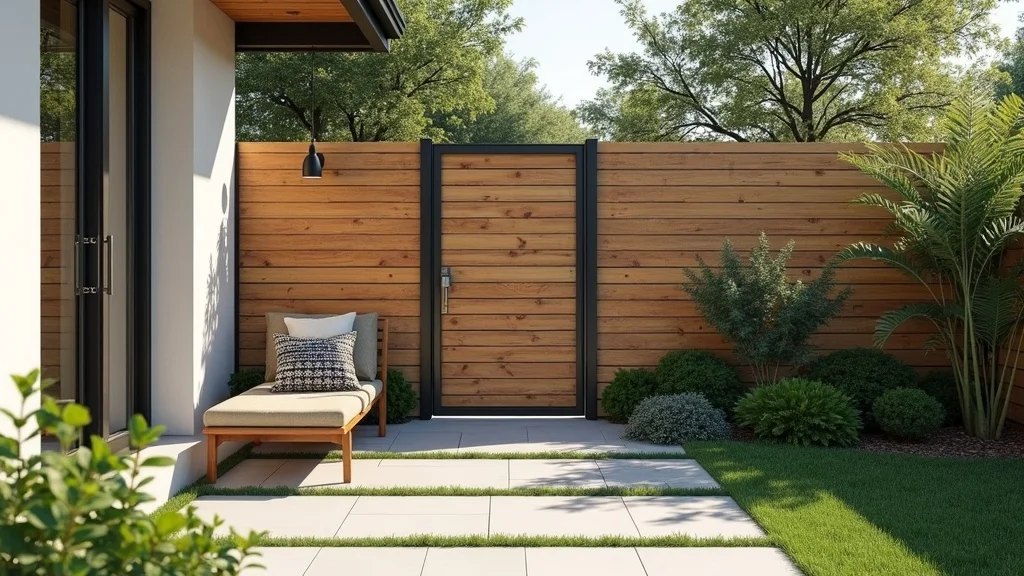
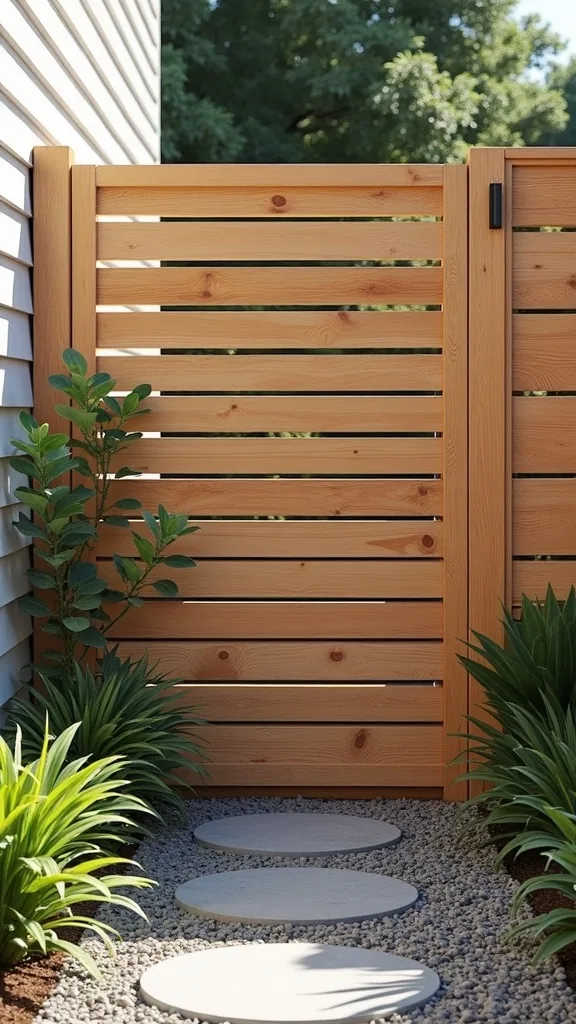
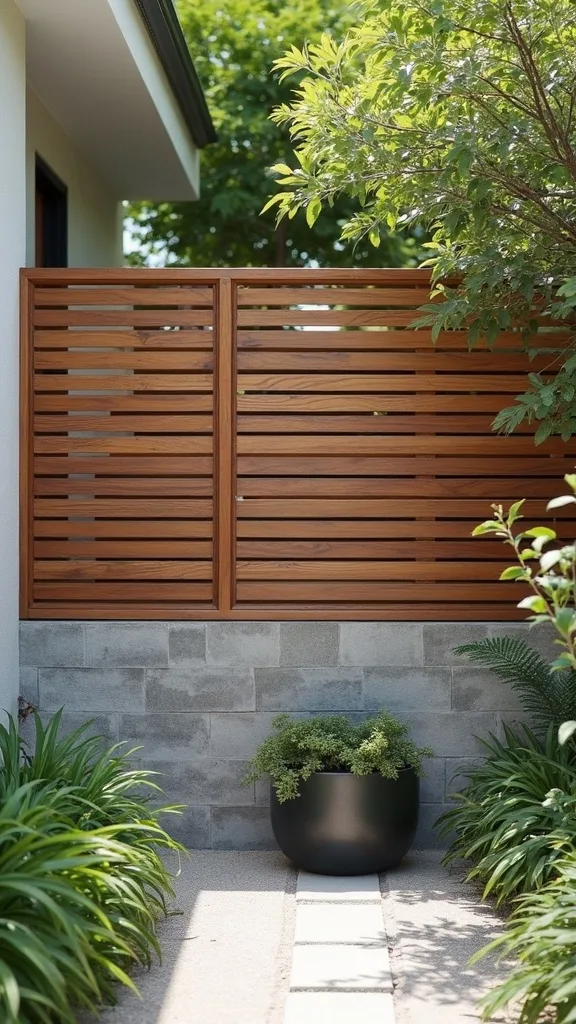
1. Mix-and-Match Budget Fence System (Wood Panels + Bamboo + Metal Posts for Dogs & Gardens)
I always start by building one simple “backbone” and then swapping in privacy where I actually need it—this is how I get affordable fence solutions like DIY wood panels, bamboo screens, and metal posts to work together for dogs and garden boundaries. From my experience, this approach stretches a $250–$600 budget much farther than committing to one pricey material across the whole yard.
I set 6 ft steel T-posts about 8 ft apart for most runs, then attach a 16 ft cattle panel or 6 ft welded wire using U-clips and a post driver. After that, I add 4 ft x 8 ft wood lattice panels (stained or painted) only where sightlines matter—usually the patio edge or near the grill zone.
I find that bamboo fence rolls (6 ft high x 16 ft long) soften the look instantly, and exterior zip ties or 14-gauge galvanized wire keeps it tight. For colour, I like matte black spray paint on the metal and a warm cedar stain on wood for a “planned” finish.
Pro Tip: I always leave a 2–3 inch gap at the bottom of bamboo sections—if it touches soil, it wicks moisture and typically starts to darken and split within a season, so that tiny lift keeps it looking fresh longer.
2. Pallet Privacy Fence Panels (The Right Way to Make Them Look Intentional)
From my experience, pallets can be one of the most convincing cheap fence ideas—but only if I treat them like real panels instead of random wood stacked upright. I find that the “budget” look disappears when I standardize height and spacing, even if the materials were free.
I always start by choosing heat-treated pallets (marked “HT”) and avoiding anything stamped “MB.” Then I cut them to a consistent 48–60 inch height using a circular saw and screw them to 4×4 posts set about 6–8 ft apart. For stability, I add two 2×4 horizontal rails per section and use 2-1/2 inch exterior deck screws so I’m not fighting loose nails later.
In my opinion, a solid-color exterior stain (1 gallon covers roughly 200–300 sq ft) in charcoal or warm brown makes mismatched boards read as one design. I also like adding a 1×2 cap board across the top edge for a cleaner line.
Pro Tip: I’ve found that pallets twist as they dry—so I always pre-drill and fasten from the center outward; it pulls the panel flat and prevents that “wavy fence” look that screams DIY.
3. Welded Wire + Cedar Top Rail (My Favourite “Farmhouse on a Budget” Combo)
I find that welded wire fencing is one of the most reliable fence ideas backyard projects when I want openness but still need a clear boundary. From my experience, adding a cedar top rail makes it look 3x more finished, even though it only adds about $1–$2 per linear foot.
I install 4×4 pressure-treated posts every 8 ft (or 6 ft if the ground is windy or uneven), then staple 48–60 inch welded wire to the inside face using 3/4 inch galvanized fence staples. After that, I screw a 2×4 cedar top rail along the run with 3 inch exterior screws, keeping the rail level with a 4 ft bubble level.
I always recommend a 2-coat exterior sealer on the cedar within 2 weeks of installation—typically that’s when spring rain starts testing your work. For colour, I like clear sealer for a light look or a driftwood-toned stain for a softer vibe.
Pro Tip: When I tried this on a sloped yard, I learned to “step” the wire in 6–8 inch drops instead of stretching it diagonally—stepping keeps the grid squares square, which prevents sagging and makes stapling dramatically easier.
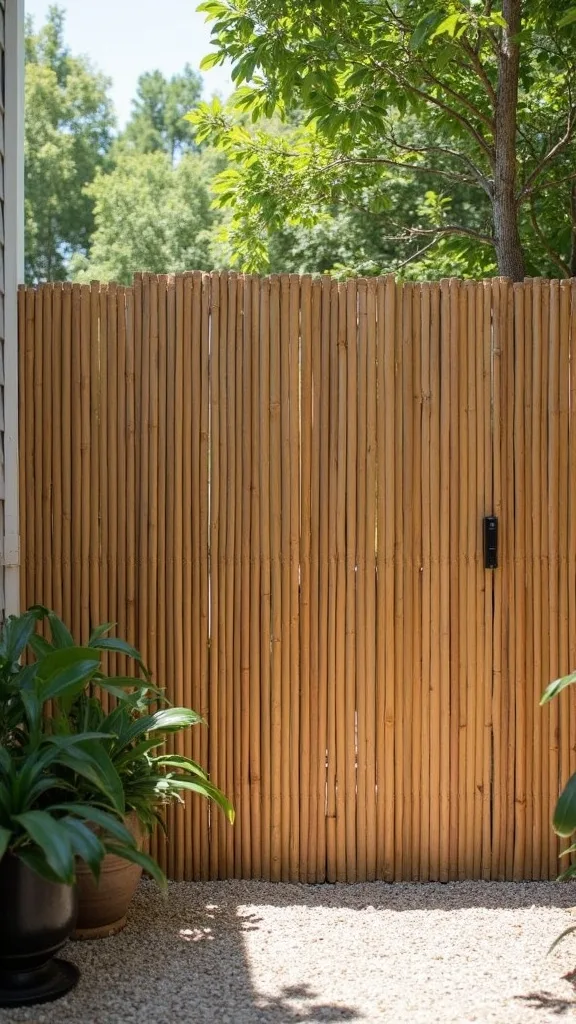
4. Bamboo Roll Fence on T-Posts (Fastest Privacy for the Money)
I always recommend bamboo rolls when someone needs privacy this weekend—because from my experience, it’s one of the quickest cheap privacy fence ideas that still feels natural outdoors. I find that it works especially well for spring when you want instant coverage before plants fill in.
I drive 6 ft T-posts about 6–8 ft apart, then unroll a 6 ft x 16 ft bamboo screen and attach it with UV-rated zip ties every 12 inches vertically. If I need more stiffness, I run a line of 14-gauge galvanized wire along the top edge and cinch the bamboo to it.
In my opinion, the best look comes from pairing bamboo with matte black posts and a thin cedar trim strip at the top (a 1×2 board). The trade-off is that bamboo can fade in full sun, so I plan on replacing or flipping sections every 2–3 years in harsher exposures.
Pro Tip: I’ve found bamboo lasts longer when I seal just the cut ends with exterior spar urethane—those ends are where splitting starts first, and sealing them takes 20 minutes but can buy you an extra season.
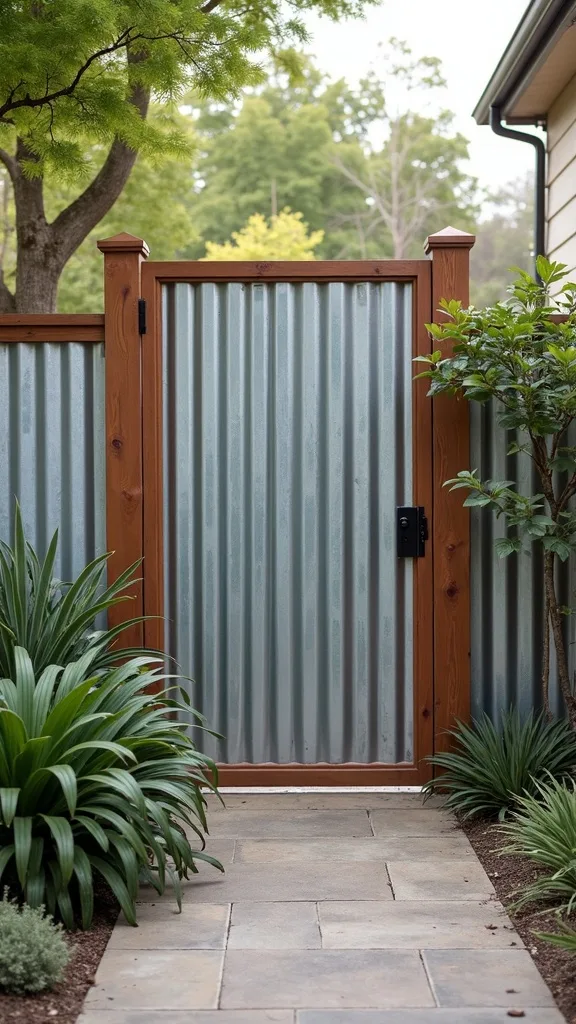
5. Corrugated Metal Panels with Wood Framing (Industrial Privacy on a Budget)
When I design this look, I use corrugated metal to get privacy without the cost of full wood boards, and I find it’s one of the sharpest backyard fence ideas for modern or industrial homes. From my experience, the key is framing it so it looks like a deliberate feature wall.
I build 6 ft wide panels using 2×4 pressure-treated frames and attach 26-gauge corrugated metal sheets (typically 8 ft long, trimmed down) with neoprene washer screws every 12–16 inches. I set posts 6 ft apart for less wobble, especially if the fence is 6 ft tall.
I always recommend painting the frame a deep black or dark bronze exterior paint and leaving the metal raw galvanized for contrast. The trade-off is that metal can sound “pingy” in wind, so I add a thin strip of exterior foam tape where the sheet meets the frame to reduce vibration.
Pro Tip: I’ve found you get fewer oil-canning dents if you pre-drill the metal on a flat surface and start fastening from the center outward—doing edges first can lock in a warp you’ll see every time the sun hits it.
6. Shadowbox Pickets Using Fence Boards (Privacy Without Buying Full Panels)
From my experience, a shadowbox layout is a smart way to get privacy while using fewer boards than a solid wall, and I find it’s one of the most practical privacy fence ideas for breezy backyards. In my opinion, it looks custom even when I’m sticking to a strict budget.
I set 4×4 posts 8 ft apart, then run two 2×4 rails. Instead of full coverage, I alternate 1×6 fence pickets on each side, spacing them about 1-1/2 inches apart—this blocks most sightlines while letting air move through. I typically build to 5 ft or 6 ft tall depending on local rules.
I always recommend using cedar pickets if you can afford it (they stay straighter), but pressure-treated pine is cheaper upfront and works fine with a good exterior stain. For a clean look, I like a warm brown semi-transparent stain that still shows grain.
Pro Tip: I’ve found the fence looks noticeably more “high-end” if I align picket seams so they land on the same rail line—random seam heights create visual clutter even if the spacing is perfect.
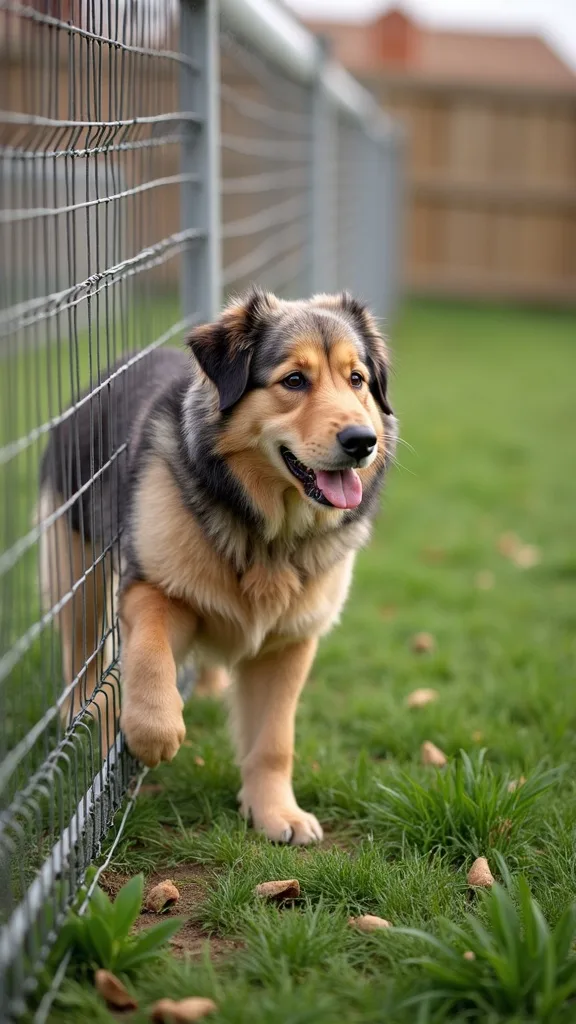
7. Dog-Safe Welded Wire Fence with a Dig Guard (Cheap Fence Ideas for Dogs)
I always take dog behavior seriously, and from my experience, the cheapest fence fails when a determined digger finds one soft corner. I find that a simple welded wire setup becomes a genuinely dog-safe boundary when I add a basic dig guard and tighten the bottom edge.
I use 4 ft or 5 ft welded wire (2 inch x 4 inch openings) on T-posts set 6–8 ft apart, then add a 24 inch wide wire apron along the base. I secure the apron with landscape staples every 12 inches and cover it with 2–3 inches of mulch or gravel so paws don’t catch.
In my opinion, a top tension wire (galvanized, 12–14 gauge) is worth the extra $15–$30 because it keeps the fence from bowing when dogs jump. If you want a softer look, I weave in a 50% privacy mesh on the street-facing side.
Pro Tip: When I tried this with a high-energy dog, I learned to place the apron on the inside of the yard—dogs dig from your side, and an inside apron stops them before they ever reach the fence line.
8. Hog Panel Fence with Wood Posts (Clean Lines for Garden Boundaries)
I find that hog panels give me the cleanest “open” look for garden fence ideas without paying for custom metalwork. From my experience, they’re also forgiving for DIYers because the panels are rigid and don’t sag like lighter wire.
I set 4×4 posts every 8 ft, then attach 16 ft hog panels (usually around 50 inches tall) using heavy-duty fence brackets or galvanized screws with fender washers. If I want a taller barrier, I stack two panels with a 2×4 mid-rail, but I keep total height under 6 ft in most suburban yards.
I always recommend cedar for the posts and rails if the fence is visible from the patio—yes, it costs more upfront, but it saves time on repainting later. For a budget version, I use pressure-treated posts and stain them a cedar tone after 30 days of drying.
Pro Tip: I’ve found the panels look straighter long-term if I install a 1×2 “picture frame” trim on the top and sides—without it, minor post shifts show up as wavy grid lines in photos and in real life.
Cost & Materials Estimate
For the majority of DIY budget fence projects, I typically see a total spend of about $200–$1,200 depending on whether you’re fencing 25 ft or closer to 100 ft and how much privacy you add.
| Item | Estimated Cost | Where to Buy |
|---|---|---|
| 6 ft steel T-posts (pack of 5) | $45–$75 | Home Depot |
| 48–60 in welded wire roll (50 ft) | $75–$140 | Lowe’s |
| Bamboo fence roll (6 ft x 16 ft) | $45–$90 | Amazon |
| Exterior deck screws (2-1/2 in, 5 lb box) | $28–$45 | Home Depot |
| Fast-setting concrete mix (50 lb bag) | $7–$12 | Lowe’s |
| UV-rated zip ties (pack of 200) | $9–$18 | Amazon |
Total estimated cost: $200–$1,200 I save money by using wire + posts for the full run and splurging only on 1–3 “privacy pocket” panels where we actually sit.
9. PVC-Coated Chain Link with Privacy Slats (Budget Privacy Without Rebuilding)
In my opinion, upgrading an existing chain link fence is one of the most underrated cheap fence ideas budget moves, because I’m improving what’s already there instead of starting over. From my experience, privacy slats can make a yard feel calmer within an afternoon.
I measure the height (typically 4 ft or 6 ft), then order matching privacy slats and a bottom locking channel. I slide slats every 2 inches or so (depending on the kit), and I plan 2–4 hours for a 50 ft run. If the fence is rusty, I wire-brush rough spots and hit it with a rust-inhibiting spray before adding slats.
I find that dark green or charcoal slats visually “disappear” behind plants, while tan can read more traditional. The trade-off is wind load—more privacy means more push, so I check that posts are solid in the ground.
Pro Tip: I always install slats starting at the least visible corner and work toward the patio—most kits have slight color variation between boxes, and starting out of sight helps the finished run look more consistent.
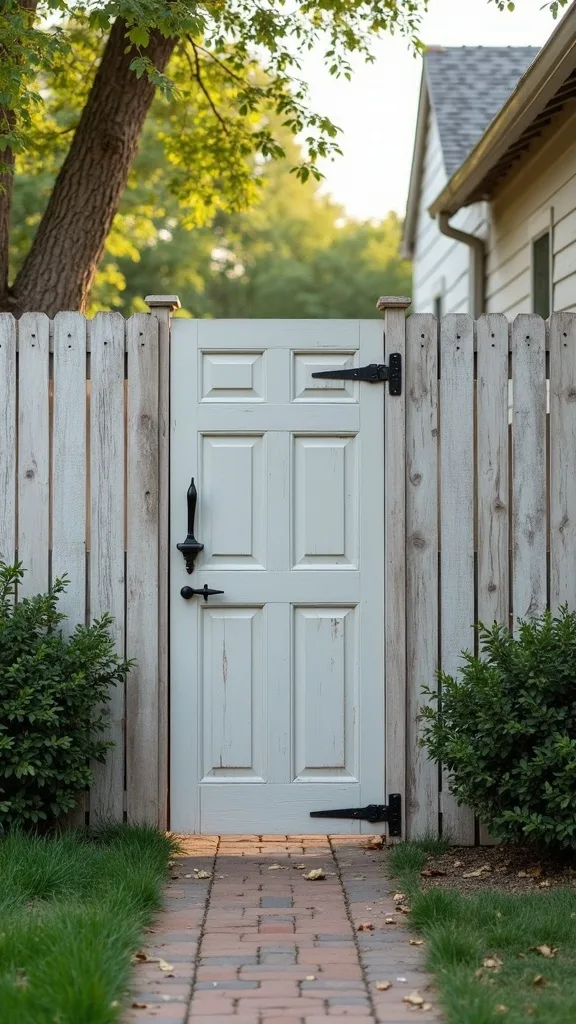
10. Reclaimed Door or Shutter Fence (Front Yard Fence Ideas with Personality)
From my experience, reclaimed doors and shutters create the most charming front yard fence ideas when I want a boundary that doubles as decor. I find that the trick is choosing pieces that share one common detail—height, colour family, or panel style—so it looks curated instead of chaotic.
I build a simple frame using 4×4 posts set 6 ft apart and two 2×4 rails, then screw doors/shutters onto the rails with 2-1/2 inch exterior screws. I aim for a consistent finished height of 36–42 inches in front yards, which typically feels welcoming and keeps sightlines open.
I always recommend exterior primer plus 2 coats of porch-and-patio paint, especially if the doors were previously indoor pieces. Soft white, sage green, or matte black reads intentional, but I accept the trade-off that painted surfaces need touch-ups every 1–2 years.
Pro Tip: I’ve found that adding a 1×3 “reveal strip” between mismatched doors creates a deliberate rhythm—those little gaps visually separate styles so the fence feels like a gallery wall instead of a salvage pile.
11. Split-Rail Fence with Welded Wire Backing (Rustic and Dog-Practical)
I always recommend split-rail when someone wants a rustic boundary, but from my experience, it needs wire backing if you have dogs or a veggie patch. I find that adding welded wire keeps the charm while making it functional.
I install a standard 2-rail or 3-rail split-rail kit (8 ft sections are common) and staple 48 inch welded wire to the inside with galvanized staples every 6–8 inches. If I’m containing small dogs, I choose a tighter mesh (2 inch x 4 inch) and keep the bottom edge pinned with landscape staples every 12 inches.
In my opinion, weathered wood looks great as-is, but I’ll use a clear exterior sealer if the fence sits near sprinklers. The trade-off is that wire can catch leaves, so I plan a quick 15-minute tidy every couple of weeks in peak spring growth.
Pro Tip: I’ve found the wire disappears visually if I paint it flat black before installing—once it’s up, painting is messy and you’ll inevitably hit the rails, so doing it on the roll saves time and looks cleaner.
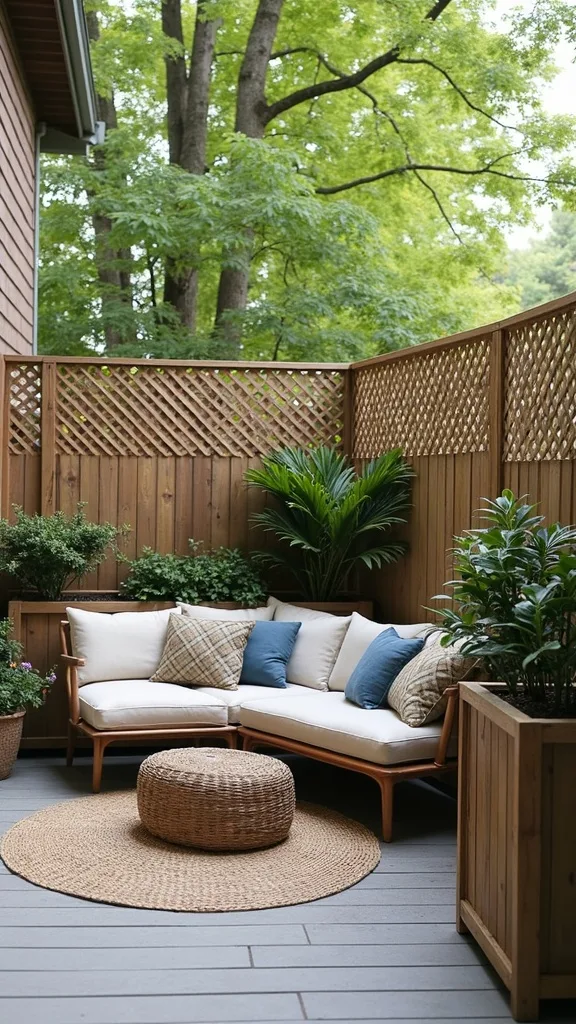
12. Lattice Panels with Planter Boxes (Privacy Where You Sit, Not Everywhere)
When I design this look, I focus privacy exactly where people lounge, and I find it’s one of the smartest cheap privacy fence ideas for patios. From my experience, you can make a small space feel secluded without fencing the entire yard.
I use 4 ft x 8 ft vinyl or wood lattice panels and attach them to 4×4 posts set in 50–60 lb bags of fast-setting concrete. In front, I build (or buy) two planter boxes around 36 inches long and 16–18 inches deep, then plant fast climbers like clematis or annual vines for spring-to-summer coverage.
I always recommend painting lattice a single colour—matte black or warm white—so it reads like architecture. The trade-off is watering: planters dry out faster, so I plan on checking moisture every 2–3 days in hot weeks.
Pro Tip: I’ve found lattice looks far more expensive when I add a 1×2 trim frame around the perimeter—without that frame, the thin edges can look flimsy even if the panel is sturdy.
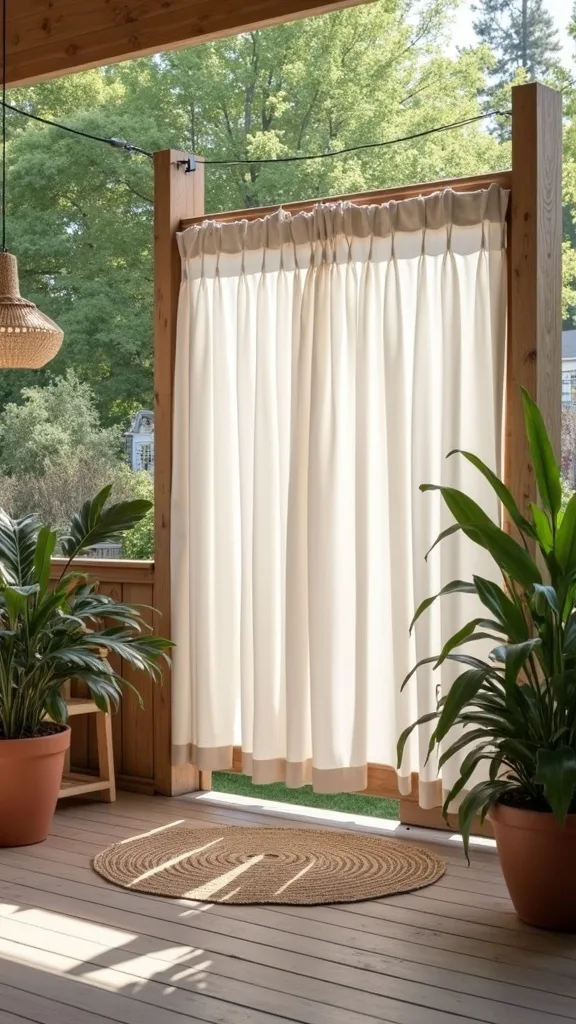
13. Privacy Screen Fence Using Outdoor Curtains on a Simple Frame
I find that outdoor curtains are a surprisingly effective “soft fence” when I need quick privacy for a patio or hot tub area. From my experience, this is one of the cheapest fence ideas when you can’t dig post holes or you want something adjustable for sun and wind.
I build a basic 6 ft tall frame using 4×4 posts and a 2×4 top beam, then hang 2 outdoor curtain panels (often 52 inches wide x 84 inches long) on stainless curtain rings. I like to anchor the posts in planters or concrete-filled buckets if I’m avoiding permanent footings, but I accept the trade-off that it’s less wind-resistant.
I always recommend solution-dyed outdoor fabric in beige, gray, or stripe patterns because it typically fades slower. For a cleaner look, I add a bottom hem weight or a thin dowel rod so the panels hang straight.
Pro Tip: I’ve found you can reduce flapping dramatically by adding a second, lower tension line (paracord or coated wire) about 18 inches off the ground and clipping the curtain edges to it with small carabiners.
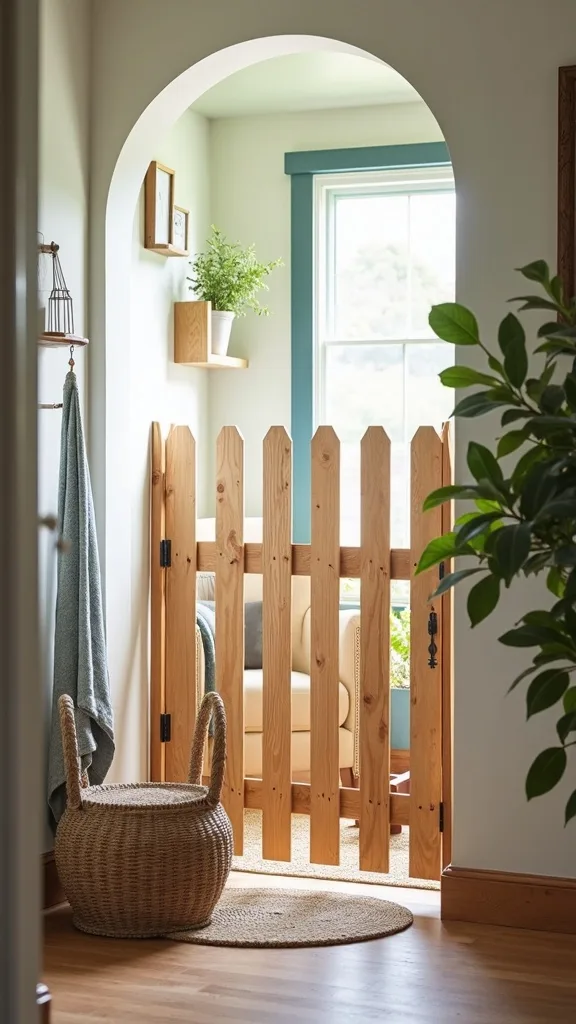
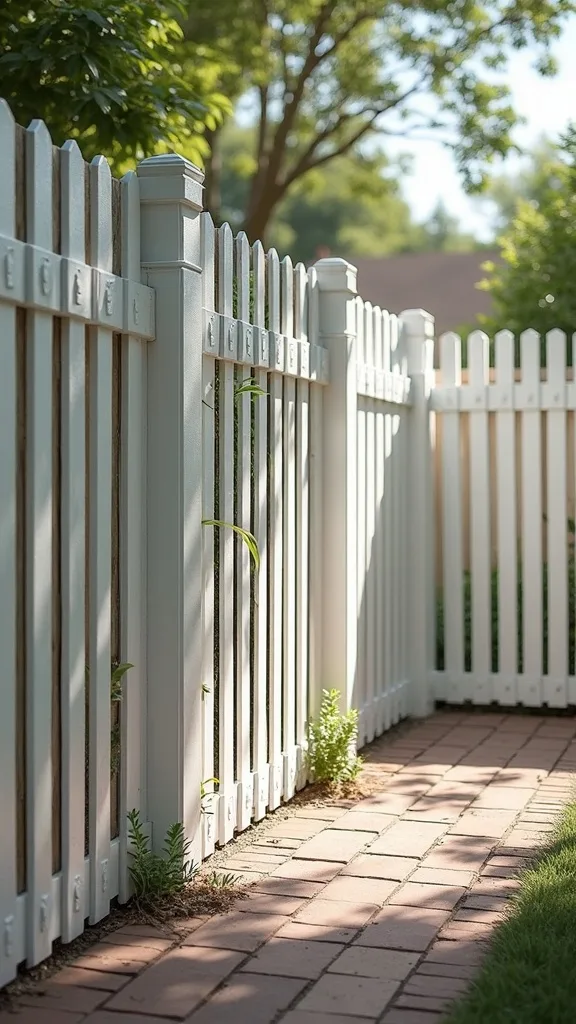
14. Painted Picket Fence Refresh (Cheapest “New Fence” Look for Front Yards)
I always check whether an old picket fence is salvageable before replacing it, because from my experience, paint and a few boards can change everything for under $150–$300. I find this is one of the most realistic front yard fence ideas when the structure is still sound.
I replace any broken pickets with 1×3 or 1×4 cedar boards, then sand rough spots with 80-grit followed by 120-grit. After that, I prime bare wood and apply 2 coats of exterior paint, letting it dry 4–6 hours between coats (longer if spring is humid).
In my opinion, soft white looks classic, but a deep charcoal can feel modern and hides dirt near sidewalks. The trade-off is that darker colours can show brush marks, so I use a 4-inch mini roller for the flat faces and a brush only for edges.
Pro Tip: I’ve found the cleanest finish comes from painting pickets before reinstalling them—laying them on sawhorses prevents drips along the edges and saves you from “edge misses” that show up as raw lines from the street.
15. Low Garden Border Fence with Hardware Cloth (Keeps Critters Out Cheaply)
From my experience, a low fence is often all I need to protect a garden bed in spring, and I find hardware cloth is the unsung hero of garden fence ideas. In my opinion, it’s the best value when rabbits are the main problem, because it’s tighter than typical welded wire.
I cut 24–30 inch tall hardware cloth (usually 1/2 inch openings) and attach it to 2×2 stakes or 1×2 cedar strips every 4 ft. I bury the bottom edge about 4 inches down or flare it outward as a 6 inch apron to discourage digging. A 25 ft roll is usually enough for a couple of raised beds.
I always recommend wearing gloves and using tin snips—hardware cloth edges are sharp. For looks, I staple it to a simple cedar frame and add a narrow top cap strip so it doesn’t read like “construction material.”
Pro Tip: I’ve found that if you fold a 1-inch hem along the top edge (using a scrap 2×4 as a bending guide), it becomes dramatically safer to handle and keeps the mesh from snagging sleeves when you’re weeding.

16. Freestanding Fence Panels in Planters (No-Dig Backyard Boundaries)
I always recommend freestanding panels when digging is a nightmare—rocky soil, buried utilities, or rental restrictions. From my experience, this is one of the most accessible cheap fence ideas because you can build it with basic tools and move it later.
I use 2 large planters (at least 18–20 inches wide) per 6 ft panel, set 4×4 posts inside, and fill with 2–3 bags of 50 lb concrete each. Then I attach a 6 ft x 6 ft wood privacy panel or a 72-inch outdoor screen between the posts with exterior screws and L-brackets.
I find that painting the planters and posts the same matte colour (black or dark bronze) makes the whole thing feel like a designed divider. The trade-off is weight—once cured (usually 24–48 hours), it’s heavy, so I add hidden casters only if the surface is smooth and level.
Pro Tip: I’ve found you get less cracking if you mist the concrete lightly for the first 12 hours in hot sun—fast drying can weaken the top layer, and that’s what eventually loosens the post over time.
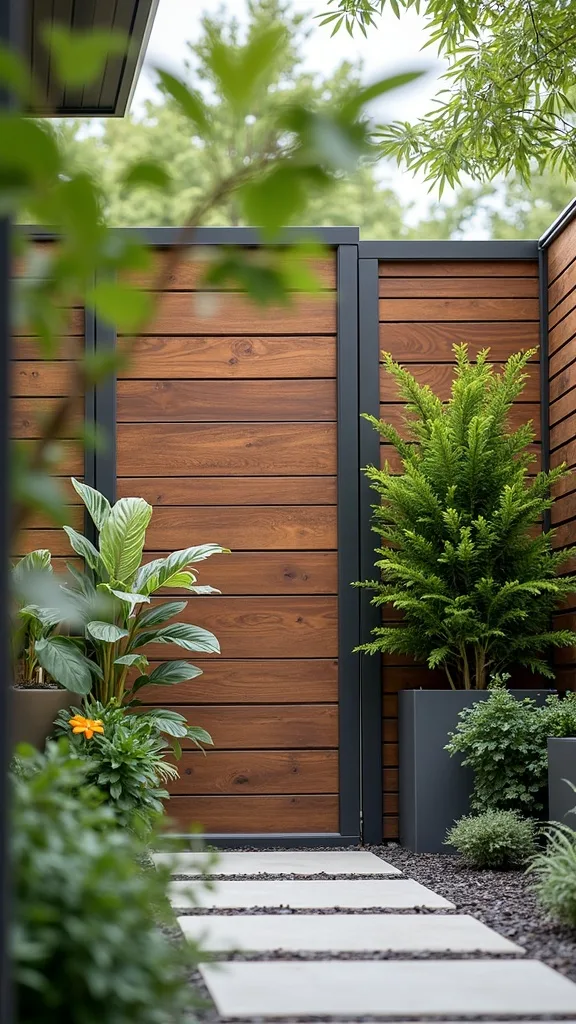
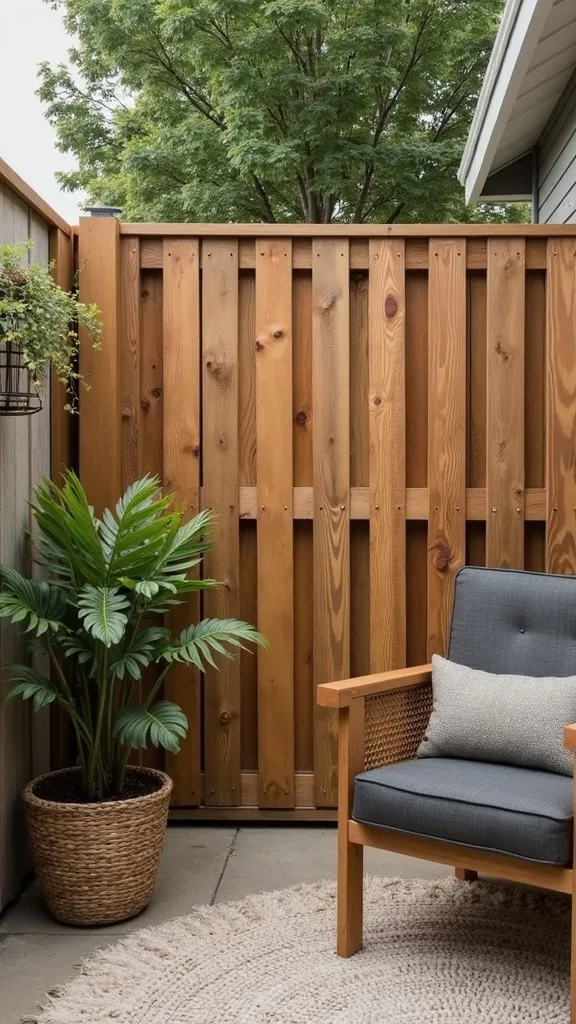
17. Horizontal Slat Fence Using 1×3 Furring Strips (Modern Look, Lower Cost)
When I design a modern fence on a budget, I reach for 1×3 furring strips because I find they create clean lines without the cost of thicker lumber. From my experience, the trade-off is durability—so I use them where they won’t get kicked, weed-whacked, or soaked by sprinklers.
I set posts 6 ft apart (closer than usual to reduce flex), then attach 1x3s horizontally with a 1/2 inch gap using 1-5/8 inch exterior screws. I typically keep height at 4 ft for a sleek boundary or 6 ft for privacy, and I seal all cut ends to slow water absorption.
I always recommend a solid exterior stain in black or dark walnut because it hides minor warping and makes the gaps feel intentional. If you prefer lighter, a semi-transparent cedar tone works, but it shows more imperfections.
Pro Tip: I’ve found furring strips last noticeably longer if you install them with a tiny 1/8 inch spacer behind each board (like a washer) so water can drain—flush boards trap moisture and can start cupping within a wet spring.
18. Upcycled Bed Frame Fence (Vintage Metal for Small Sections)
I find old metal bed frames are perfect for short runs—like a side yard pinch point or a garden nook—because they’re sturdy and often cheap or free. From my experience, this is one of those cheap fence ideas budget wins that looks like intentional vintage decor if I repeat the shape.
I use bolt cutters or a metal-cutting blade to remove sharp protrusions, then mount the frame sections to 4×4 posts spaced about 4–6 ft apart. For a 10–20 ft stretch, I can usually use 2–3 bed frames and tie them together with steel mending plates and outdoor-rated bolts.
I always recommend a rust-converting primer followed by 2 coats of exterior enamel, allowing about 24 hours cure time before heavy rain. Matte black reads classic, while deep green blends into landscaping.
Pro Tip: I’ve found the safest finish is to cap any cut tube ends with vinyl chair-leg caps—paint alone doesn’t soften those edges, and caps prevent snags on sleeves and dog collars.
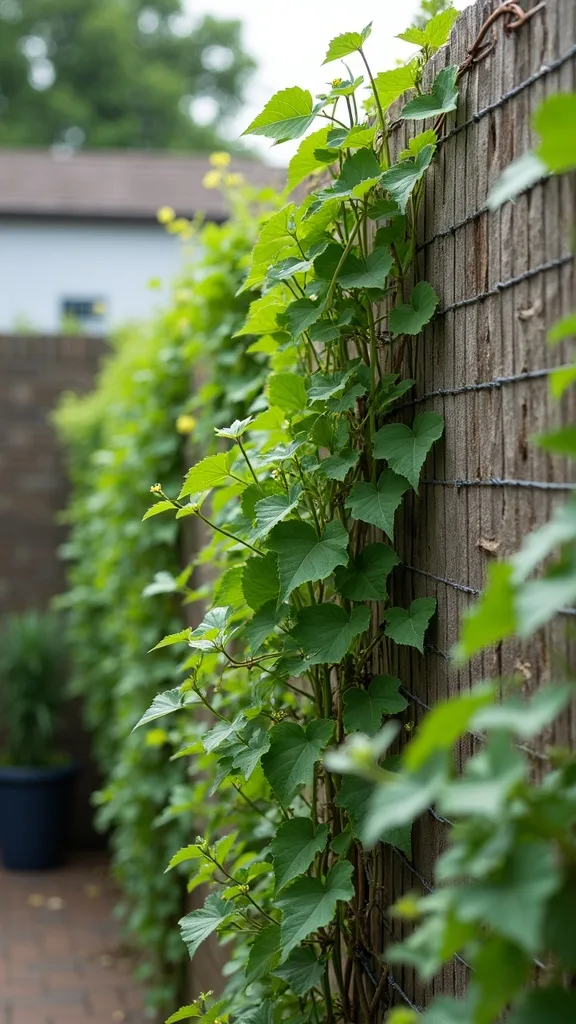
19. Living Fence with Fast-Growing Vines on Wire (Budget Privacy Over Time)
From my experience, a living fence is the cheapest way to get “lush privacy,” but I find it demands patience and a simple support structure. In my opinion, it’s ideal when you can tolerate partial privacy for 8–12 weeks while spring growth kicks in.
I install 5 ft welded wire on posts 8 ft apart, then plant climbers every 18–24 inches—like annual morning glory (fast) or perennial clematis (longer-term). I water deeply 2–3 times per week in the first month and add a 2 inch mulch ring to reduce evaporation.
I always recommend a drip hose if you’re planting a long run, because it’s cheaper than replacing stressed plants. The trade-off is maintenance: vines can creep where you don’t want them, so I plan a quick trim every 2 weeks in peak season.
Pro Tip: I’ve found you get fuller coverage faster if you angle young vines sideways along the bottom wire for the first 2–3 ft—training horizontally creates more branching, which means more leaves and better privacy sooner.
20. Privacy Mesh on Existing Fences (Instant Coverage for Patios and Pools)
I always recommend privacy mesh when someone needs immediate coverage without building anything new, because from my experience it’s one of the fastest cheap privacy fence ideas you can do in a single afternoon. I find it’s also kinder to budgets because you’re improving a fence you already own.
I measure the run and buy a 4 ft or 6 ft tall privacy screen roll, then attach it with UV-rated zip ties every 12 inches along the top and sides. For a 50 ft stretch, I usually need 100–150 zip ties to keep it from billowing in wind. If the fence is chain link, I thread ties through the diamonds for a tighter hold.
In my opinion, 70%–90% blockage is the sweet spot—more privacy means more wind load, which can stress posts. Dark gray and black look more “architectural,” while green blends into hedges.
Pro Tip: I’ve found the mesh lasts longer if you run a top cable (steel wire rope) and tie the mesh to that instead of only the fence—cable takes the tension, so the mesh grommets don’t tear out during spring storms.
21. Concrete-Block + Wood Slat Fence (Budget-Friendly and Surprisingly Polished)
When I tried a block-and-slat combo for a side yard, I was shocked by how “built-in” it felt for the price, and I find it’s a great option for modern backyard fence ideas. From my experience, the blocks do the heavy lifting, and the wood adds warmth.
I lay standard 8x8x16 concrete blocks in short piers (usually 2–3 blocks high, roughly 16–24 inches) and set 4×4 posts in the cores with concrete. Then I attach horizontal 1×4 or 1×6 slats above, keeping a 1/2 inch gap for airflow. I typically space piers 6 ft apart for stiffness.
I always recommend sealing the blocks with a masonry sealer if they’re in a splash zone. The trade-off is time—masonry work is slower than driving T-posts, so I plan a full weekend (8–12 hours) for even a small run.
Pro Tip: I’ve found the cleanest look comes from using “cap blocks” on top of the piers—those caps hide slight level differences, and they prevent water pooling in the block cores that can freeze and crack in colder climates.
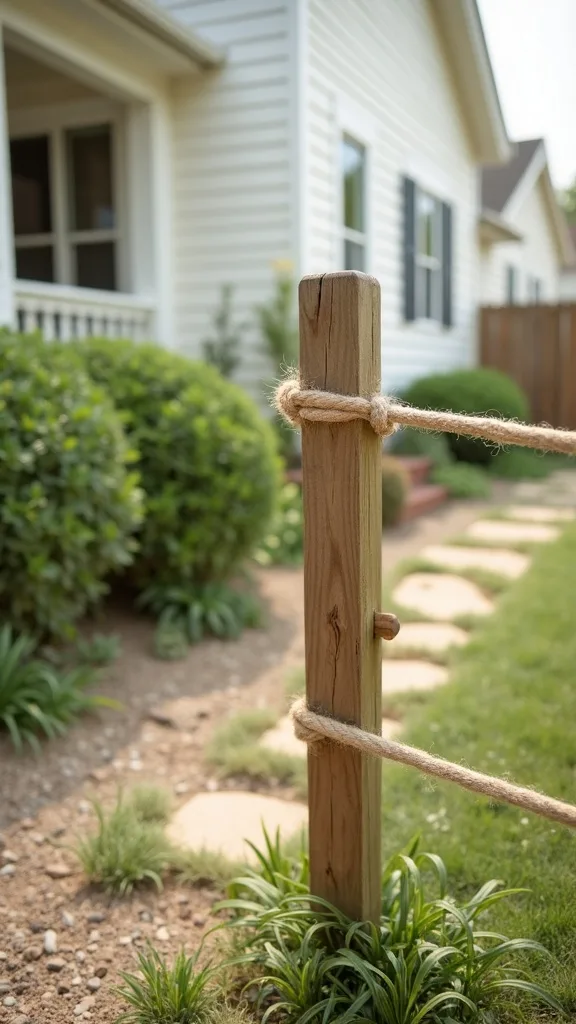
22. Simple Rope-and-Post Boundary (Cheap Front Yard or Side Yard Marker)
I find a rope-and-post boundary is perfect when I want a visual fence without the cost—or the “closed in” feeling—of solid panels. From my experience, it works best for front yard fence ideas where you’re guiding foot traffic rather than containing pets.
I set 4×4 posts about 6–8 ft apart and keep height around 30–36 inches. Then I run two lines of 3/4 inch outdoor rope (or marine-grade polypropylene) through eye bolts, tying off with simple knots that I can retighten after rain. For a 40 ft run, I usually need about 100 ft of rope to allow for wraps and knots.
I always recommend staining posts a medium brown and choosing a natural tan rope for a coastal or farmhouse vibe. The trade-off is durability—rope will weather, so I plan to replace it every 2–4 years depending on sun exposure.
Pro Tip: I’ve found that adding a small stainless spring link (like a gate spring) at one end keeps the rope taut as it stretches—without it, the line sags by mid-summer and starts to look sloppy.
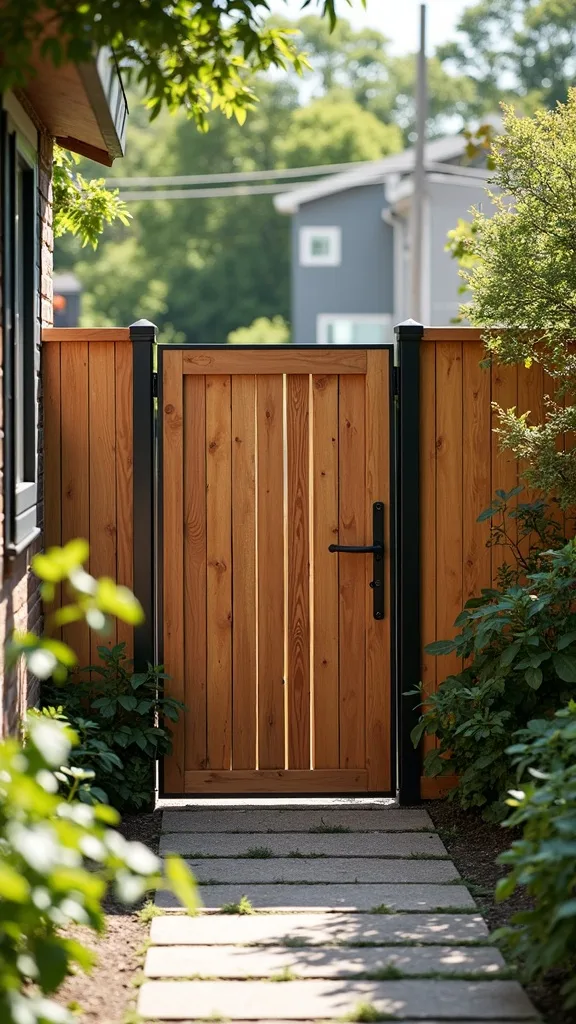
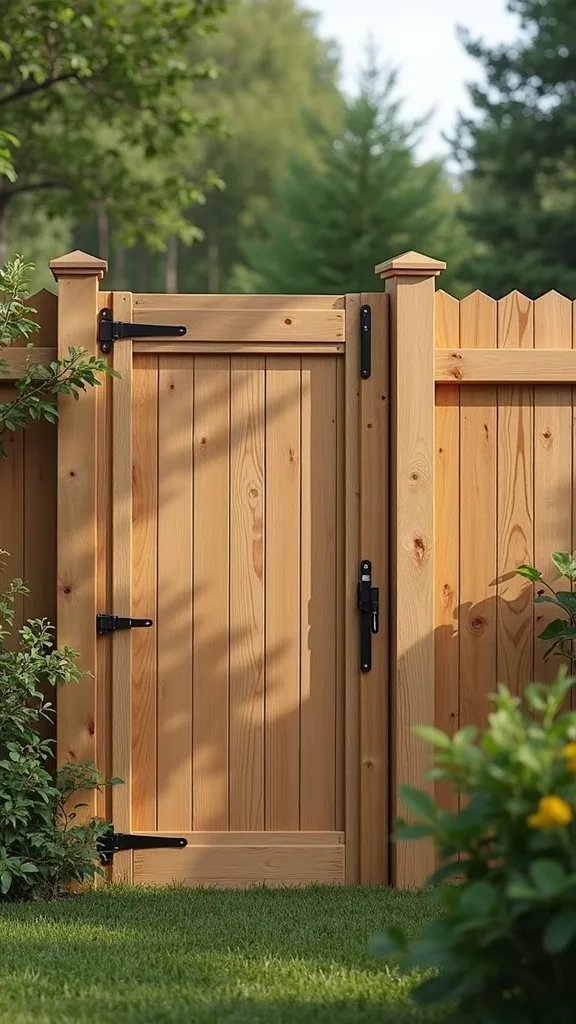
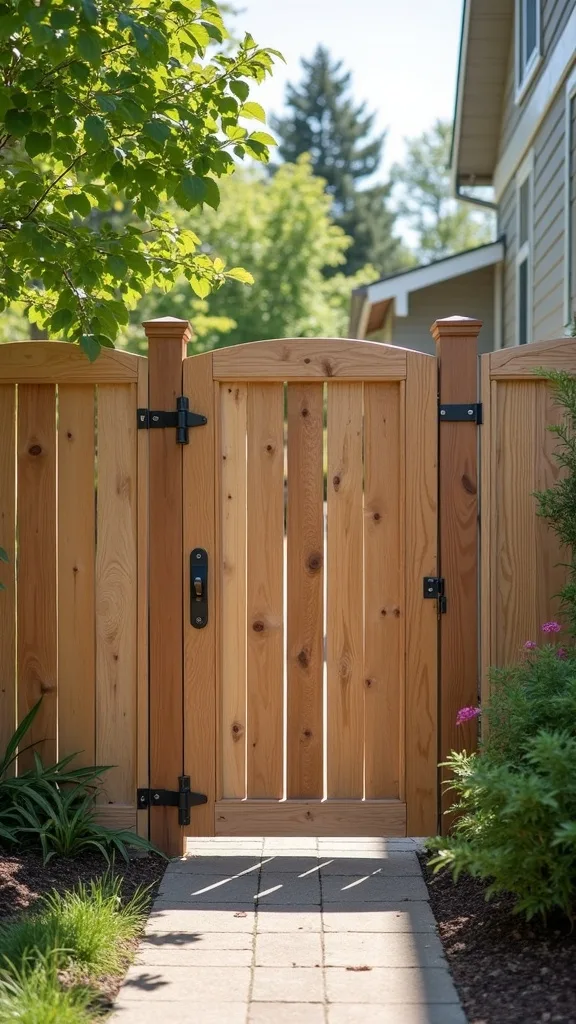
23. DIY Gate Upgrade for Any Budget Fence (Where the Whole Project Feels Expensive)
I always tell people the gate is where a cheap fence looks either “temporary” or truly finished, and from my experience, a $40–$90 gate upgrade can elevate the whole run. I find that even the simplest wire fence feels intentional when the entry point is solid and aligned.
I build a 36 inch or 42 inch wide gate frame from 2x4s and brace it with a diagonal 2×4 to prevent sag. Then I hang it with a heavy-duty strap hinge set (rated around 50–75 lb) and add a simple latch plus a drop rod if it’s a double gate. I leave a 1/2 inch gap on the hinge side and about 1 inch at the bottom for ground clearance.
In my opinion, black powder-coated hardware looks the most “designed” because it matches T-posts and wire. The trade-off is that cheaper hinges can squeak, so I keep a small tube of silicone lubricant handy.
Pro Tip: I’ve found the real secret is setting the hinge post extra deep—at least 30 inches in most soils—because gate movement loosens shallow posts faster than any straight fence run ever will.
24. Painted Metal Post + Wood Panel Hybrid (Modern Backyard Fence Ideas on a Budget)
From my experience, mixing metal posts with wood infill is one of the cleanest ways to get a modern fence vibe while keeping costs controlled. I find this hybrid approach works especially well when you want a few “privacy moments” but don’t need a full 6 ft wall everywhere.
I set 2-3/8 inch galvanized fence posts 6–8 ft apart and paint them with a rust-inhibiting metal spray. Then I attach 6 ft wood privacy panels or DIY slat panels using post brackets and 1-1/2 inch exterior screws. For a 24 ft run, I usually need 4 posts and 3 panels, which helps me budget in clear chunks.
I always recommend pairing black posts with a warm cedar stain, because that contrast looks intentional in most outdoor settings. The trade-off is that wood panels can warp, so I choose panels with a solid frame and add an extra screw at each corner.
Pro Tip: I’ve found the panels stay straighter if you mount them 1–2 inches above grade—when the bottom frame sits in splashback, it swells and twists first, and that warp telegraphs up the whole panel.
25. Budget-Friendly “Privacy Pockets” (Fence Only Where You Need It Most)
I always start by mapping sightlines from the neighbor’s windows, because from my experience, most yards only need privacy in 2–3 key spots. I find this is the most realistic way to approach cheap fence planning: build less fence, but make it count.
I measure the patio seating area (often 10 ft x 12 ft) and add a 6 ft tall screen just along the exposed edge—usually 8–16 ft total instead of 60–100 ft around the whole yard. I’ll use one 6 ft x 8 ft wood panel plus a 6 ft bamboo roll, or two 72-inch outdoor screens, depending on budget and wind.
In my opinion, this is where styling matters: I add a planter (at least 18 inches wide) and an outdoor sconce or solar fence lights to make the “pocket” feel like an outdoor room. The trade-off is partial coverage—you’re choosing comfort in one zone over full perimeter control.
Pro Tip: I’ve found the most convincing privacy pocket includes an overhead element—string lights on a 10–12 ft span or a small pergola corner—because once the eye reads a “ceiling,” the fence reads like a designed wall, not a budget workaround.
Final Thoughts
I find that the most affordable fences aren’t about finding one magic material—they’re about choosing a simple structure and then putting privacy exactly where it changes how you use the yard. In my opinion, spring is the perfect time to do this because the ground is workable, weekend temperatures are manageable, and you can let plants do some of the “fencing” for you over the next 8–12 weeks.
From my experience, the biggest win comes when I treat the fence like outdoor furniture: I pick a consistent colour (usually matte black + warm wood), I upgrade the gate hardware, and I add one softening layer like bamboo, vines, or planters. It costs a little more upfront, but it saves me from ripping it out later because it “never looked right.”
If you want, tell me your rough linear footage (even an estimate like 40 ft or 120 ft), whether you need dog containment, and the privacy level you’re after (light screening vs. full block), and I’ll help you narrow these cheap fence ideas on a budget to the 2–3 options that typically work best.
What I’d Do Differently
When I first tried this, I made the classic budget-fence mistake: I bought privacy material for the entire perimeter before I confirmed my sightlines and my dog’s habits. I ended up installing a 6 ft bamboo roll along a 40 ft stretch that nobody could even see into—while the patio corner (the one spot I actually wanted privacy) still felt exposed. Worse, my dog immediately discovered the one low gap at the bottom edge and started pawing at it, which meant I had to undo sections and add a wire apron anyway. From my experience, the correct approach is to build the cheapest “skeleton” first (posts + wire), live with it for 7 days, and then add privacy only where you feel the need when you’re actually using the yard.
I also wish I’d known how much the gate affects the whole project. In my opinion, spending an extra $40–$60 on heavier strap hinges and a real latch would have saved me weeks of annoyance from sagging and sticking. If you’re starting this spring, I recommend you pick one fence style, buy materials for just one 8–16 ft test section, and build momentum from there—start small, then extend once you love how it functions.
Products I Recommend for This Project
Here are some of my favourite products to help you bring these ideas to life:
- PetSafe Outdoor Dog Fence Dig Defence Barrier — I like it for reinforcing the bottom edge quickly when you need extra dog-proofing without pouring concrete.
- Amagabeli 6ft x 16ft Bamboo Reed Fence Roll — I use it for instant privacy on T-posts, and it softens wire fences fast.
- YARDGARD Welded Wire Fence Roll (48 in x 50 ft) — I find this size is a practical balance for gardens and small-to-medium dogs.
- VIVOSUN 14 Gauge Galvanized Steel Wire — I use it as a top tension wire to reduce sag and keep runs looking straight.
- National Hardware Heavy Duty Strap Hinge Set — I recommend it when a budget fence needs a gate that won’t sag after a few weeks of spring use.