This post contains affiliate links. As an Amazon Associate, I earn from qualifying purchases at no extra cost to you.
Are you looking for colorful kitchen ideas that feel playful for summer without painting every cabinet? Do you want a simple way to refresh your space using accessories you can swap out in a weekend?
I always start by treating the kitchen like a “working room” first and a “pretty room” second, because styling has to survive real cooking. In this post, I’m sharing my most practical kitchen accessories styling moves—things I’ve used in my own home and in friends’ kitchens to add color fast, keep counters usable, and avoid that cluttered look.
In my opinion, this is perfect for renters, busy families, and anyone who wants a colorful home vibe without a big renovation budget or a 3-week timeline.
From my experience, the easiest wins come from repeating color in threes: a towel + a countertop accessory + one open-shelf moment. I’ll show you how I build a “summer kitchen” palette with color-blocked canisters, striped towels, and a fruit-bowl rainbow so it looks styled—even when the dishwasher is running.
I find that once you nail one small zone, the rest of the kitchen becomes easier to finish with confidence. Below are 25 Colorful Kitchen Accessories & Styling Ideas that…
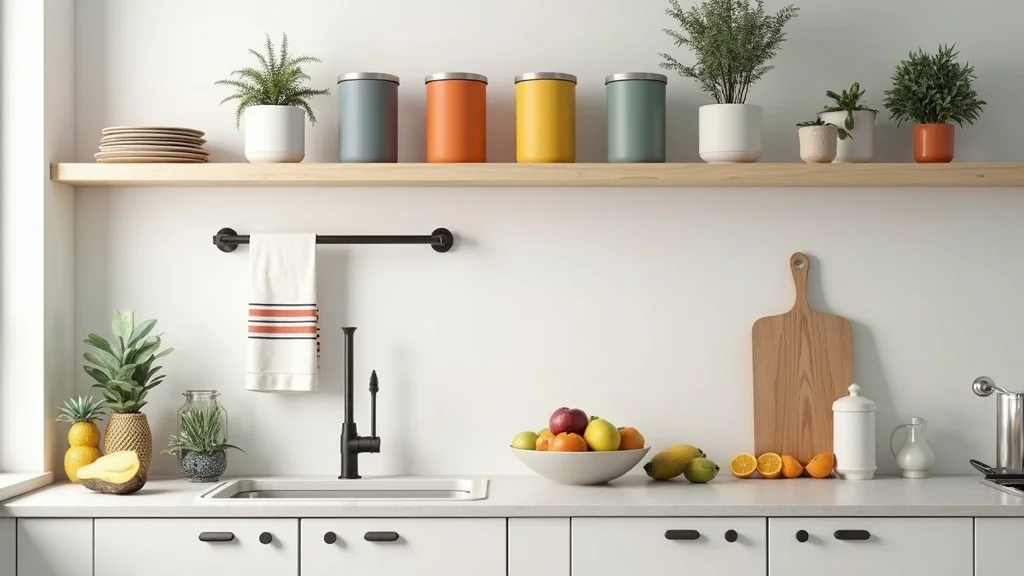
1. Build One Open-Shelf Moment: Color-Blocked Canisters + Striped Towels + a Rainbow Fruit Bowl
I always start by styling one “hero shelf” because a single, intentional vignette can make the whole kitchen feel like fun kitchen decor without touching a cabinet. When I design this look, I use the visual trio that never fails me in summer: color-blocked canisters, striped towels, and a rainbow fruit bowl arranged by color.
I find that a 36-inch open shelf looks balanced with 5–7 items total, so I’ll place 3 canisters (like 32–64 oz sizes) on one side and a 10–12 inch fruit bowl on the other. Then I hang 2 striped towels (16×28 inches) on hooks below or fold 1 over the oven handle and 1 over a drawer pull to repeat the stripes twice.
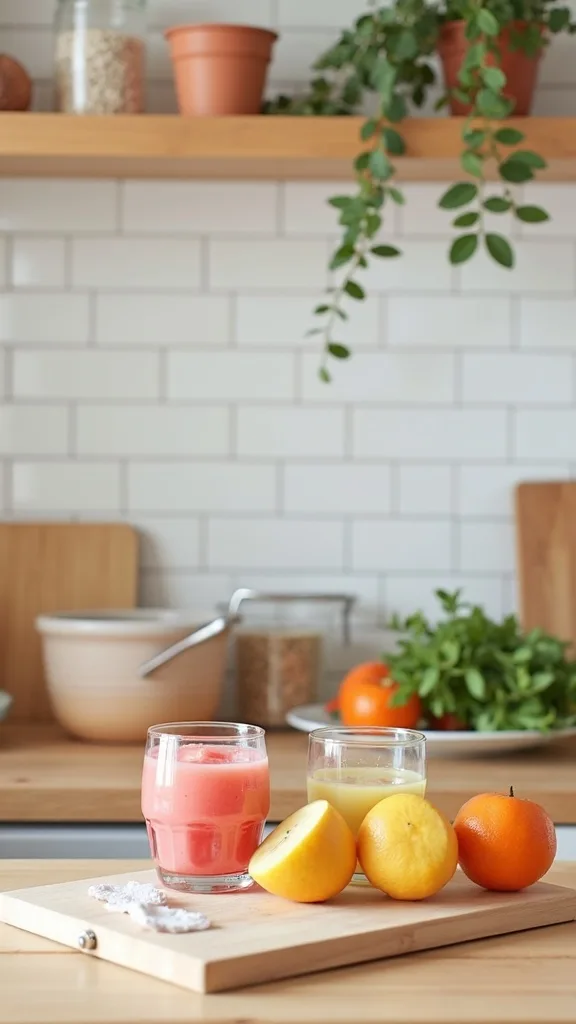
For materials, I typically choose powder-coated steel canisters with silicone gaskets, cotton Turkish towels, and a ceramic or mango-wood bowl. I keep fruit to 3–5 colors (lemons, limes, oranges, red apples, purple plums) so it reads as curated, not chaotic.
Pro Tip: From my experience, fruit looks “photo-ready” longer if I tuck 2–3 faux lemons at the back of the bowl and keep real bananas off the shelf—bananas release ethylene gas that typically ripens (and browns) nearby fruit faster.

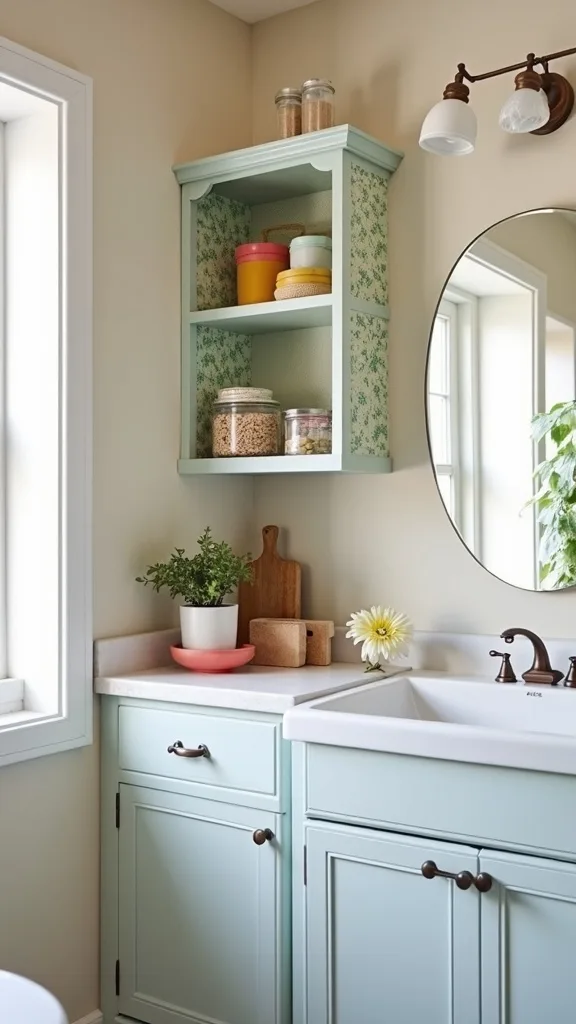
2. Choose a 3–5 Color Summer Palette You Can Repeat
From my experience, the fastest way to make colorful kitchen ideas look grown-up (not random) is to limit the palette and repeat it. I find that 3–5 colors is the sweet spot for most kitchens because it feels lively but still coordinated.
I always start by picking 1 “base” color you already have (often white cabinets or stainless appliances), then I add 2 main accents and 1–2 small “spark” colors. For example, I’ll do cobalt + citrus yellow as the main pair, then add a little hot pink in a spoon rest and a mint green in a soap dispenser. I recommend testing the palette in a 12×12 inch “color square” on the counter using 6–8 small items before you buy anything big.
For affordable sourcing, I reach for cotton towels, silicone utensil sets, and melamine trays in those exact shades so the color is consistent. In my opinion, glossy ceramics look sharper under most kitchen lighting than matte plastic, but plastic is cheaper and less breakable.
Pro Tip: I’ve found that if your kitchen has a lot of stainless steel, choosing one accent color with a cool undertone (like teal) and one with a warm undertone (like coral) prevents the space from looking “flat” under warm white light (2700K–3000K — the cosy, yellowish tone you see in most homes).
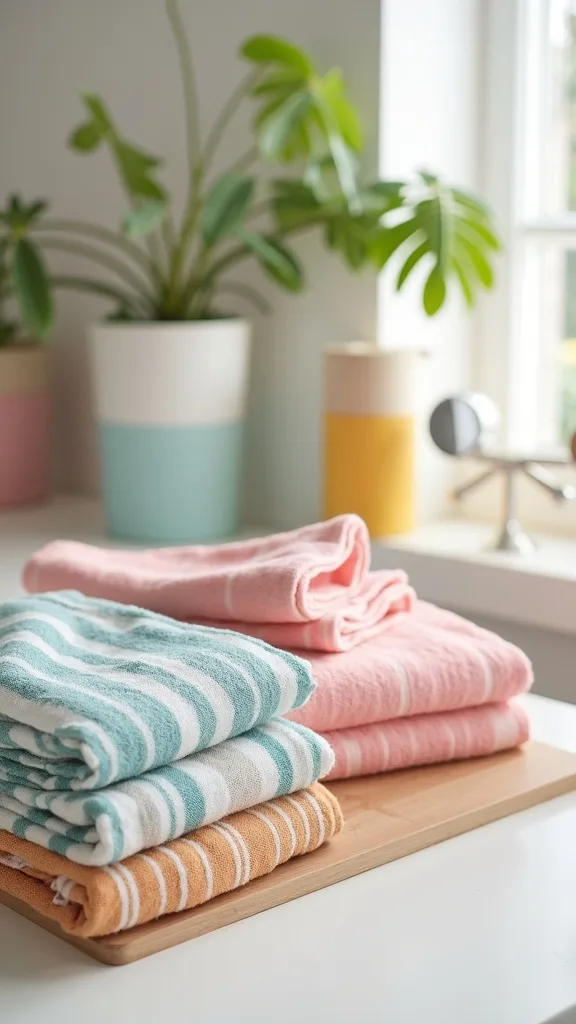
3. Swap in Striped Towels for Instant Pattern (Without Visual Clutter)
I find that towels are the easiest pattern to add because they’re functional and you can change them in 30 seconds. From my experience, stripes read cleaner than florals in a kitchen because they echo the straight lines of cabinets and tile.
I always recommend buying at least 4 towels so you can rotate: 2 on display and 2 in the wash. I like 16×28 inch cotton towels for daily use and a 20×30 inch waffle-weave towel for hands because it dries faster. When I design this look, I keep stripe spacing consistent—either thin (about 1/8 inch lines) or bold (1/2 inch lines)—so it doesn’t fight other patterns.
Materials matter: 100% cotton or cotton-linen blends handle heat better than microfiber near the stove. I usually hang towels on 2 adhesive hooks placed 6 inches apart on the side of a cabinet for a tidy “mini gallery” effect.
Pro Tip: I’ve found that towels look more intentional if I fold them to the same visible height—about 9–10 inches showing—because mismatched lengths can make even expensive kitchen accessories styling feel messy.
4. Create a Countertop “Color Station” on a Small Tray
I always start by corralling color on a tray because it keeps the counter usable while still giving you that colorful home pop. In my opinion, a tray is the difference between “styled” and “cluttered,” especially in a busy summer kitchen.
I recommend a tray that’s 12×16 inches or 14×18 inches—big enough for essentials, small enough to move when you cook. I’ll place a 16 oz dish soap bottle, a 10 oz hand soap pump, and a small scrub brush in one consistent color family, then add 1 accent (like a bright sponge holder). Typically, I keep the tray within 6–10 inches of the sink so it feels purposeful, not like decor floating in space.
For materials, I like melamine or powder-coated metal trays because they wipe clean in under 1 minute. Bamboo looks warm, but it can stain if soap drips repeatedly—so it’s a trade-off between vibe and maintenance.
Pro Tip: From my experience, putting a thin silicone bar mat (cut to about 10×14 inches) inside the tray prevents soap bottles from “gluing” themselves down with residue, and it keeps the tray looking new longer.
5. Use a Bright Spoon Rest That Actually Catches Drips
I find that a spoon rest is one of the most underrated places for color because it sits front-and-center during cooking. When I tried this in my own kitchen, a single coral spoon rest made my stove area feel like fun kitchen decor without adding any extra objects.
I always recommend choosing one that’s at least 5 inches wide and 9–10 inches long so it holds a ladle and a spatula at the same time. I place it on the right or left of the cooktop (whichever side you naturally set tools down) and keep it within 3–4 inches of the burner edge so it’s convenient. If you cook daily, I find that glazed ceramic cleans up faster than unglazed stoneware.
For materials, look for glazed ceramic, enameled cast iron, or heat-safe silicone rated for high temperatures. I avoid thin plastic here because it can warp over time near heat.
Pro Tip: I’ve found that spoon rests with a slightly raised lip (about 1/4 inch) contain sauce better than flat ones, which means fewer “mystery drips” that typically bake onto the stovetop during summer batch-cooking.
6. Color-Code Cutting Boards (Pretty + Practical)
From my experience, colorful cutting boards pull double duty: they add personality and they make cooking feel more organized. I find that if you keep them standing upright, they function like art without sacrificing counter space.
I always start by choosing 3 boards in 3 colors—typically 11×14 inches for daily prep, plus one larger 15×20 inch board for watermelon, pineapple, or big summer salads. I store them in a wire rack that’s about 4–5 inches wide so they don’t topple. For placement, I keep the rack within 12 inches of the prep zone (usually between sink and stove) so it’s genuinely useful.
For materials, I like dishwasher-safe polypropylene for the bright colors, and I’ll add one acacia board for warmth. In my opinion, wood looks richer but needs oiling every 4–6 weeks, which is a real maintenance trade-off.
Pro Tip: I’ve found that choosing boards with the same handle shape (even across different colors) makes the set look cohesive on display—mismatched silhouettes can make your colorful kitchen ideas feel accidental.
7. Add Color with Stackable Mixing Bowls on Open Storage
I always start by checking what I can display that I already use weekly, and mixing bowls are a perfect candidate. From my experience, a nested set adds a satisfying “color gradient” look without needing extra decor pieces.
I recommend a set of 3–5 bowls, ideally with diameters around 8 inches, 10 inches, and 12 inches so they stack neatly. When I design this look, I place the stack on a 10–12 inch deep shelf or in a glass-front cabinet, and I keep it at eye level (about 54–60 inches from the floor) so the color reads immediately. If you’re short on space, I find that one bright bowl on the counter is enough—no need to display the whole set.
Materials I trust for daily use are melamine (budget-friendly), stainless with colored exteriors, or glazed ceramic. Ceramic costs more upfront, but it typically resists staining from tomato or turmeric better than some plastics.
Pro Tip: I’ve found that bowls look more “styled” if the smallest bowl faces upward and the largest faces downward—alternating direction breaks up the monotony and makes the stack feel intentional.
8. Upgrade Your Dish Rack with a Pop-Color Version
I find that the dish rack is basically a permanent countertop accessory, so it’s a smart place for color. In my opinion, this is one of the most realistic colorful kitchen ideas because it changes the look even when the kitchen isn’t perfectly clean.
I always recommend measuring your sink run first: most counters handle a rack around 17–20 inches long and 12–14 inches wide. I keep mine at least 4 inches away from the backsplash so water doesn’t pool behind it, and I empty the drip tray every 1–2 days in summer humidity. If you have a small kitchen, I find that a compact rack (about 12 inches long) plus a microfiber drying mat works better than a huge rack.
For materials, I trust powder-coated steel or BPA-free plastic with a removable drip tray. Bamboo racks look charming, but they can mildew faster if you don’t dry them daily—so it’s a trade-off.
Pro Tip: From my experience, choosing a rack with a separate utensil caddy that clips on the outside (not inside) keeps airflow around forks and spoons, which typically reduces that “musty” smell that can happen in warm-weather kitchens.
Cost & Materials Estimate
I find that most colorful accessory refreshes land between $45 and $220 depending on how many zones you update at once.
| Item | Estimated Cost | Where to Buy |
|---|---|---|
| Set of 4 striped cotton kitchen towels (16×28 in) | $14–$28 | Amazon |
| 3-piece color canister set (32–64 oz) | $28–$55 | IKEA |
| Melamine or metal tray (12×16 in) for sink styling | $12–$30 | Target |
| Ceramic fruit bowl (10–12 in) | $18–$45 | Wayfair |
| Battery puck lights (set of 3) or 12–24 in LED strip | $18–$60 | Home Depot |
Total estimated cost: $45–$220 I always recommend saving money by starting with towels + a tray, and splurging only on canisters you’ll keep out year-round.
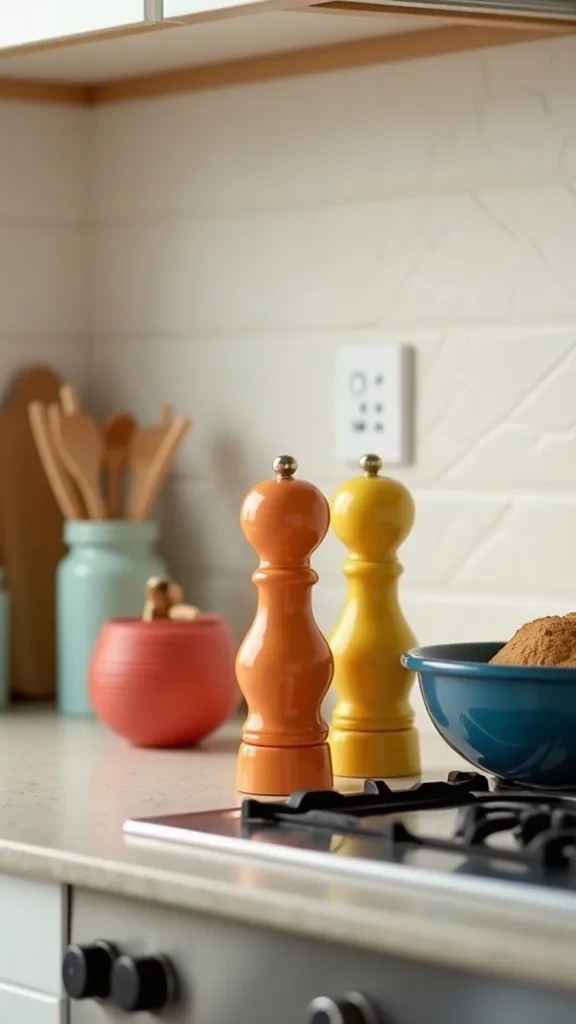
9. Style a Bright Salt Cellar + Pepper Mill Pair Near the Stove
I always start by making the stove zone feel intentional, and a colorful salt cellar instantly does that. I find that pairing it with a pepper mill in a complementary shade creates a small “moment” that reads like thoughtful kitchen accessories styling.
I recommend a salt cellar that holds about 6–8 oz so it lasts but doesn’t clump for months. I place it 8–10 inches from the cooktop edge (close enough to grab, far enough to avoid constant splatter) and keep the pepper mill around 8–10 inches tall so it’s easy to handle. If you cook with flaky salt, I find a wide-mouth cellar (about 3.5–4 inches across) is much easier for pinching.
For materials, I like glazed ceramic or acacia wood with a tight-fitting lid. Bright acrylic is affordable, but it can scratch—so I reserve it for lower-traffic shelves.
Pro Tip: I’ve found that salt stays freer-flowing if you add 8–10 uncooked rice grains to the cellar in humid months; it’s subtle, but it typically reduces clumping without changing flavor.
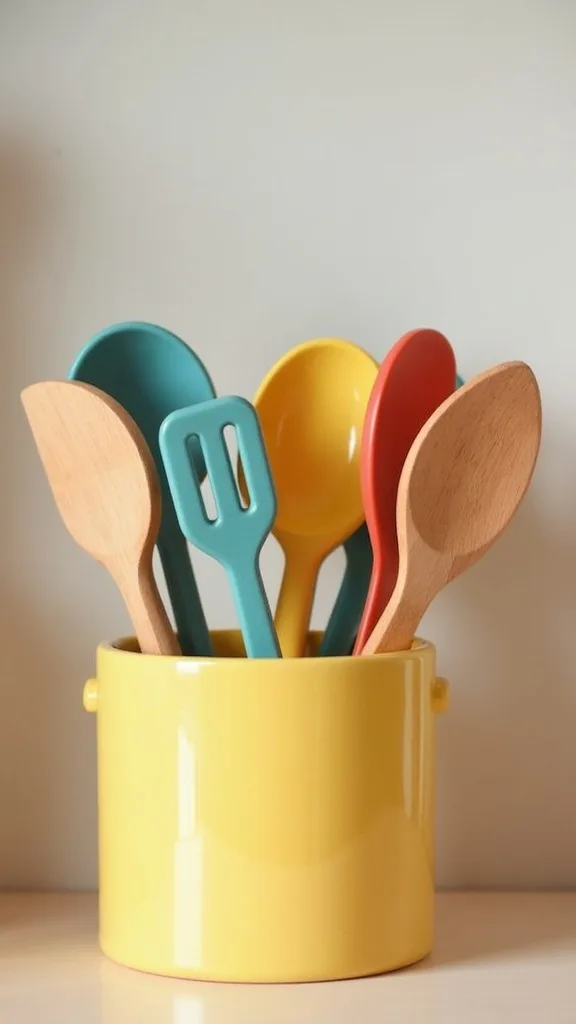
10. Use a Colorful Utensil Crock (But Limit What Goes In It)
From my experience, a utensil crock is a high-impact color move, but it only looks good if it’s edited. I find that a crowded crock makes the whole counter feel busy, even if the crock itself is gorgeous.
I always start by choosing a crock that’s 6–7 inches tall and at least 5 inches wide so tools don’t tip. Then I limit it to 8–12 tools max: a silicone spatula, a wooden spoon, tongs, a whisk, and a ladle are usually enough for daily cooking. I place it within 10–14 inches of the stove, and I keep the tallest tool under about 14 inches so it doesn’t visually tower over everything.
For materials, I recommend glazed ceramic or enameled metal in a saturated color like teal, tomato red, or sunflower yellow. Silicone tools in matching tones are affordable and easy to replace, but they can stain with turmeric—so darker colors are more forgiving.
Pro Tip: I’ve found that putting 2–3 inches of dried beans (like black beans) in the bottom of the crock adds weight so it won’t tip when you grab a heavy ladle—just cover the beans with a small round of parchment for easier cleaning.
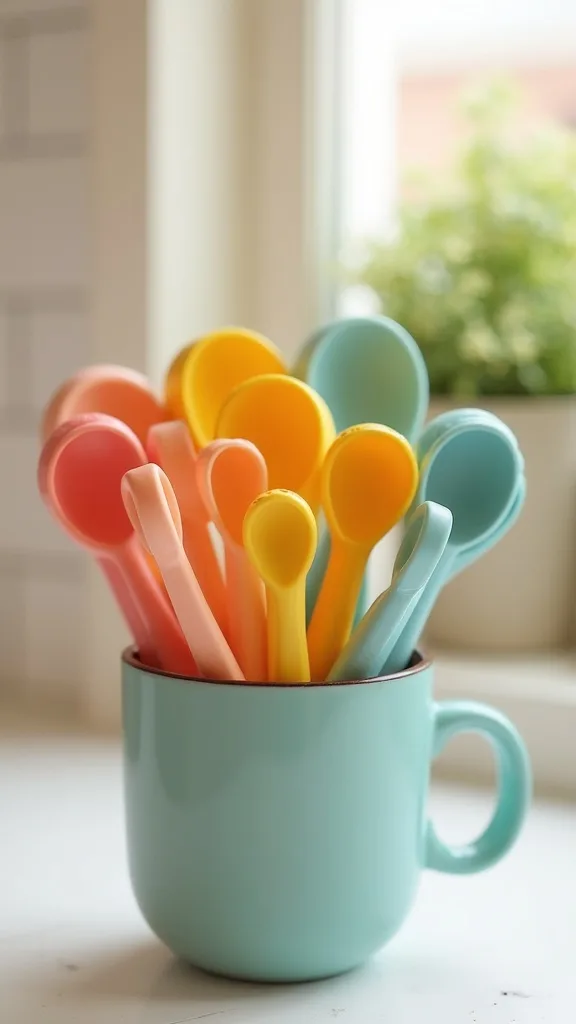
11. Bring in a Set of Mini Colorful Measuring Spoons You’ll Actually See
I find that tiny tools are a low-risk way to test colorful kitchen ideas because they cost less and don’t take up space. When I tried swapping my plain metal measuring spoons for a bright set, my baking drawer instantly felt more cheerful.
I always recommend buying a set with at least 5 pieces (1/4 tsp through 1 tbsp) and a ring that opens easily, because you’ll use it more if it’s not annoying. I store mine in a shallow drawer organizer that’s about 2 inches tall, and I keep it within 1–2 drawers of the mixing bowls so the workflow makes sense. If you prefer open storage, I find that hanging them on a 12-inch rail with S-hooks looks tidy and keeps them accessible.
For materials, I like stainless steel with colored handles or BPA-free plastic that’s dishwasher-safe. Plastic is more affordable, but it can absorb odors over time—so that’s the trade-off.
Pro Tip: From my experience, measuring spoons with engraved (not printed) markings stay readable after 50+ dishwasher cycles, which matters if you want your cute color to remain genuinely functional.
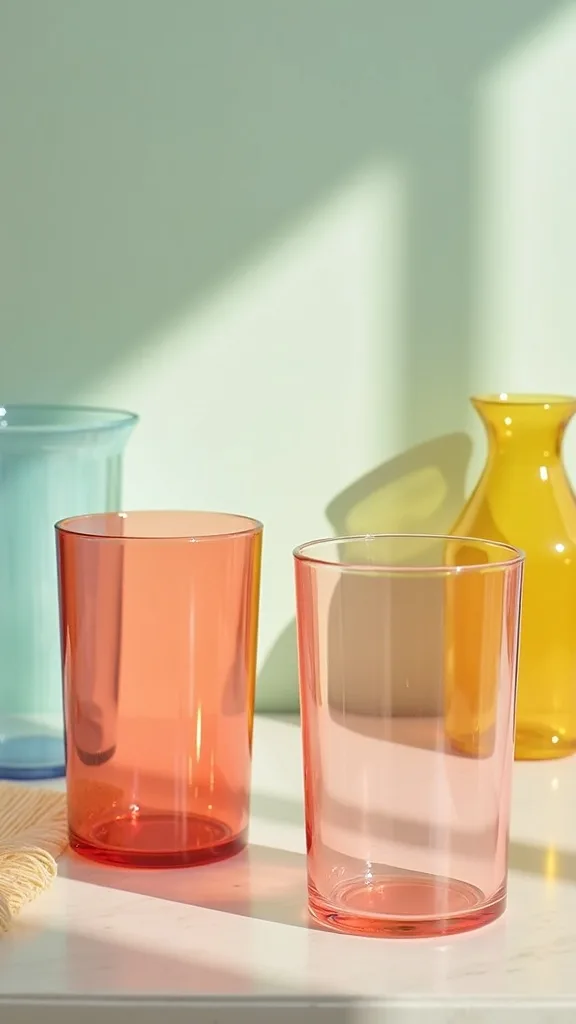
12. Create a “Summer Drink Corner” with Colorful Glassware
I always start by giving summer its own little zone because it makes everyday routines feel special. In my opinion, a drink corner is one of the most practical ways to bring fun kitchen decor into a working kitchen.
I recommend claiming a 16–20 inch stretch of counter near an outlet if you use an electric kettle, or near the fridge if you do iced drinks. I’ll stack 4–6 acrylic tumblers (16 oz) or colored highball glasses (12–14 oz) on a tray, then add a small jar of paper straws and a citrus squeezer. If you’re tight on space, I find that a 10×14 inch tray still works—just keep it edited to 5 items max.
For materials, acrylic is budget-friendly and kid-proof, while glass feels more elevated but breaks more easily. I like a washable cotton runner under the tray to catch condensation.
Pro Tip: I’ve found that if you store glasses upside down on a tray, they show less dust on open counters, and you avoid that “stale cabinet smell” that sometimes clings to glassware in humid summer kitchens.
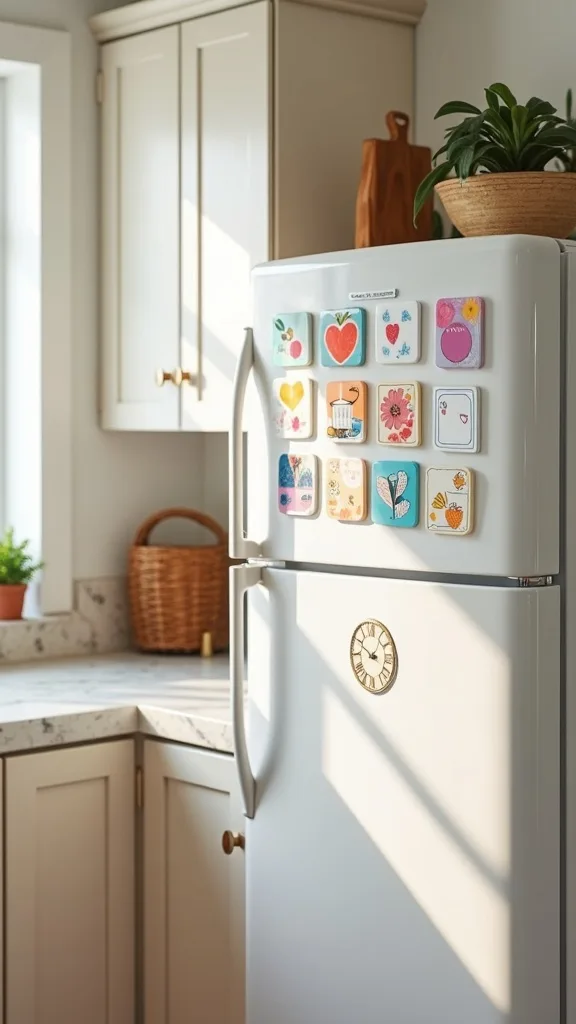
13. Add Color with a Magnetic Fridge “Mini Gallery” (Done Neatly)
From my experience, the fridge is either visual chaos or an opportunity for curated color—there’s rarely an in-between. I find that a small, intentional magnetic display can support colorful home styling without taking over the room.
I always start by clearing one rectangle area, about 12×18 inches, and limiting it to 6–9 items total. I’ll use 4 matching magnets, 1 postcard, 1 weekly menu card, and 1 small photo, then leave breathing room around everything (at least 1 inch between pieces). If you want it extra tidy, I recommend a magnetic acrylic frame in an 8×10 inch size so papers don’t curl.
For materials, I like strong neodymium magnets with colorful caps, plus cardstock in 3–4 palette colors. The trade-off is that stronger magnets can scratch some finishes, so I add tiny felt dots to the back.
Pro Tip: I’ve found that placing your magnetic “gallery” on the upper third of the fridge door (not the center) keeps it visible but reduces the chance of kids or guests shifting pieces when they reach for handles.
14. Use Peel-and-Stick Wallpaper Inside One Cabinet for a Surprise Pop
I always recommend “hidden color” if you want playful summer energy without committing to a full-room change. From my experience, lining one cabinet interior gives you that joyful hit every day, and it’s renter-friendly in most cases.
I start with a single door cabinet—typically 18–24 inches wide—and measure the interior back panel. Most rolls are 17.7–20.5 inches wide, so I plan for 1 roll to cover about 30–40 square feet, which is usually enough for 1–2 cabinets. I clean the surface with isopropyl alcohol, wait 10 minutes to fully dry, then apply from top to bottom using a plastic smoothing tool to avoid bubbles.
I find that bold stripes or small-scale fruit prints work especially well for a summer kitchen vibe. Matte wallpaper hides minor bumps better than glossy, but glossy wipes clean easier—so it’s a trade-off.
Pro Tip: When I tried this, I learned to leave a 1/8 inch border around the edges instead of wrapping into corners; that tiny gap prevents peeling from humidity and door-slam vibration over the next 6–12 months.
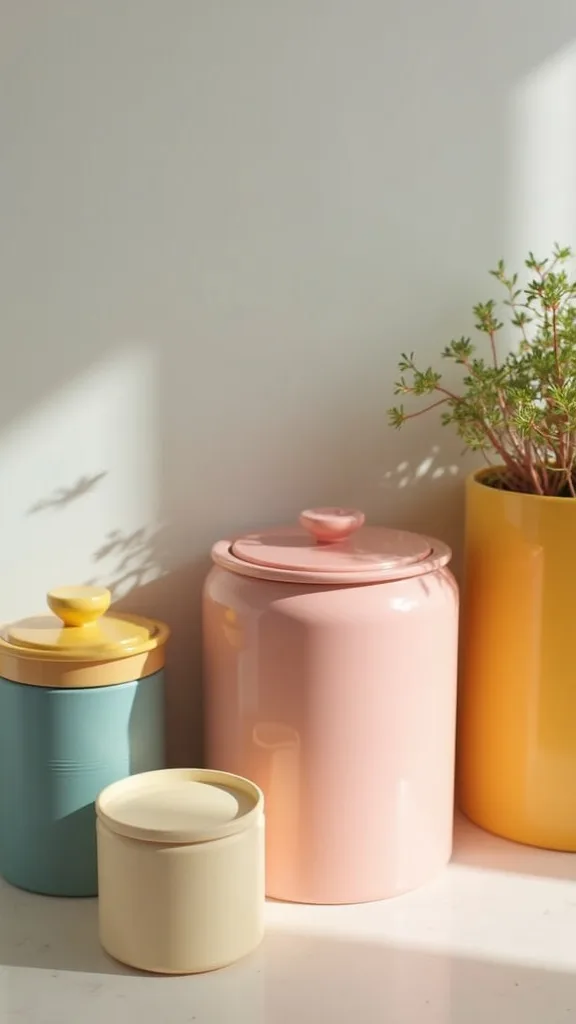
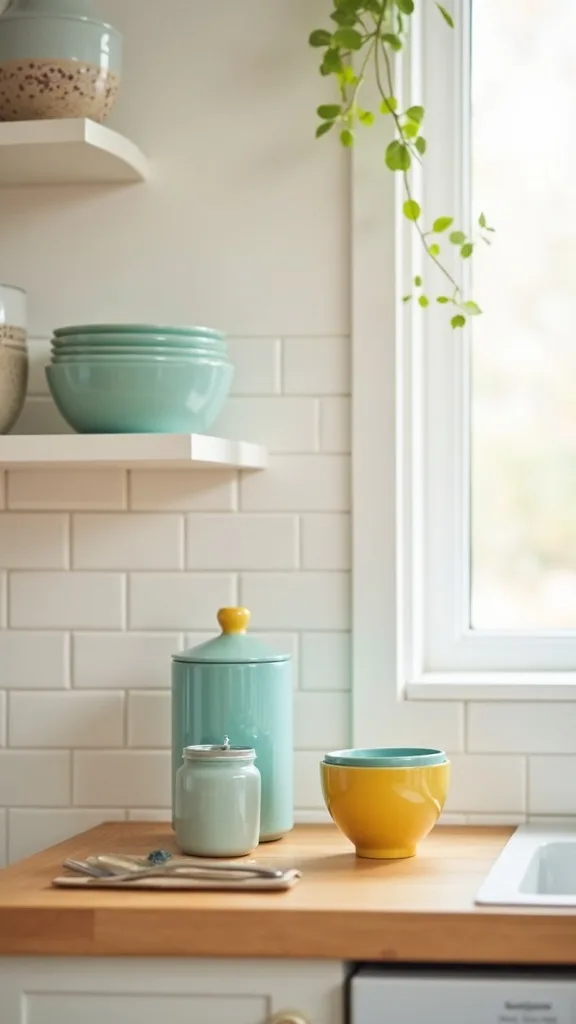
15. Color-Block with Matching Canisters for Pantry Staples
I find that canisters are the cleanest way to add color because they replace visual clutter with a consistent shape. From my experience, color-blocking pantry staples makes even a small counter look calmer.
I always start by choosing 3–4 canisters in the same style—like 48 oz for flour, 48 oz for sugar, and 32 oz for rice or coffee. I line them up with about 1–1.5 inches between each so they read as a set, and I keep them within 18 inches of the main prep area. If you have open shelves, I recommend placing the tallest canister (around 9–10 inches) at one end to create a gentle height “step.”
For materials, I like powder-coated steel with silicone gaskets or glass with bamboo lids. Glass shows levels (helpful), but it also shows mess—so it’s not everyone’s favorite.
Pro Tip: I’ve found that labeling the bottoms (not the fronts) with a small piece of painter’s tape helps you keep the color-block look intact while still rotating staples—front labels can visually “break” the block effect.
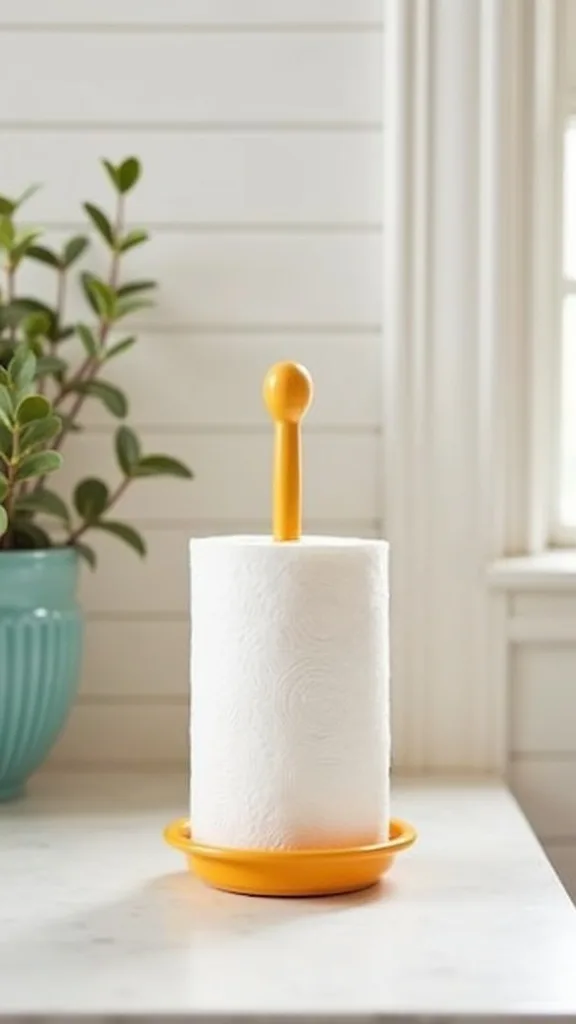
16. Make Your Paper Towel Holder a Color Accent
I always look for items that live out on the counter anyway, and a paper towel holder is one of them. In my opinion, upgrading it is a sneaky way to support colorful kitchen ideas without adding more stuff.
I recommend a holder with a weighted base (at least 2 lb) so you can tear with one hand. Most bases are 6–7 inches wide, and I keep mine 6–8 inches from the sink for quick cleanup. If you want extra color, I’ll pair a bright holder with paper towels that have subtle pattern—just keep it to 1 pattern so it doesn’t compete with your towels.
For materials, powder-coated steel in a saturated color holds up well, and marble bases feel luxe but cost more upfront. I find that wood bases can warp if they sit in puddles, so they need a drier placement.
Pro Tip: I’ve found that holders with a top tension arm (instead of a loose rod) reduce “unspooling” in humid summer months, which keeps the roll looking neat even when the kitchen gets steamy.
17. Layer a Washable Runner for a Summer Color Hit Underfoot
From my experience, a runner is one of the quickest ways to change the mood of a kitchen because it adds color at a large scale. I find that this is especially helpful if your counters are already busy and you don’t want more objects on top.
I always start by measuring the walkway: most kitchens do well with a 2.5×7 ft or 2.5×9 ft runner. I leave at least 4–6 inches of floor showing on each side so it doesn’t feel wall-to-wall. For safety, I recommend a non-slip rug pad cut 1 inch smaller than the rug, and I wash the runner every 2–3 weeks in summer if you’re cooking a lot.
For materials, I like machine-washable polyester blends for affordability and easy care. Cotton feels softer but can shrink, so you may need to air dry—trade-offs matter.
Pro Tip: I’ve found that runners with a low pile (under about 1/4 inch) trap fewer crumbs, and they’re easier to vacuum along cabinet toe-kicks where mess tends to collect.
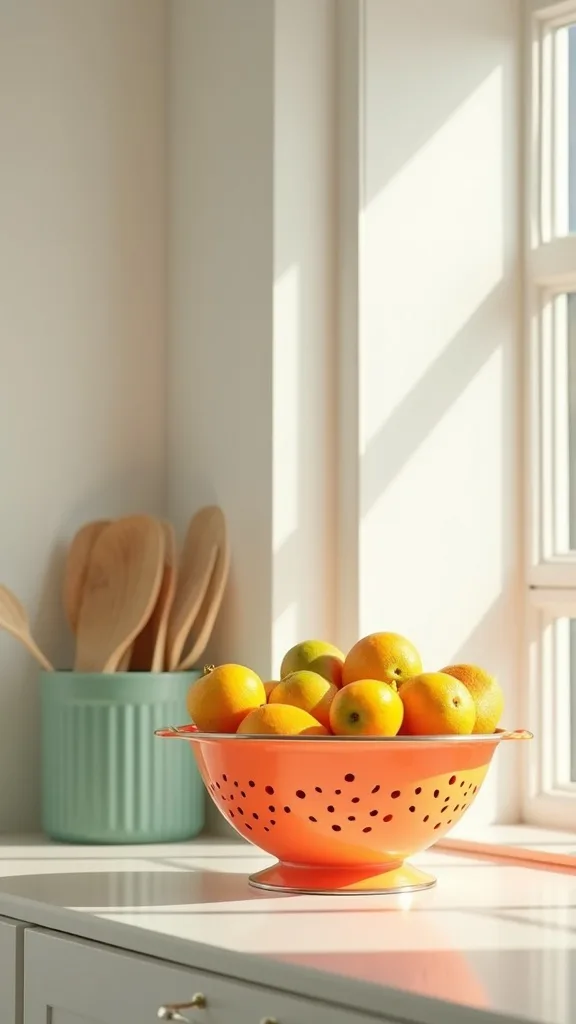
18. Use a Bright Colander as Counter Decor (That You’ll Still Use)
I find that a colorful colander is the kind of functional object that looks like decor when it’s left out. When I design this look, I treat it like a bowl—just one that can rinse berries in 30 seconds.
I recommend a 3–4 quart colander so it can handle a full pound of strawberries or a 1 lb box of pasta. I keep it near the sink, usually within 12 inches, and I’ll set it on a small 8–10 inch plate or drip tray so water doesn’t mark the counter. If you want a more styled moment, I’ll place 3 lemons inside when it’s not in use—simple, cheap, and cheerful.
For materials, I like enamel-coated steel for bold color, or BPA-free plastic for budget-friendly options. Metal can chip if dropped, while plastic can stain—so pick your compromise.
Pro Tip: I’ve found enamel colanders stay brighter if you avoid abrasive scrubbers; a soft sponge and 2–3 minute soak in warm soapy water removes berry stains without dulling the finish.
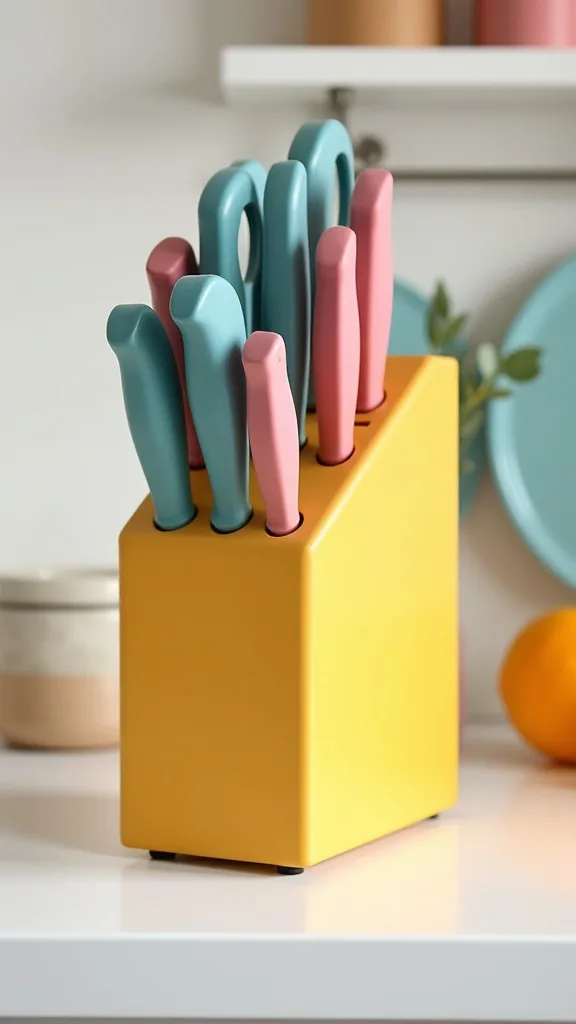
19. Add a Colorful Knife Block (Or Blade Guards) with Safety in Mind
I always approach knife storage with safety first, then style. From my experience, a colorful knife block can look fantastic, but it needs to be placed where you won’t bump it when you’re moving fast.
I recommend keeping knives at least 8 inches away from the stove edge and 6 inches back from the counter front. If you use a block, a footprint around 6×9 inches is common, so I measure before buying. For small kitchens, I find blade guards plus a drawer insert (about 15×11 inches) can be safer and more space-saving than a block on the counter.
For materials, look for a polypropylene block with easy-to-clean slots or a wood block painted in a durable enamel. Painted wood is charming, but it can chip over time—so it’s more maintenance than molded color.
Pro Tip: I’ve found that blocks with angled slots (not vertical) collect fewer crumbs and are easier to vacuum out with a handheld nozzle every 4–6 weeks, which keeps the color looking crisp and hygienic.
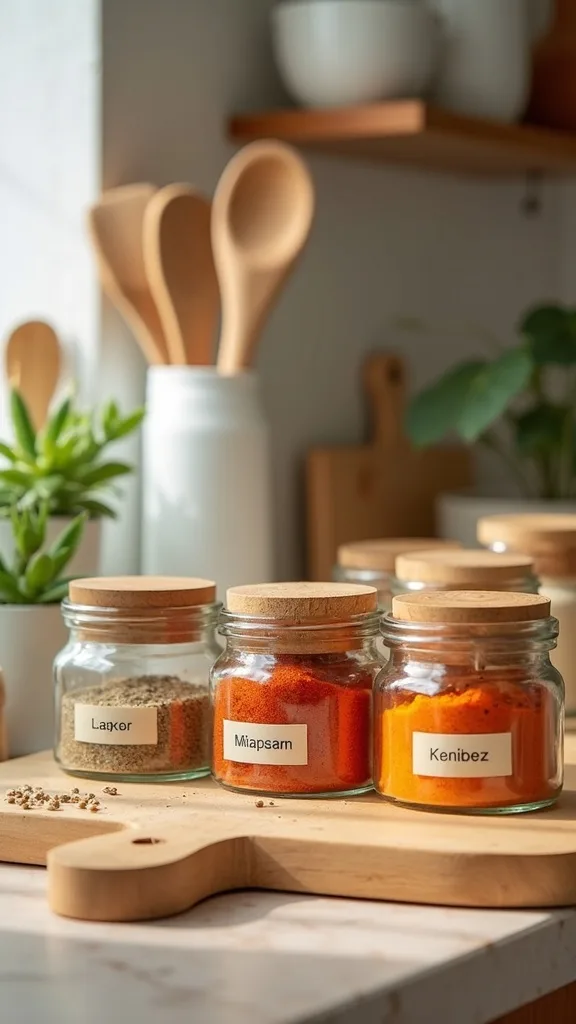
20. Style a Rainbow Spice Moment with Matching Labels
From my experience, spices are a hidden goldmine for colorful kitchen ideas because the contents are naturally vibrant. I find that the key is consistency: same jar shape, same label style, and a controlled “rainbow” order.
I always start with 12–24 spice jars (4 oz is my favorite size) and line them up on a 10–12 inch tiered spice riser so you can see labels. I arrange by color family—greens (oregano) to yellows (turmeric) to reds (paprika)—and I keep the riser at least 6 inches away from the stove to protect flavor. Typically, I refresh the most-used spices every 6–12 months for best taste.
For materials, I like square glass jars with shaker tops and waterproof labels. The trade-off is upfront time: labeling 24 jars can take 45–60 minutes, but it saves frustration later.
Pro Tip: I’ve found that writing the purchase month on the bottom with an oil-based paint marker helps you rotate spices realistically—labels stay pretty while you still know what’s getting old.
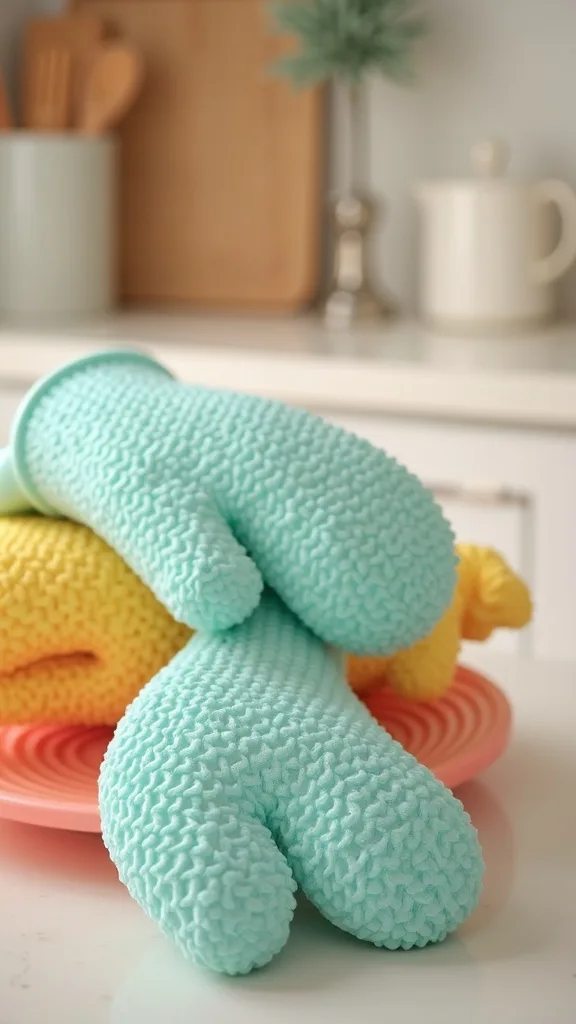
21. Use Colorful Silicone Oven Mitts That Actually Protect Your Hands
I find that oven mitts are an easy place to add bold color because they hang like little flags in the kitchen. In my opinion, they’re only worth displaying if they’re genuinely protective and comfortable.
I always recommend mitts that are at least 12–13 inches long so wrists are covered, especially if you’re pulling sheet pans. I hang 2 mitts on hooks placed about 5 inches apart near the oven, and I keep them 18+ inches away from open flame if you have a gas range. If you bake weekly, I find that silicone-grip mitts handle hot casserole dishes better than thin cotton ones.
For materials, silicone with a cotton lining is my go-to for a summer kitchen because it wipes clean after sticky marinades. Cotton looks softer, but it stains faster—trade-offs again.
Pro Tip: I’ve found that mitts with individual finger grooves feel awkward for some people; if you’re unsure, test the grip by lifting a 6–8 lb Dutch oven in-store (or with a similar weight at home) before committing.
22. Add a Small Pop of Color with Switch Plates and Outlet Covers
I always look for “micro upgrades” that make a kitchen feel finished, and colorful switch plates are one of my favourites. From my experience, they’re especially effective in rentals where you can’t change backsplash tile.
I recommend replacing just 2–4 plates first (near the main counter run) rather than doing the whole kitchen at once. Standard plates are about 4.5×2.75 inches, and swapping one takes roughly 5 minutes with a basic screwdriver. I always shut off the power at the breaker before I touch anything—safety is non-negotiable.
For materials, I like polycarbonate plates in bright colors or painted metal plates for a more substantial feel. Metal costs more, but it typically looks less “toy-like” under warm white light (2700K–3000K — the cosy, yellowish tone you see in most homes).
Pro Tip: I’ve found that choosing plates with a satin finish hides fingerprints better than glossy ones, which matters in a kitchen where hands are often slightly oily or damp.
23. Use LED Under-Cabinet Lighting to Make Colors Look Intentional
From my experience, color only looks as good as the lighting hitting it, and kitchens often have uneven light. I find that adding under-cabinet LEDs makes your accessories look deliberate, not accidental.
I always recommend warm white light (2700K–3000K — the cosy, yellowish tone you see in most homes) for most kitchens because it flatters food and keeps bright colors from looking harsh. For brightness (measured in lumens), I typically aim for 200–400 lumens per linear foot for task lighting, but I’ll go lower if you want a softer glow. Battery puck lights are quick (install in 10 minutes), while plug-in light strips take longer (30–60 minutes) but are more consistent.
For products, I like 12–24 inch LED bars or flexible strips with adhesive backing. Adhesives can fail in humidity, so I often add small mounting clips—extra effort, more reliability.
Pro Tip: I’ve found that placing the strip 1–2 inches behind the cabinet face frame reduces glare on glossy countertops and prevents “hot spots” that make your kitchen accessories styling look uneven.
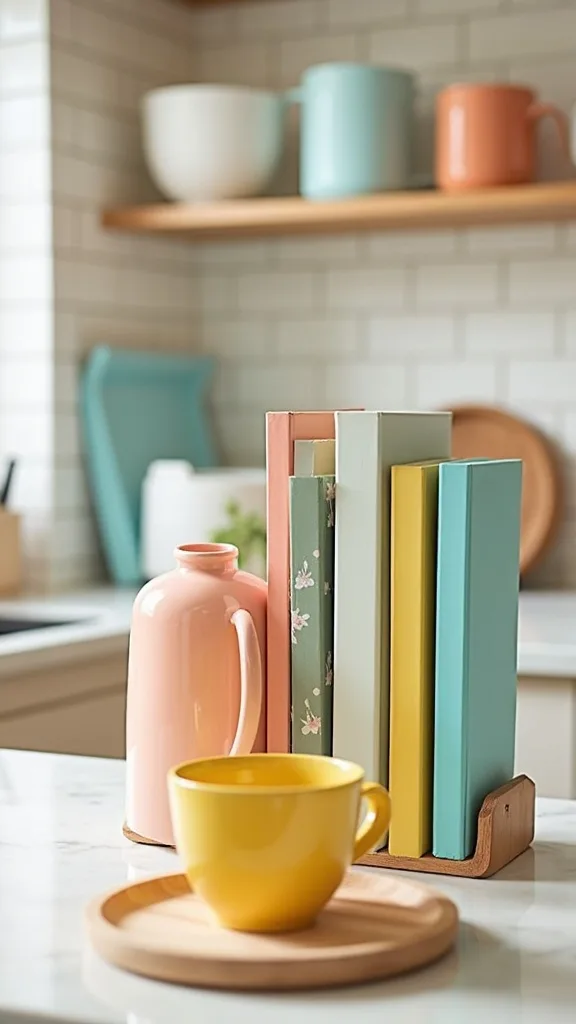
24. Style a Colorful Cookbook Stand (Even If You Mostly Use Your Phone)
I find that a cookbook stand is a charming way to add color at eye level, and it also keeps recipes clean. In my opinion, it’s a smart compromise for people who want decor that still earns its spot.
I recommend a stand that’s about 8–11 inches wide with a lip at least 1 inch deep so pages don’t slide. I’ll display 1 colorful cookbook cover for 2–4 weeks, then rotate to a new one to keep the kitchen feeling fresh for summer. If you use your phone, I find a stand with a built-in tablet ledge (around 0.75 inches deep) is more practical than a purely decorative easel.
For materials, painted metal stands are sturdy and easy to wipe, while bamboo looks warm but can absorb splashes. The trade-off is that metal can scratch counters, so I add felt pads.
Pro Tip: I’ve found that angling the stand slightly away from the stove (even 10–15 degrees) reduces grease mist settling on the cover, which keeps your bright colors looking crisp longer.
25. Finish with a “One-Minute Reset” Basket to Keep Color Looking Clean
I always end my colorful kitchen ideas with a maintenance plan, because the prettiest accessories won’t matter if the counter becomes a dumping ground. From my experience, a reset basket is the simplest way to protect your styling in real life.
I recommend a basket or bin that’s 10–12 inches wide and 6–8 inches tall—big enough for loose items, small enough to tuck away. I keep it in a lower cabinet within 2 steps of the main counter, and I do a 60-second reset before bed: mail, chargers, random toys, and receipts go into the bin. Then once a week (about 10 minutes), I empty it and put things back where they belong.
For materials, I like wipeable plastic bins in a bright color, or woven seagrass for texture. Woven looks warmer, but it’s harder to wipe if something sticky lands inside—trade-offs are real.
Pro Tip: I’ve found that labeling the basket “RESET” on the inside rim (not the front) keeps it feeling stylish while still training the household—people follow the system when the instruction is visible only when they open the cabinet.

Final Thoughts
I find that the most affordable way to create a summer kitchen is to focus on a few high-visibility, high-use items—towels, canisters, a tray by the sink, and one open-shelf moment you genuinely love. In my opinion, color feels the most “right” when it’s repeated on purpose, not sprinkled everywhere, so I always aim for 3–5 shades and echo them in at least 3 spots.
From my experience, you don’t need to buy everything at once to get real impact. I’d rather see you spend $40–$60 on a coordinated towel set and a bright utensil crock now, then add a fruit bowl or spice jars next month, because that approach typically prevents impulse buys that don’t match.
I always recommend taking one quick photo after you style your first zone—seeing it on your phone makes it easier to decide what to repeat and what to skip. If you start with one shelf, one tray, and one “reset” habit, I’ve found your kitchen stays colorful in a way that still feels calm and usable.
What I’d Do Differently
When I first tried this, I made one specific mistake: I bought colorful accessories in too many “almost the same” shades—three different blues, two different yellows, and a random green that looked cute online but clashed in my kitchen. I remember lining everything up on my 48-inch counter and feeling like it was loud without looking intentional, even though each piece was affordable. From my experience, the correct approach is to choose a tight 3–5 color palette and then match undertones on purpose (for example, either all warm-leaning brights or all cool-leaning brights). Once I swapped to one cobalt, one true lemon yellow, and one coral, the exact same number of items looked calmer and more “styled.”
I also wish I’d known how much lighting changes color—what looked crisp in daylight looked dull at night under my warm bulbs. In my opinion, it’s worth testing one towel and one canister in your actual kitchen for 24 hours before you commit to a full set, because that tiny pause typically prevents returns and regret. Pick your palette, style one shelf, and start with the pieces you’ll use this week.
Products I Recommend for This Project
Here are some of my favourite products to help you bring these ideas to life:
- OXO Good Grips POP Container Set (assorted sizes) — I find these make color and storage feel intentional because the shapes stack neatly and the seals actually keep staples fresh.
- Joseph Joseph Nest 9 Plus Food Preparation Set — I recommend this when you want coordinated color with real function, since it combines bowls, colanders, and measuring tools in one footprint.
- Utopia Kitchen Flour Sack Towels (pack of 12) — I always keep these on hand because they’re affordable, absorbent, and easy to dye or pair with striped display towels.
- Rubbermaid Brilliance Pantry Airtight Food Storage Containers — From my experience, these are great if you want a cleaner open-shelf look because the clear sides show levels and the lids snap tight.
- GE Wireless LED Puck Lights (battery-operated, multi-pack) — I find these are the quickest lighting upgrade for making colorful accessories look deliberate, especially under upper cabinets.